Setup Powershell Actions for Torii
Torii Integration for Azure Advanced Automation
Overview
Some of Torii’s Entra Microsoft 365 actions leverage Azure’s advanced automation capabilities. Additional installation steps are required in order to execute these actions.
The guide below describes how to create an Azure Automation Runbook, and securely enable Torii to execute it via webhooks.
Please follow the steps below to fully leverage Torii’s Entra Microsoft 365 offering. Skipping any of these steps may prevent you from using said actions. In case you encounter difficulties during the installation process, don’t hesitate to reach out to Torii’s Customer Support [[email protected]](mailto:[email protected])
- 1. Service Account Setup
- 2. Create an Azure Automation Account
- 3. Assign Microsoft Entra Roles and Administrators to The Automation Account
- 4. Add PowerShell Modules to The Automation Account
- 5. Create a Credential
- 6. Create a Runbook
- 7. Add a PowerShell Script
- 8. Create a Webhook
- 9. Connect Entra Microsoft 365 Integration in Torii
- 10. Guidance for Customers Using Existing PowerShell Custom Actions
1. Service Account Setup
To begin, you'll need a Service Account without Multi-Factor Authentication (MFA) with the permissions outlined below. You may use an existing account that fits these criteria or create a new one by following these steps:
-
Access the Admin Portal: Navigate to admin.microsoft.com.
-
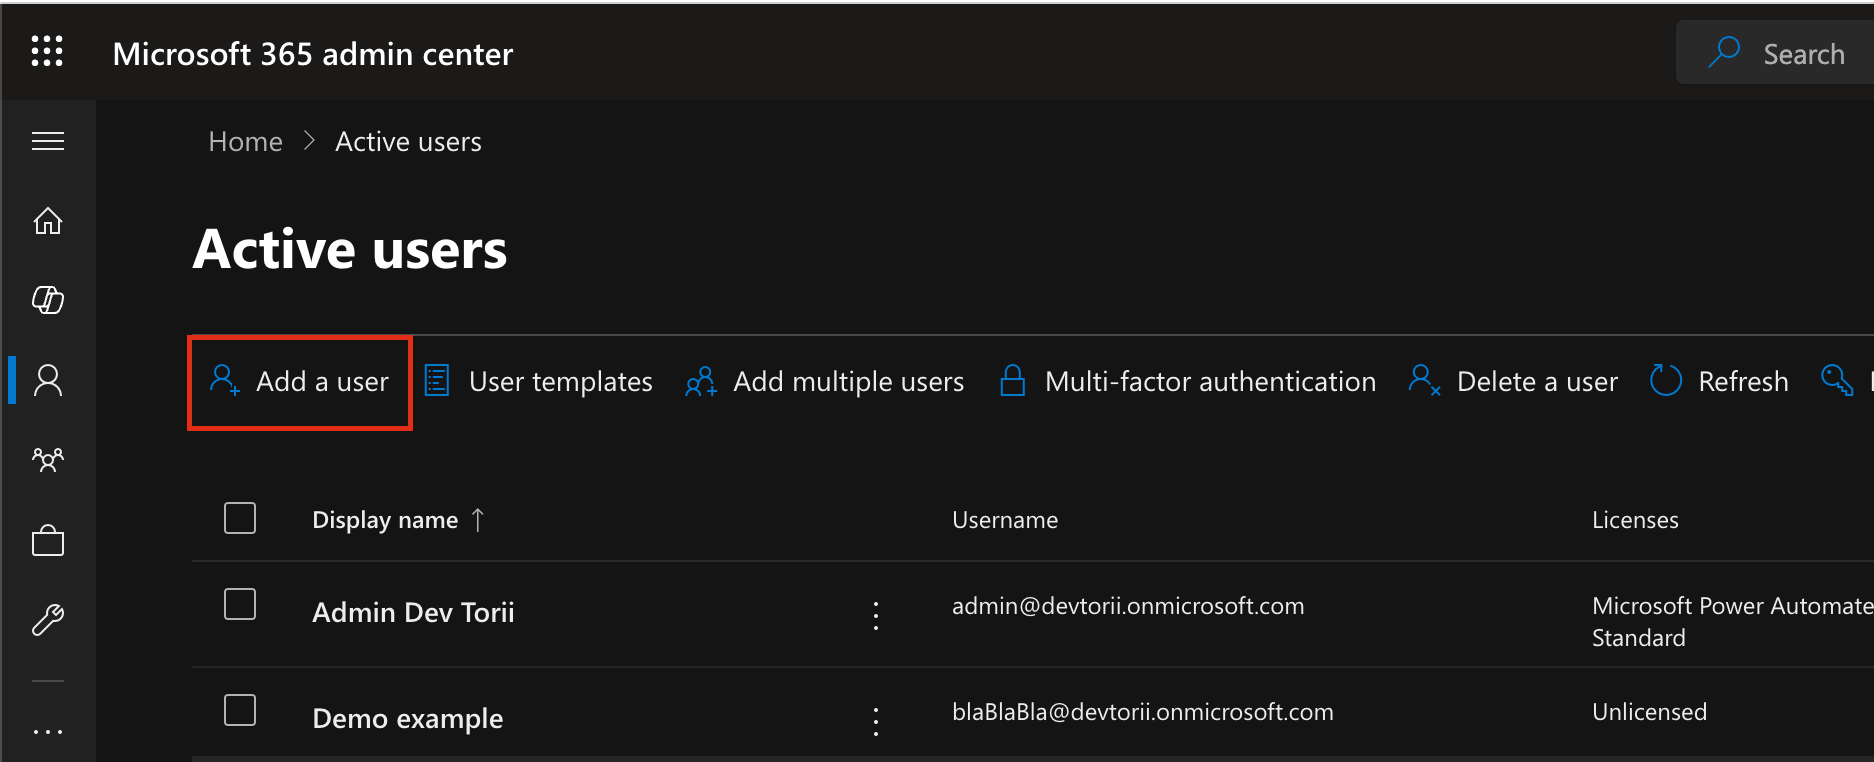
Create a New User:
- Select "Users" from the left-hand menu.
- Click on "Add a single user".
- This new user will be associated with your Azure Automation account.
- Password Policy: If your organization enforces a password policy, ensure that you update the credential password in Azure Automation whenever it changes to prevent any disruptions in script execution.
-
Configure the New Service Account User
-
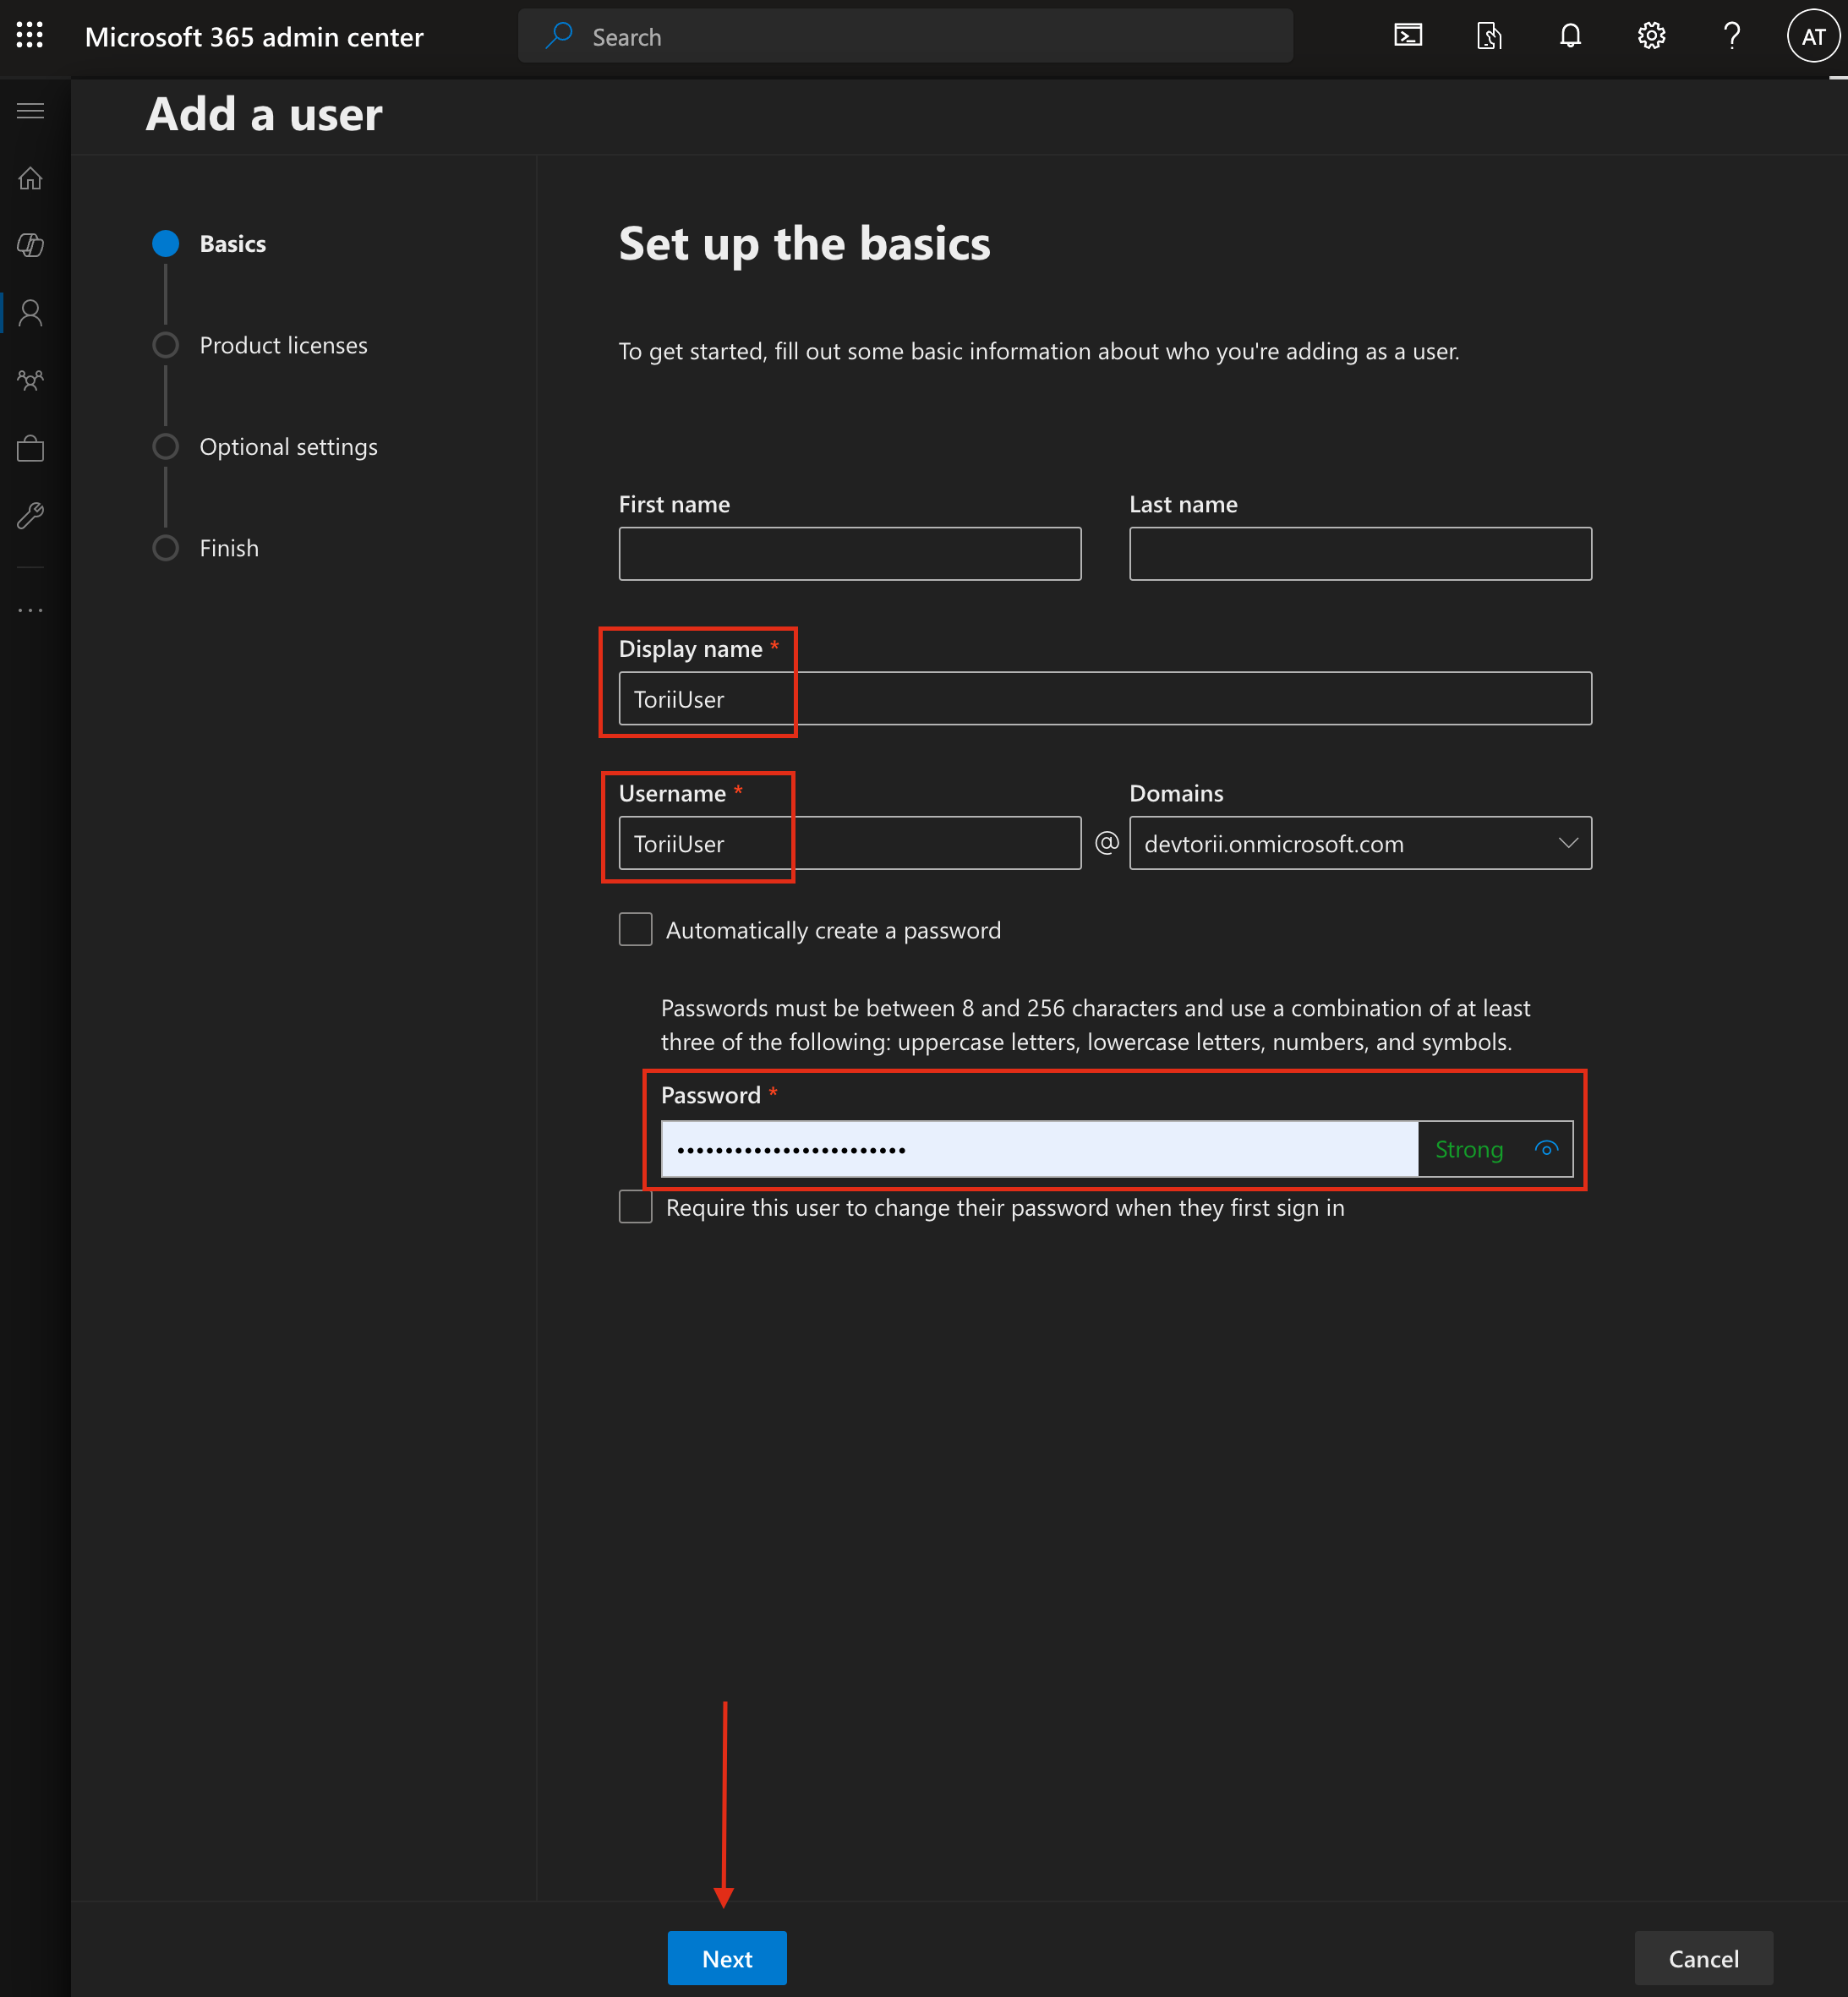
When setting up the new user, fill out the following fields:
- Display Name:
ToriiUser - Username:
ToriiUser - Keep the “Automatically create a password” checkbox unchecked.
- Password: Generate a strong password and store it securely, preferably using a password manager.
- Display Name:
-
click "Next" to continue.
-
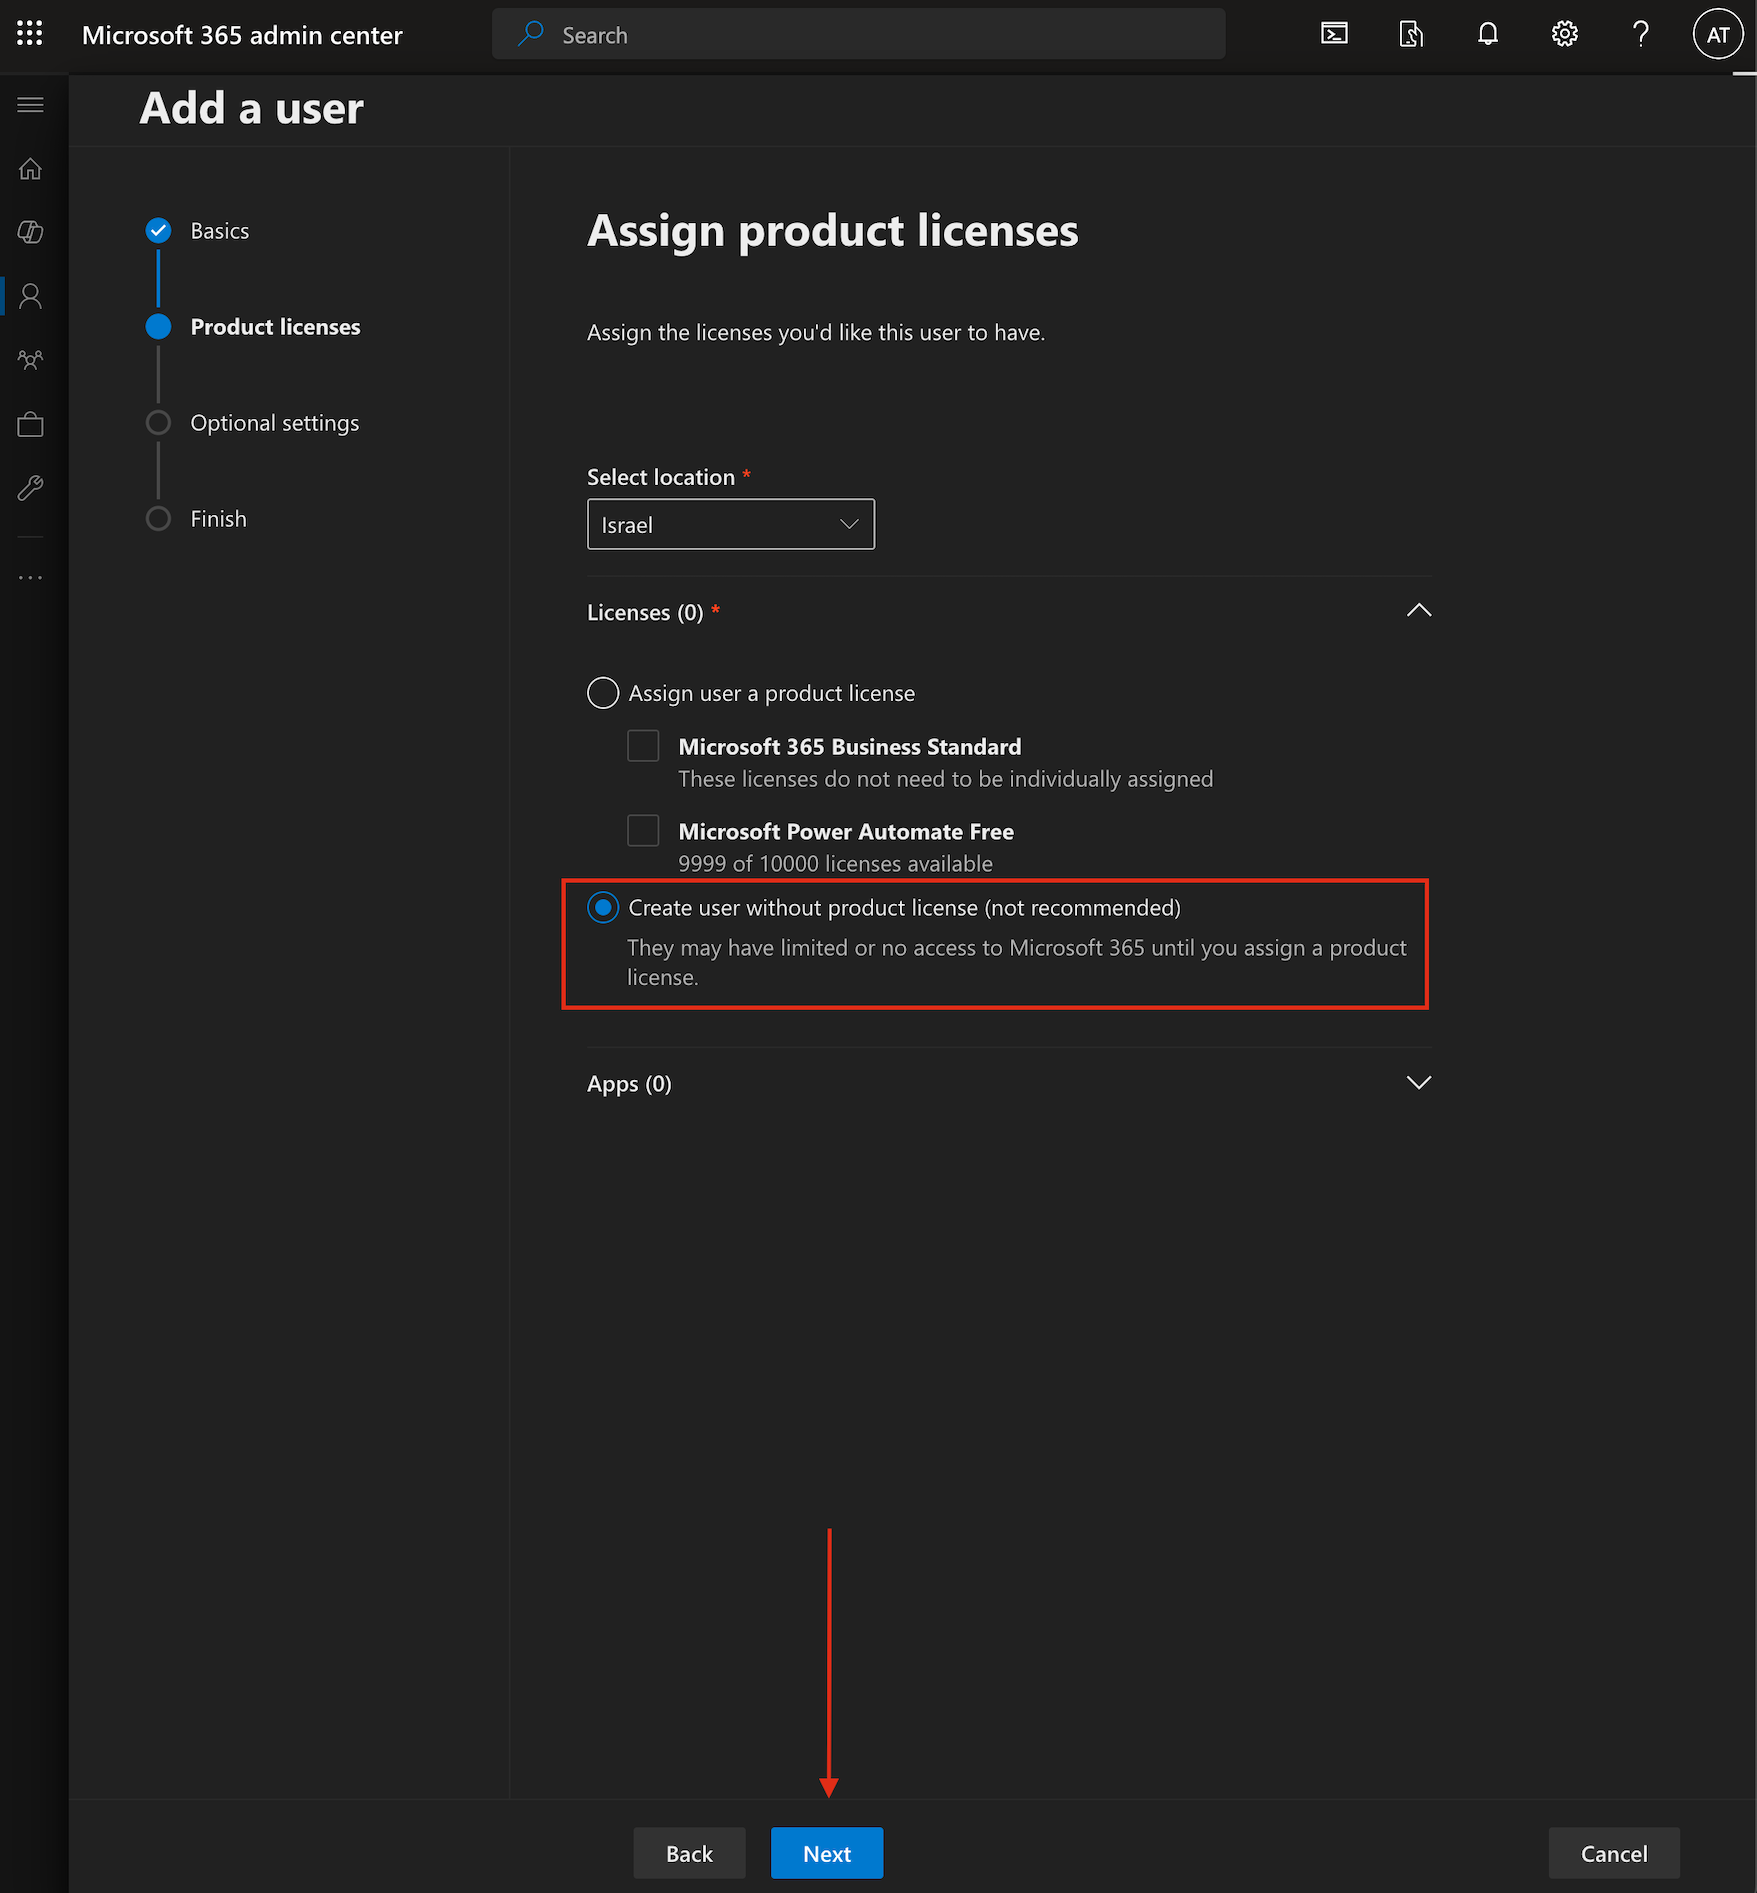
Choose "Create user without product license".
-
Click "Next".
-
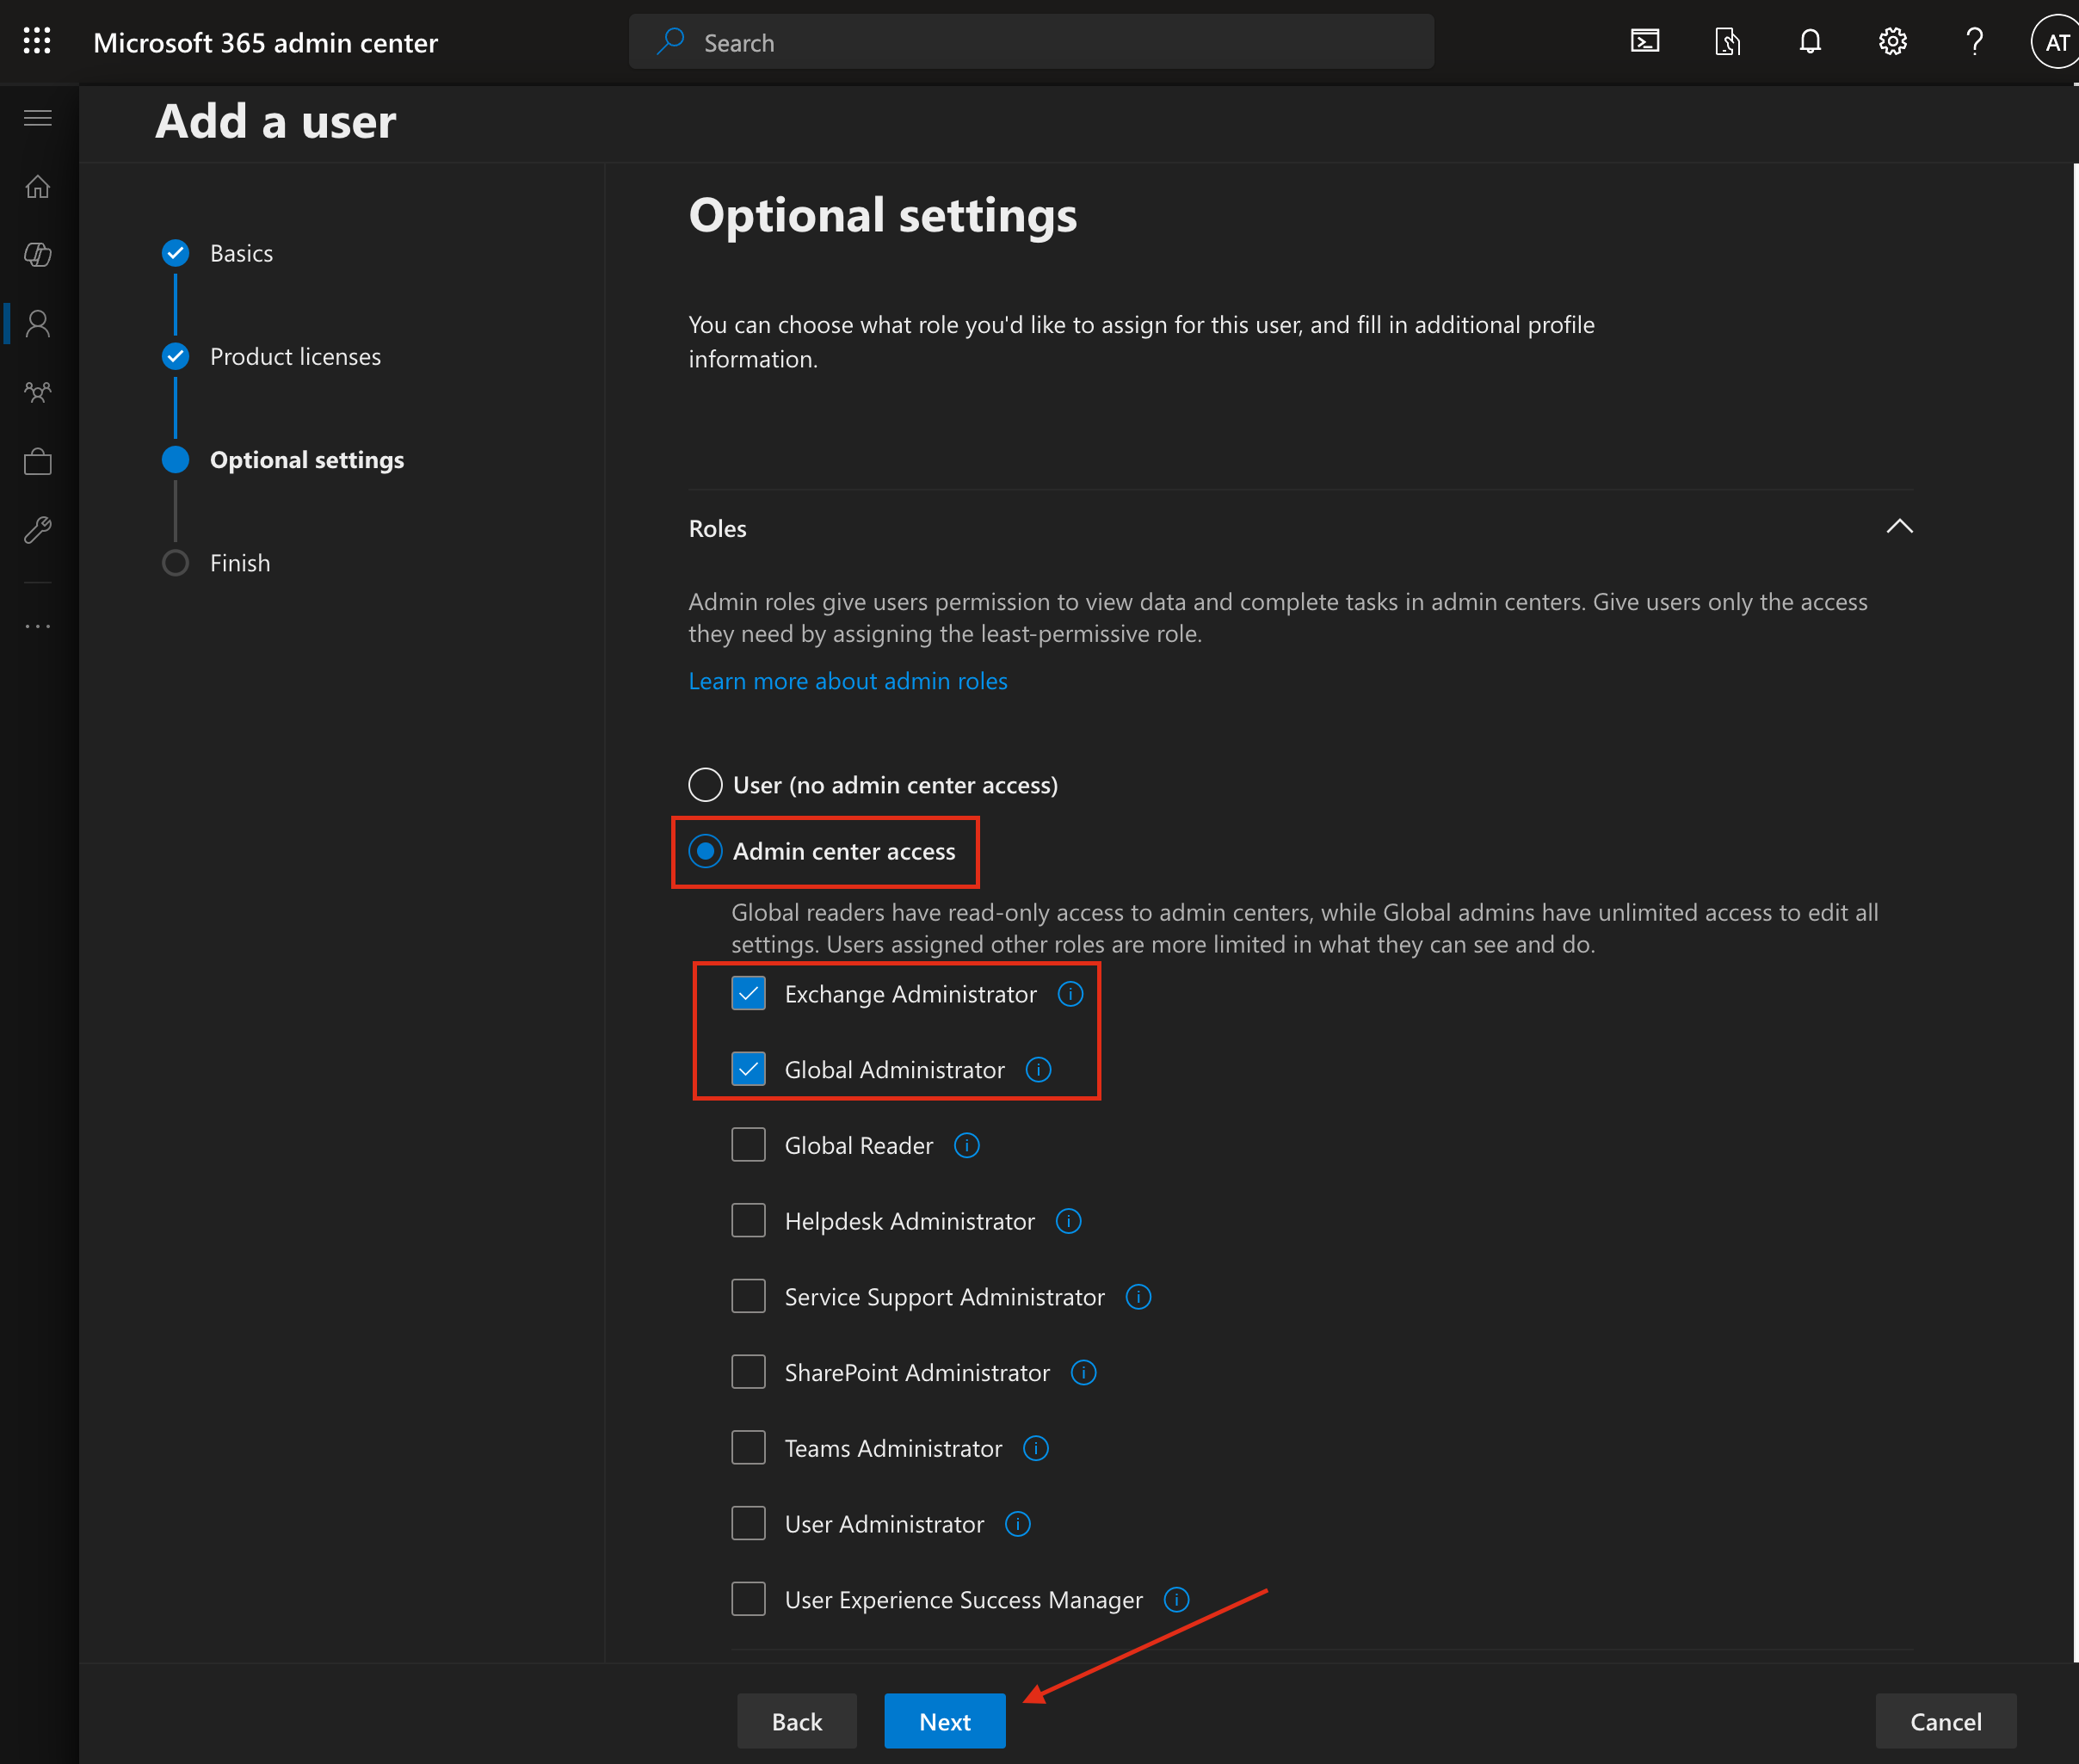
Select the "Admin center access" radio button.
-
Under "Admin center access", assign the following roles:
Exchange adminGlobal admin
-
Then, proceed by clicking "Next".
-
Review all the information to ensure accuracy, then click "Finish adding".
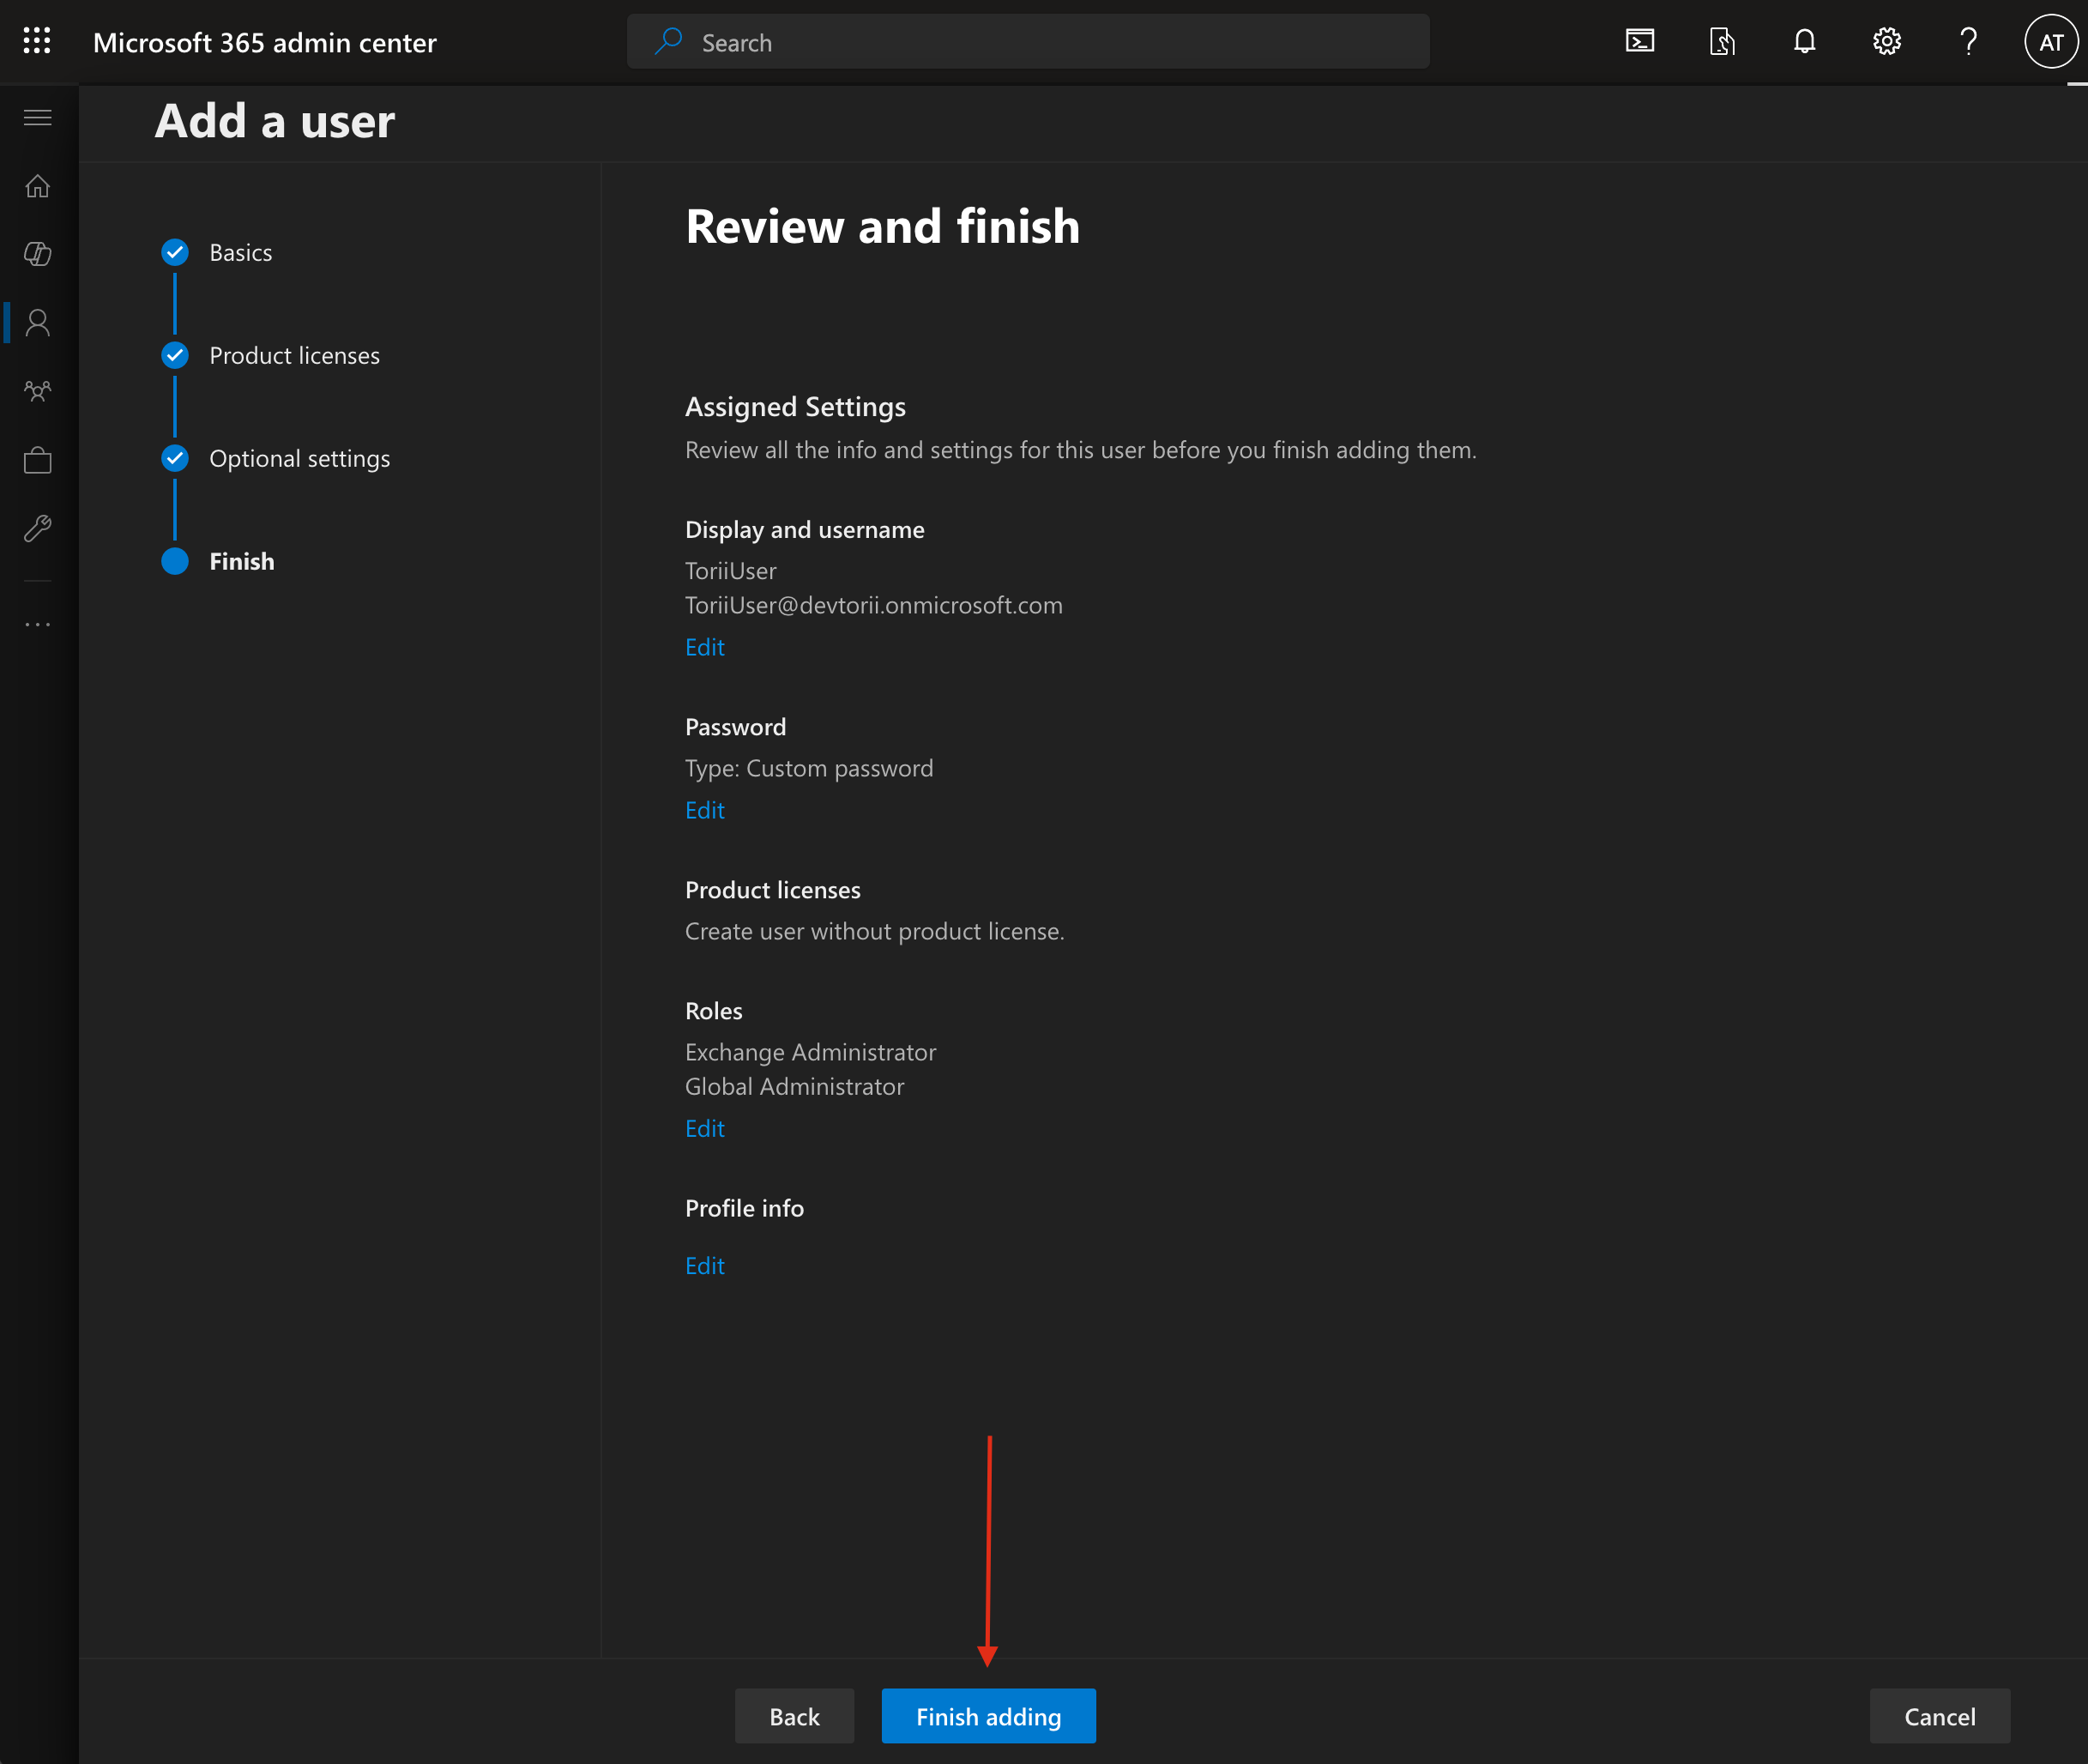
-
Important: This is your last chance to view the generated password. Save it securely, as you'll need it later when creating a credential in Azure Automation.
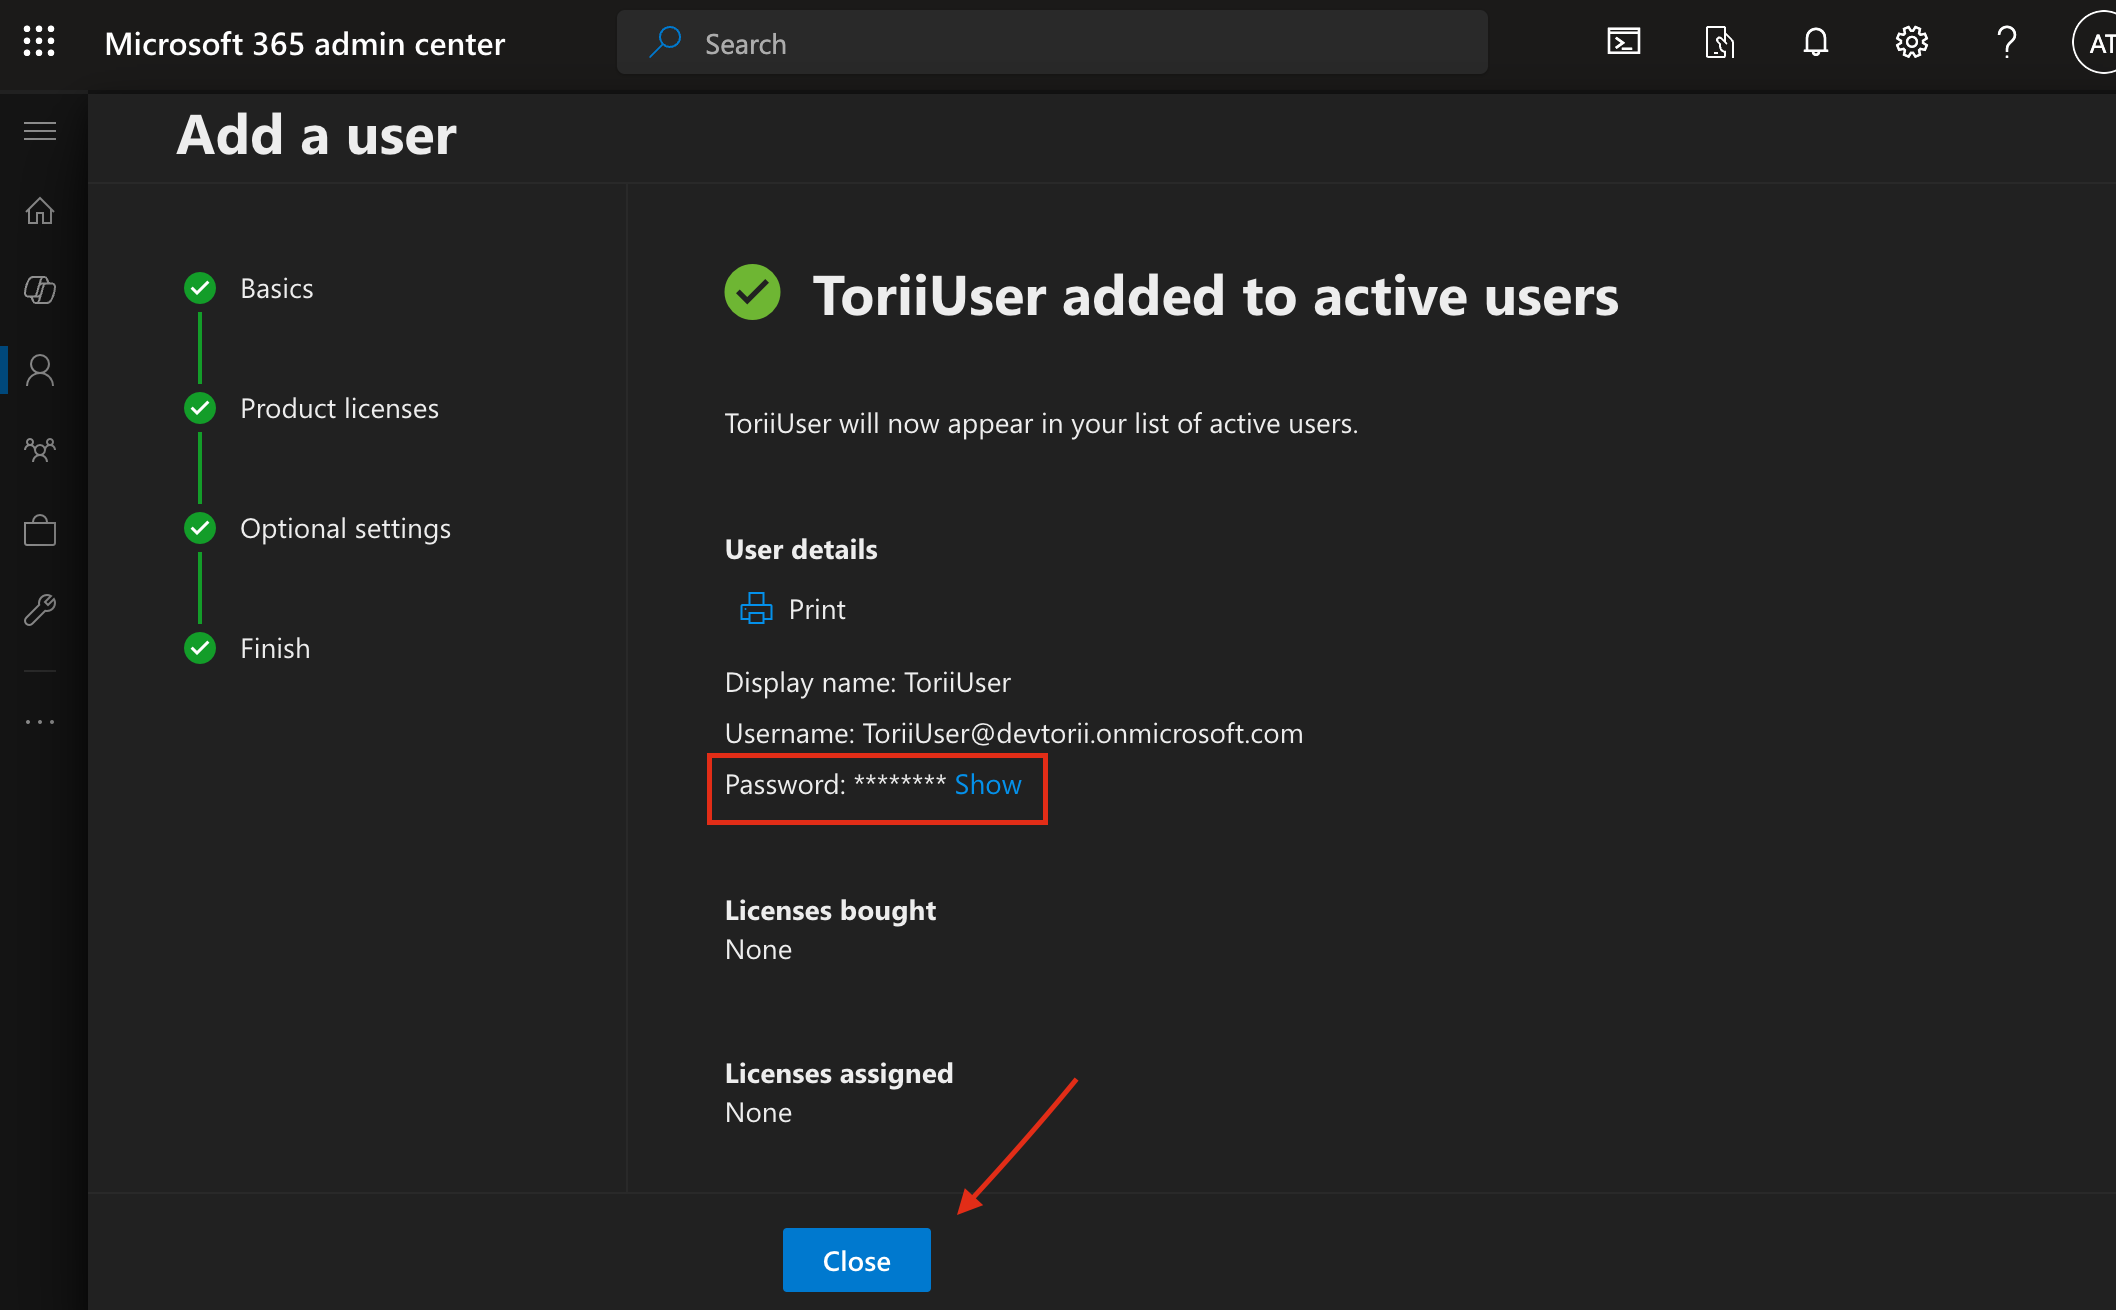
-
2. Create an Azure Automation account
-
Start the Creation Process:
- Go to the Azure portal at portal.azure.com.
- Click on "Create" in the upper-left corner.

-
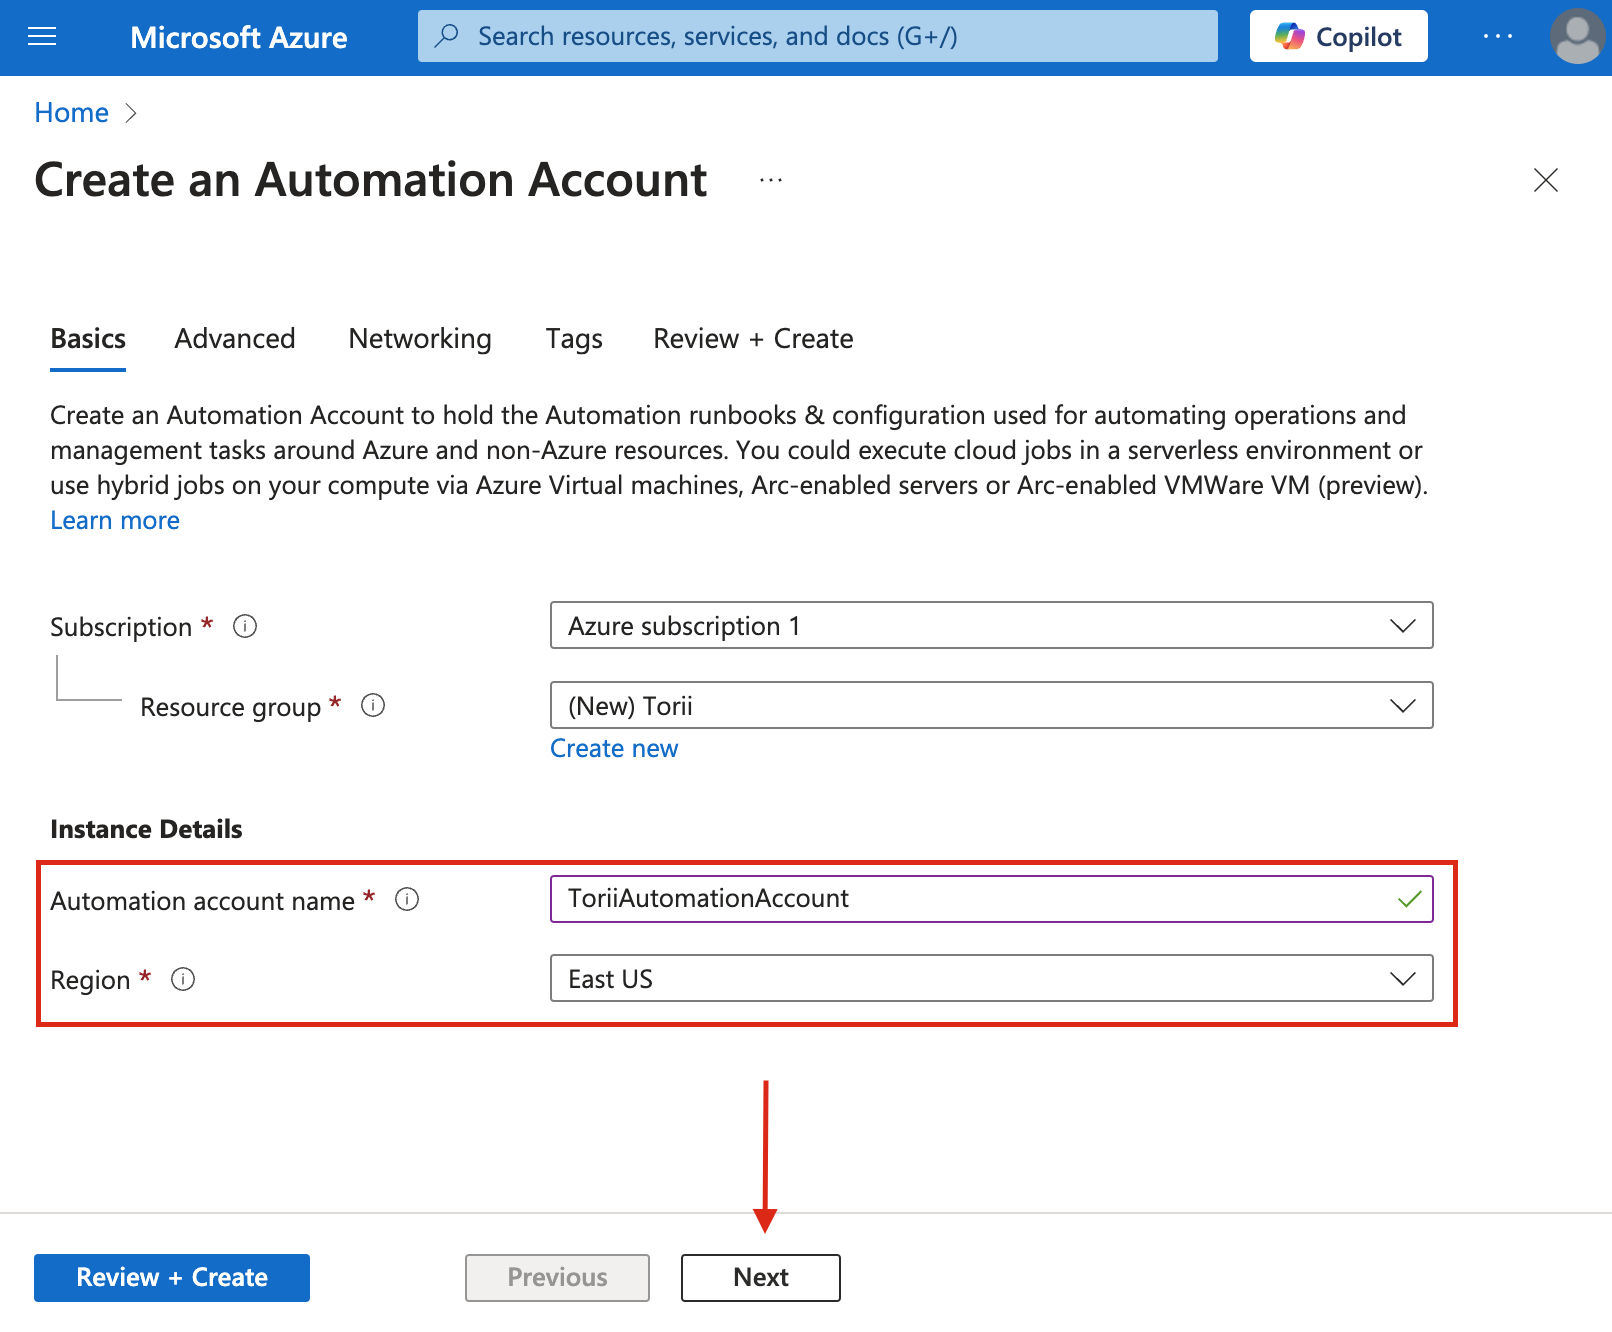
Fill the following fields:
-
Subscription: Choose the subscription you want to use for the new Automation account.
-
Resource Group:
-
Click on "Create new".
-
Name it "Torii".
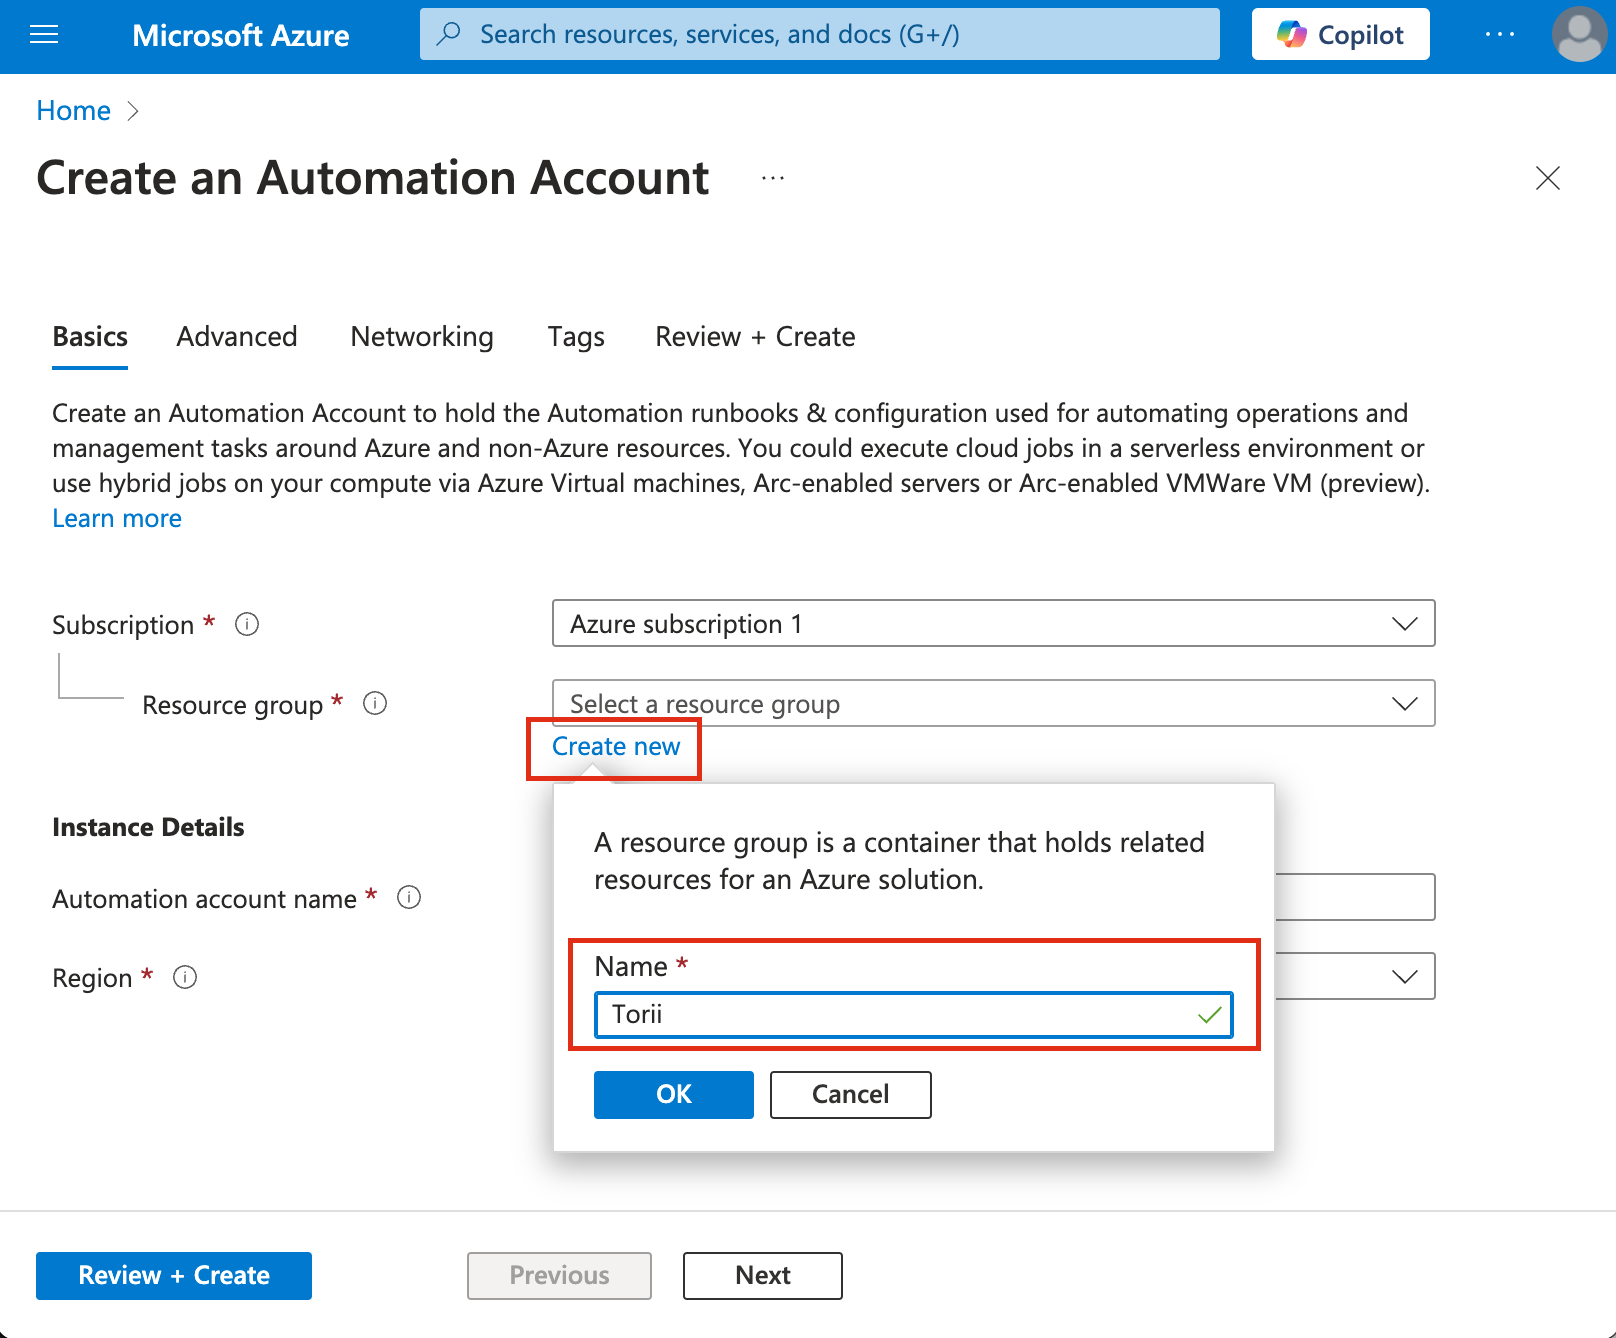
-
Ensure that this new resource group is selected.
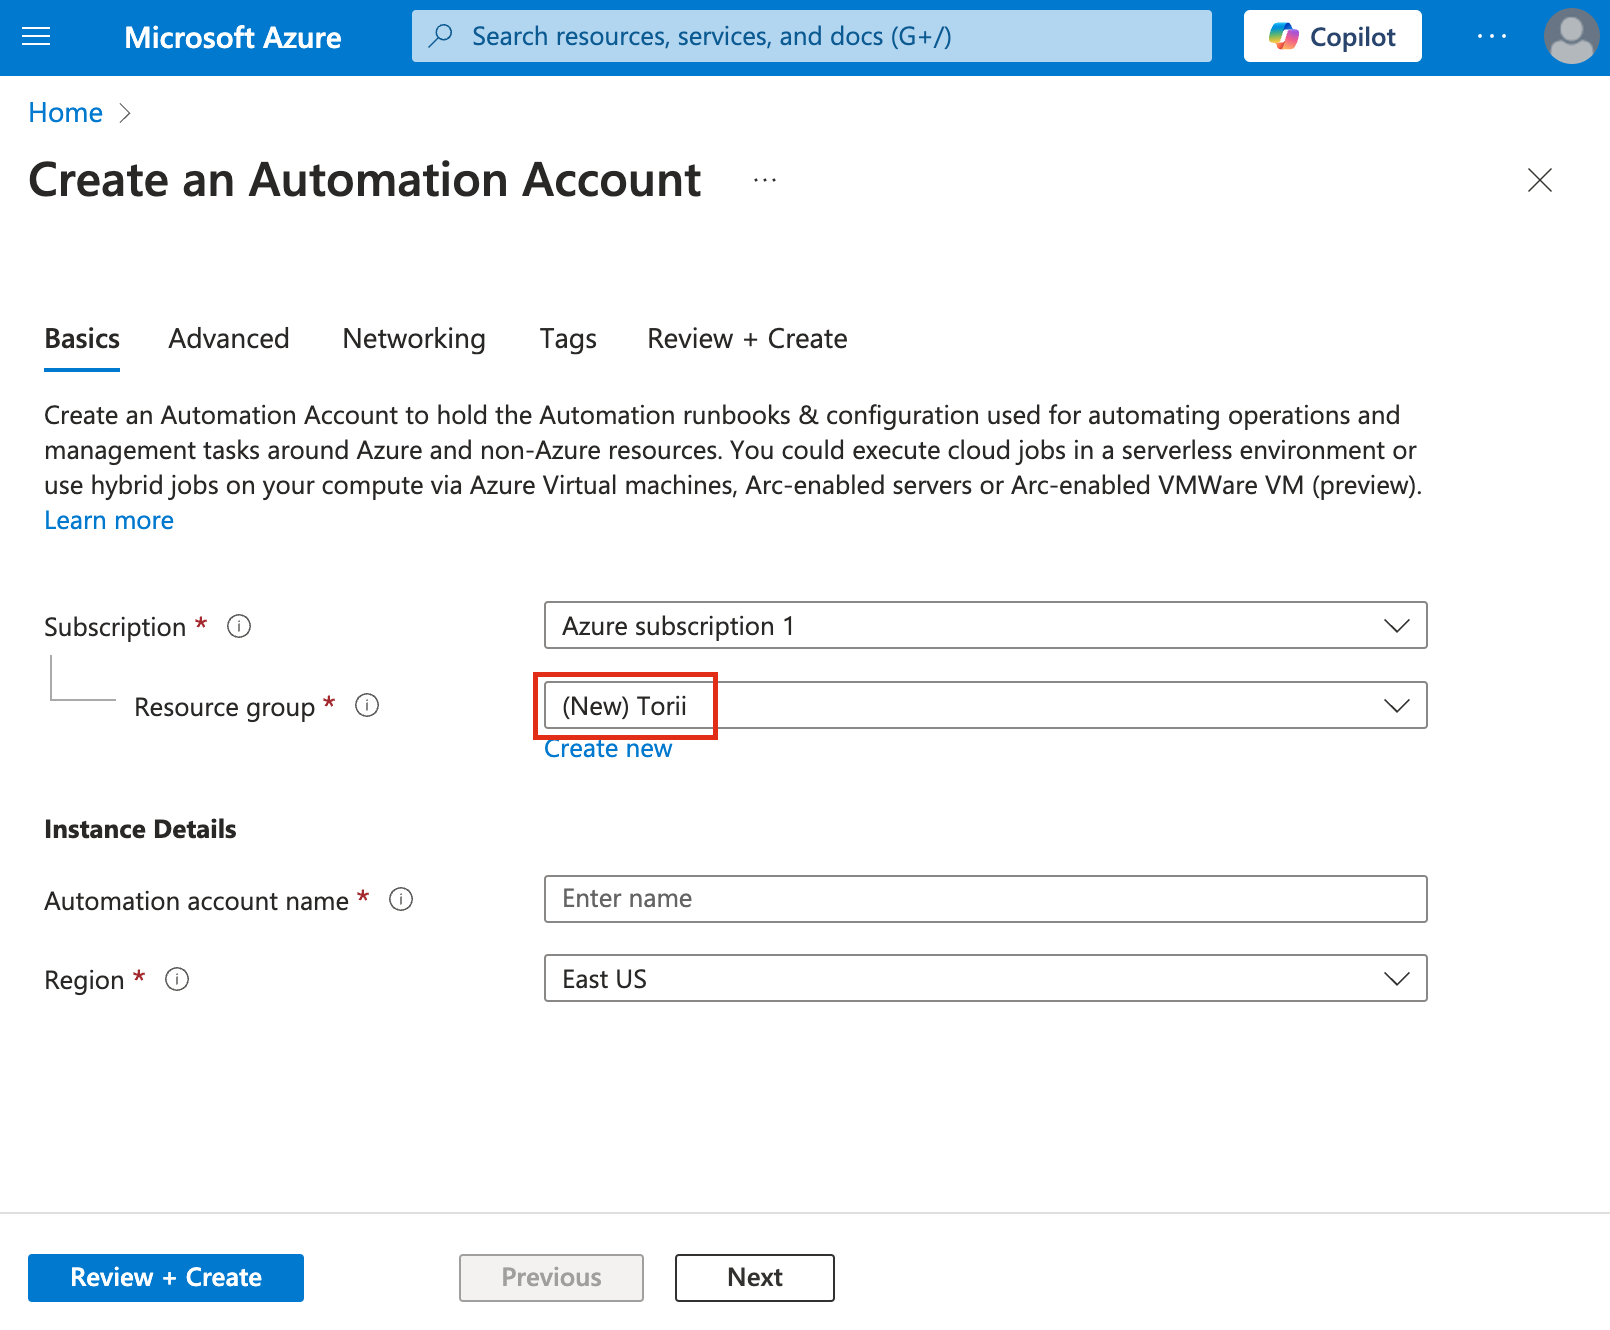
-
-
-
Automation Account Name: Enter "Torii Automation".
-
Location: Choose the region that best fits your needs.
-
Click "Next" to continue.
-
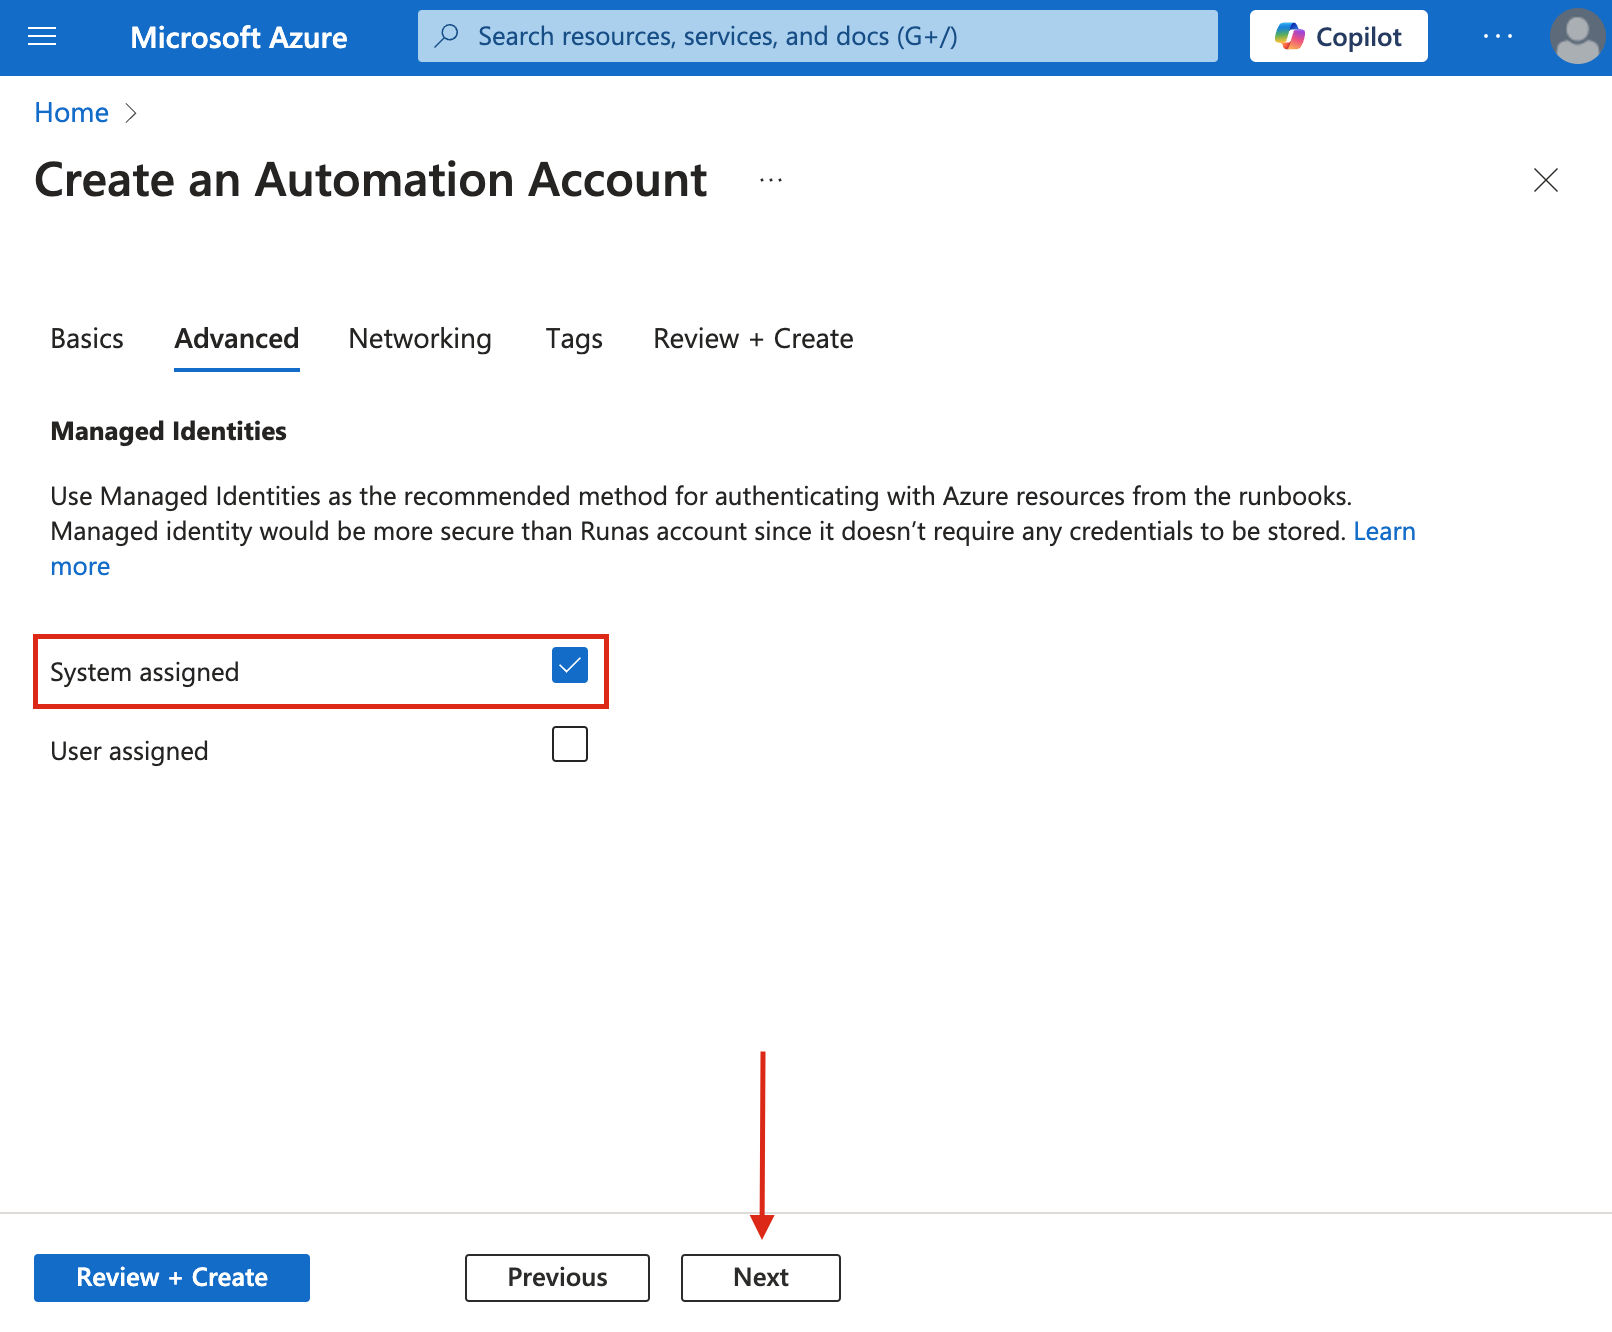
- On the Advance section:
- Check the "System Assigned" option.
- Click "Next".
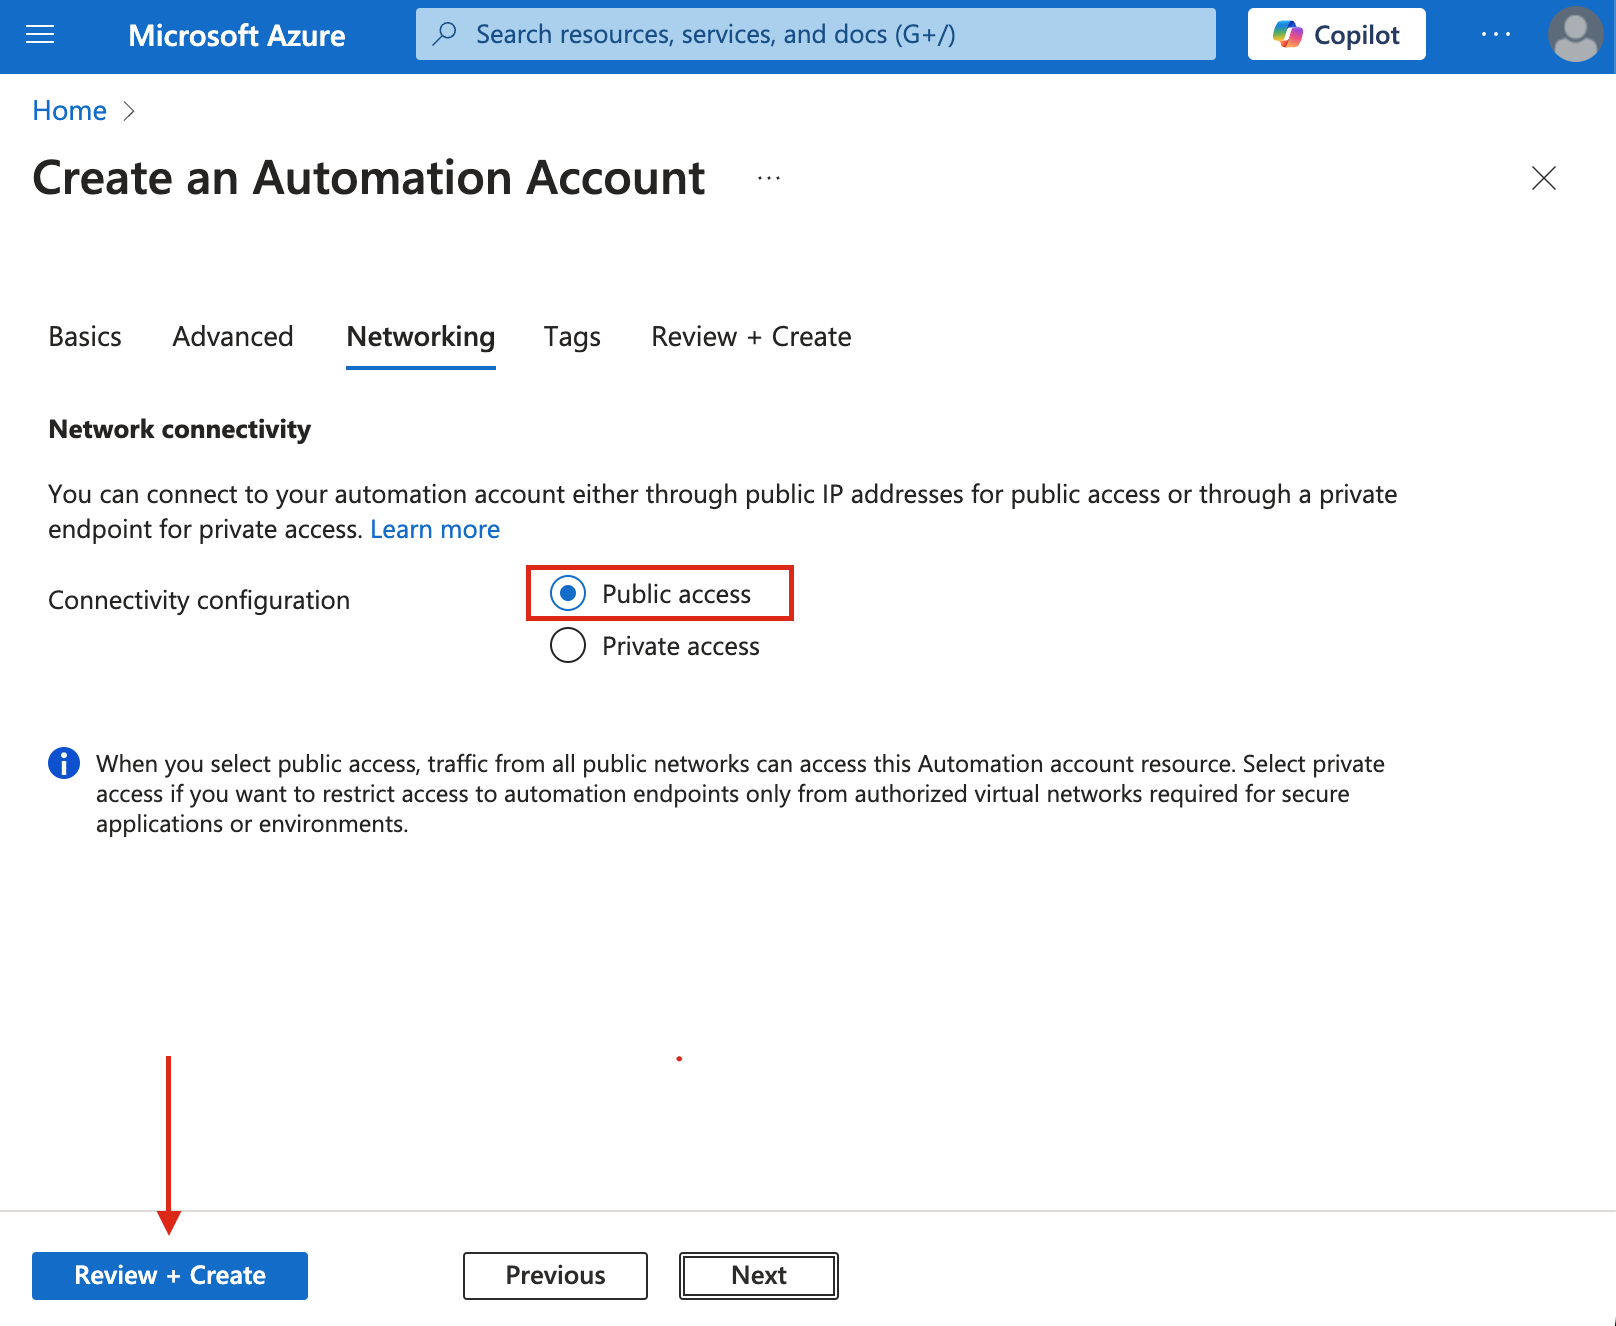
- On the Networking page:
- Select "Public access".
- Click "Review + Create"
- Note: Tags are optional and can be left blank.
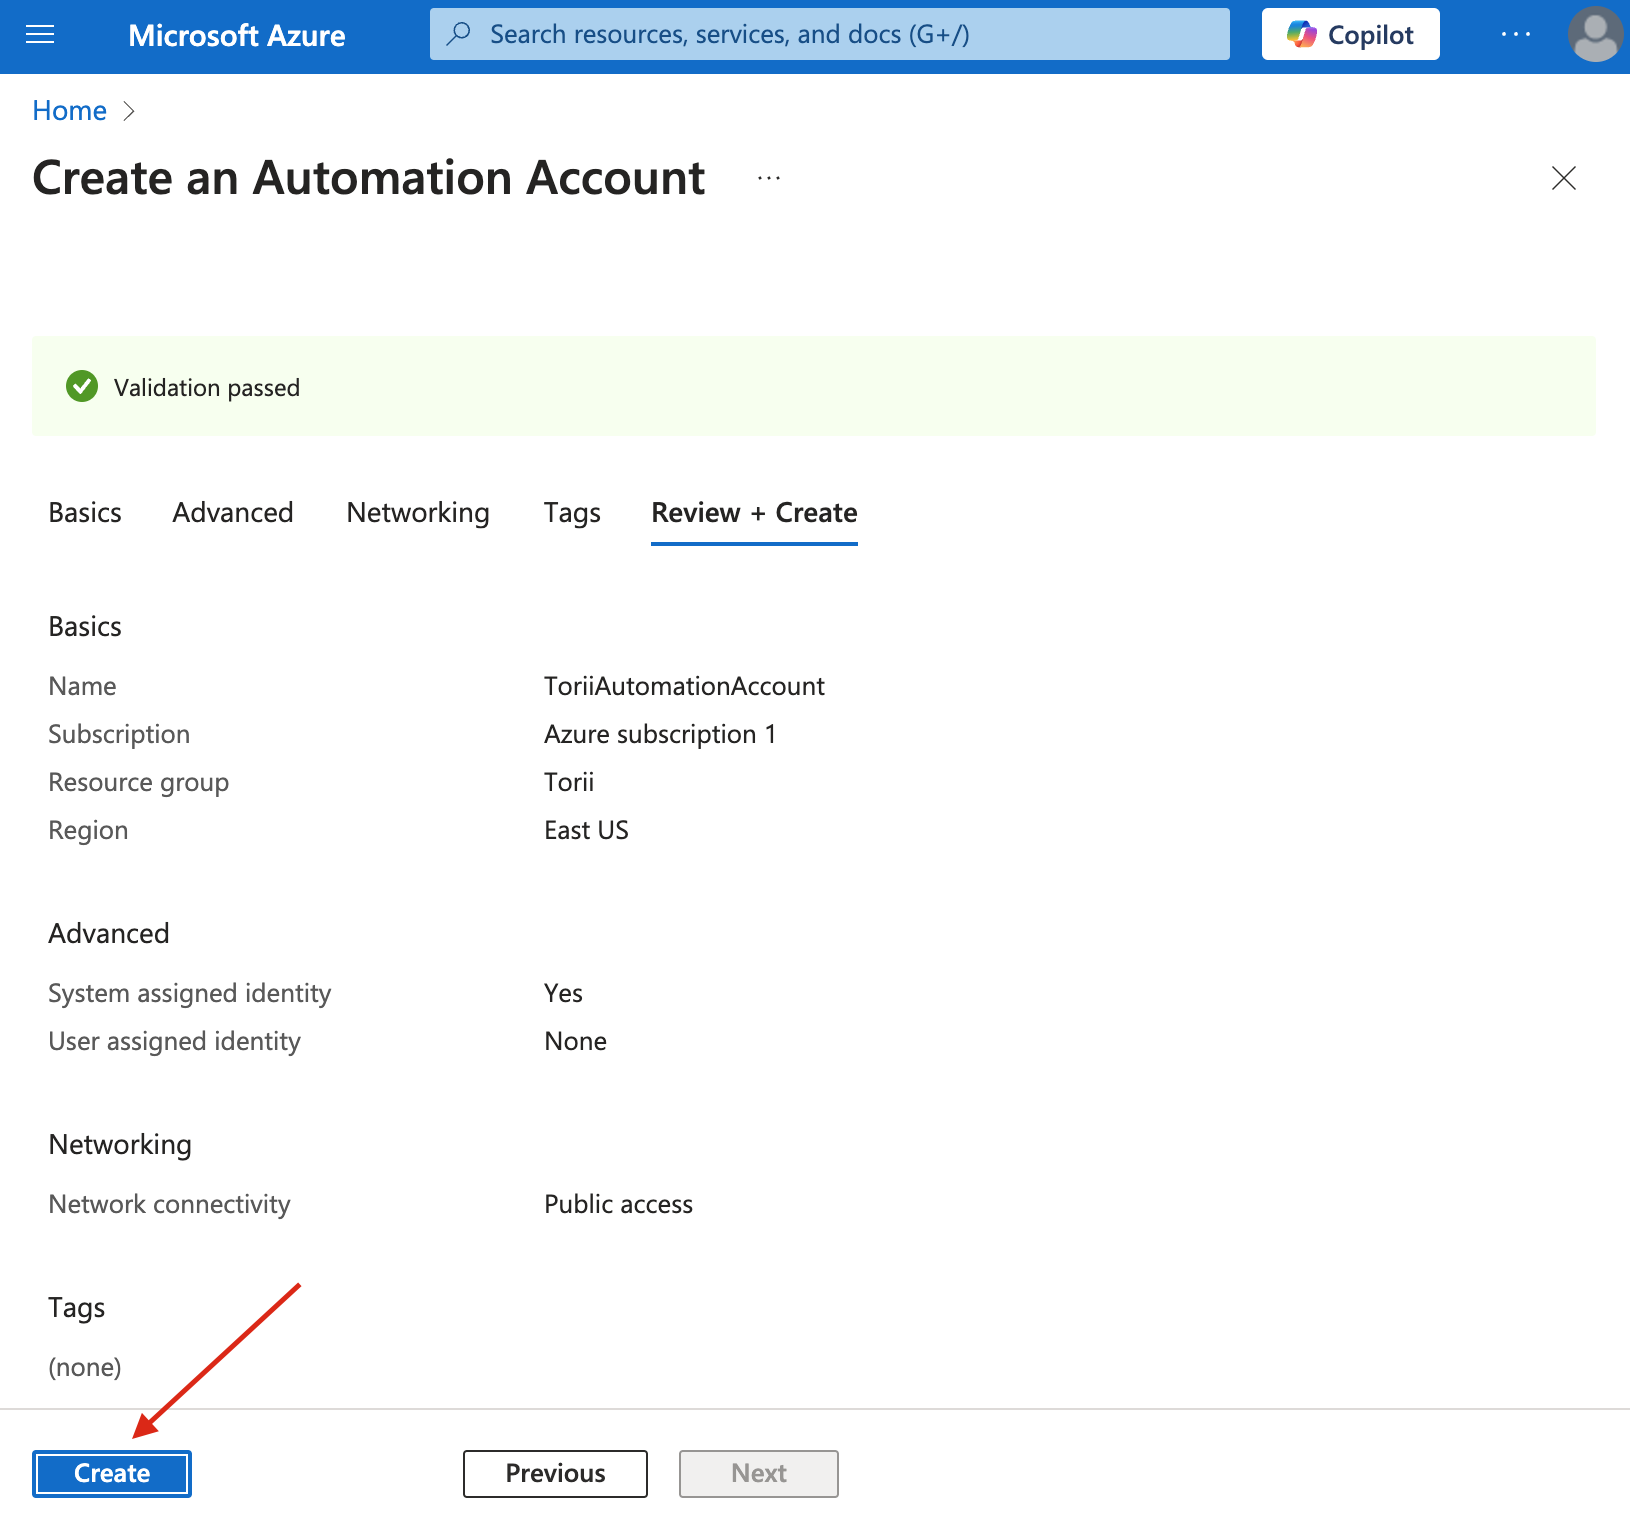
- Review and Create:
- Double-check all your entries.
- Click "Create" to finalize.
- Completion:
- Wait for the deployment to finish.
- Your new Automation account will now appear in your resource list.
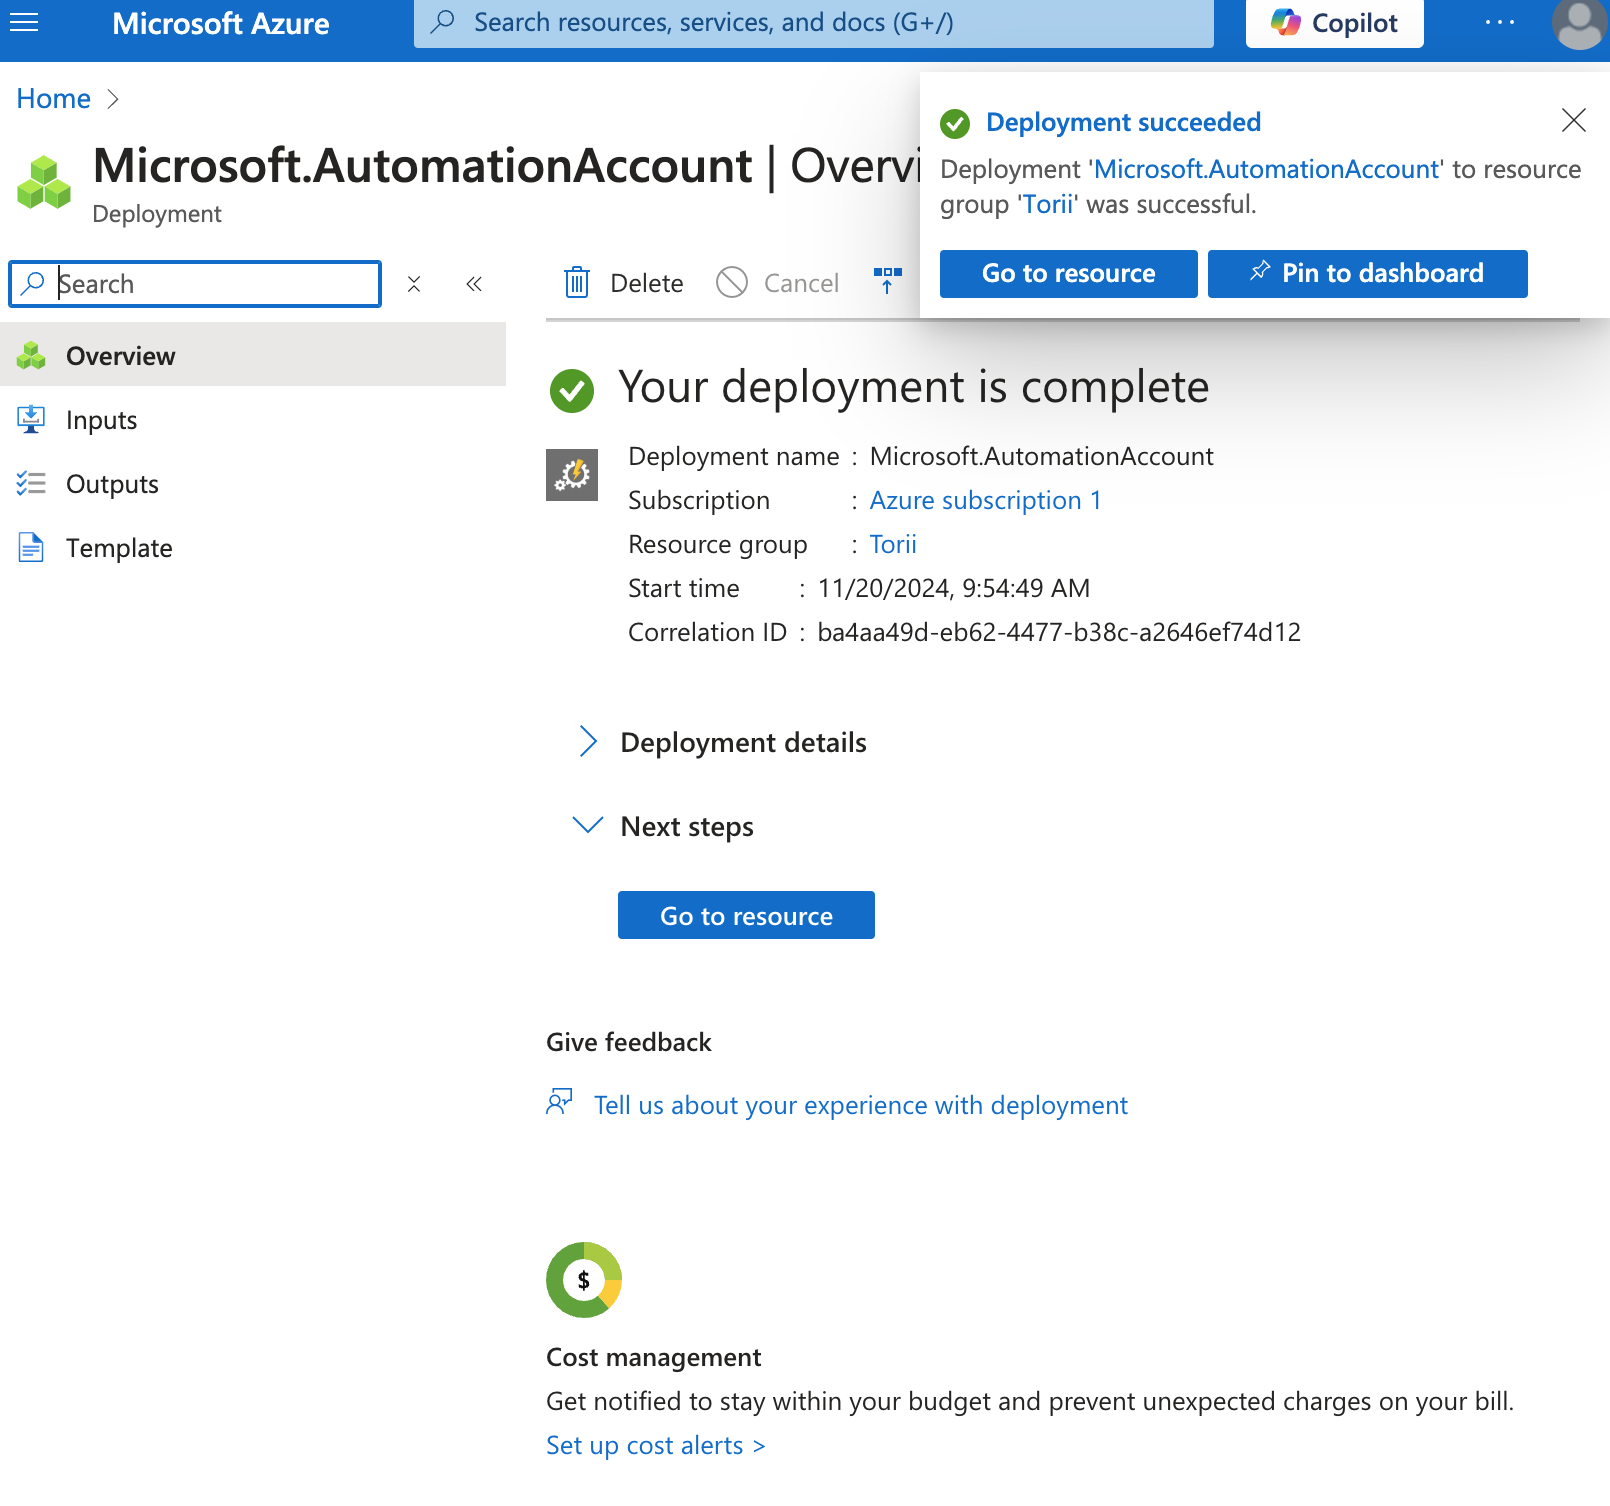
3. Assign Microsoft Entra Roles and Administrators to the Automation Account
-
Navigate to Microsoft Entra Roles and Administrators:
- Follow this link: Microsoft Entra Roles and Administrators.
- Alternatively, use the Azure portal search bar to find "Microsoft Entra Roles and Administrators".
- Follow this link: Microsoft Entra Roles and Administrators.
-
Assign the
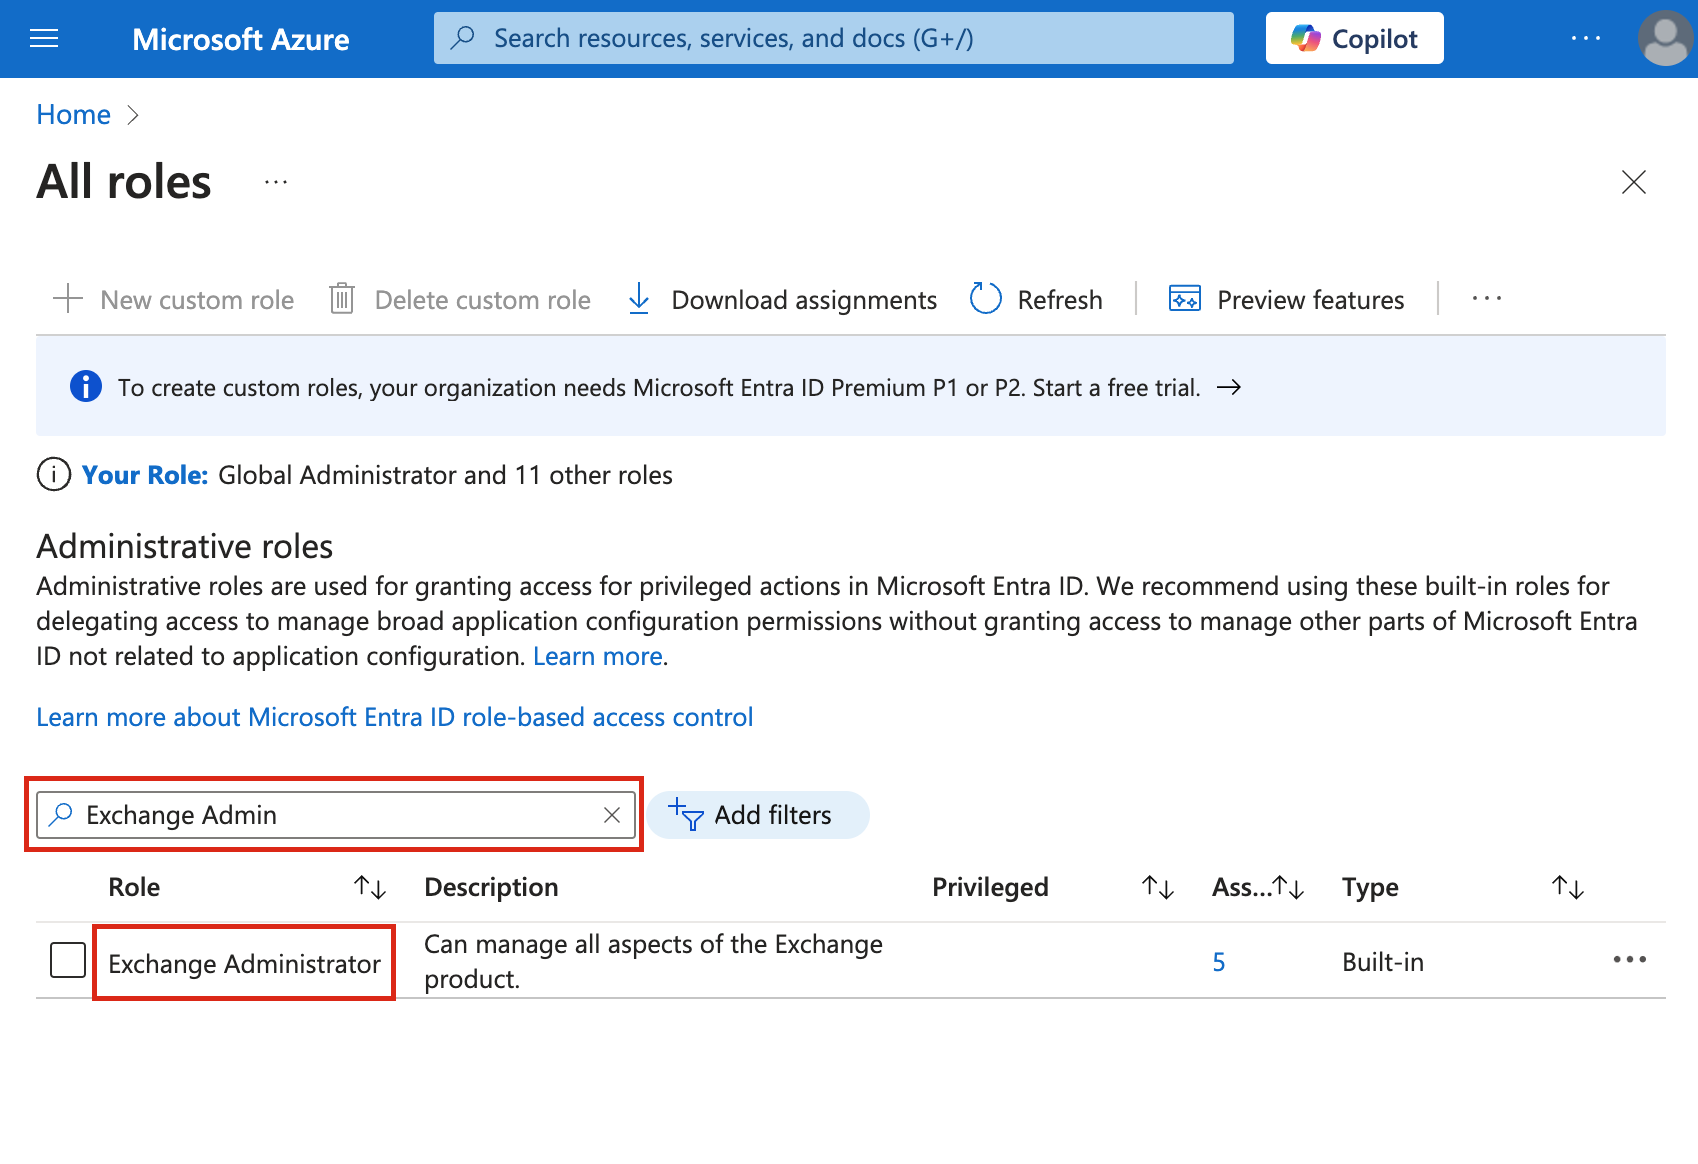
Exchange AdministratorRole:-
In the Roles and Administrators section, search for
Exchange Administrator. -
Click on the role to open its settings.
-
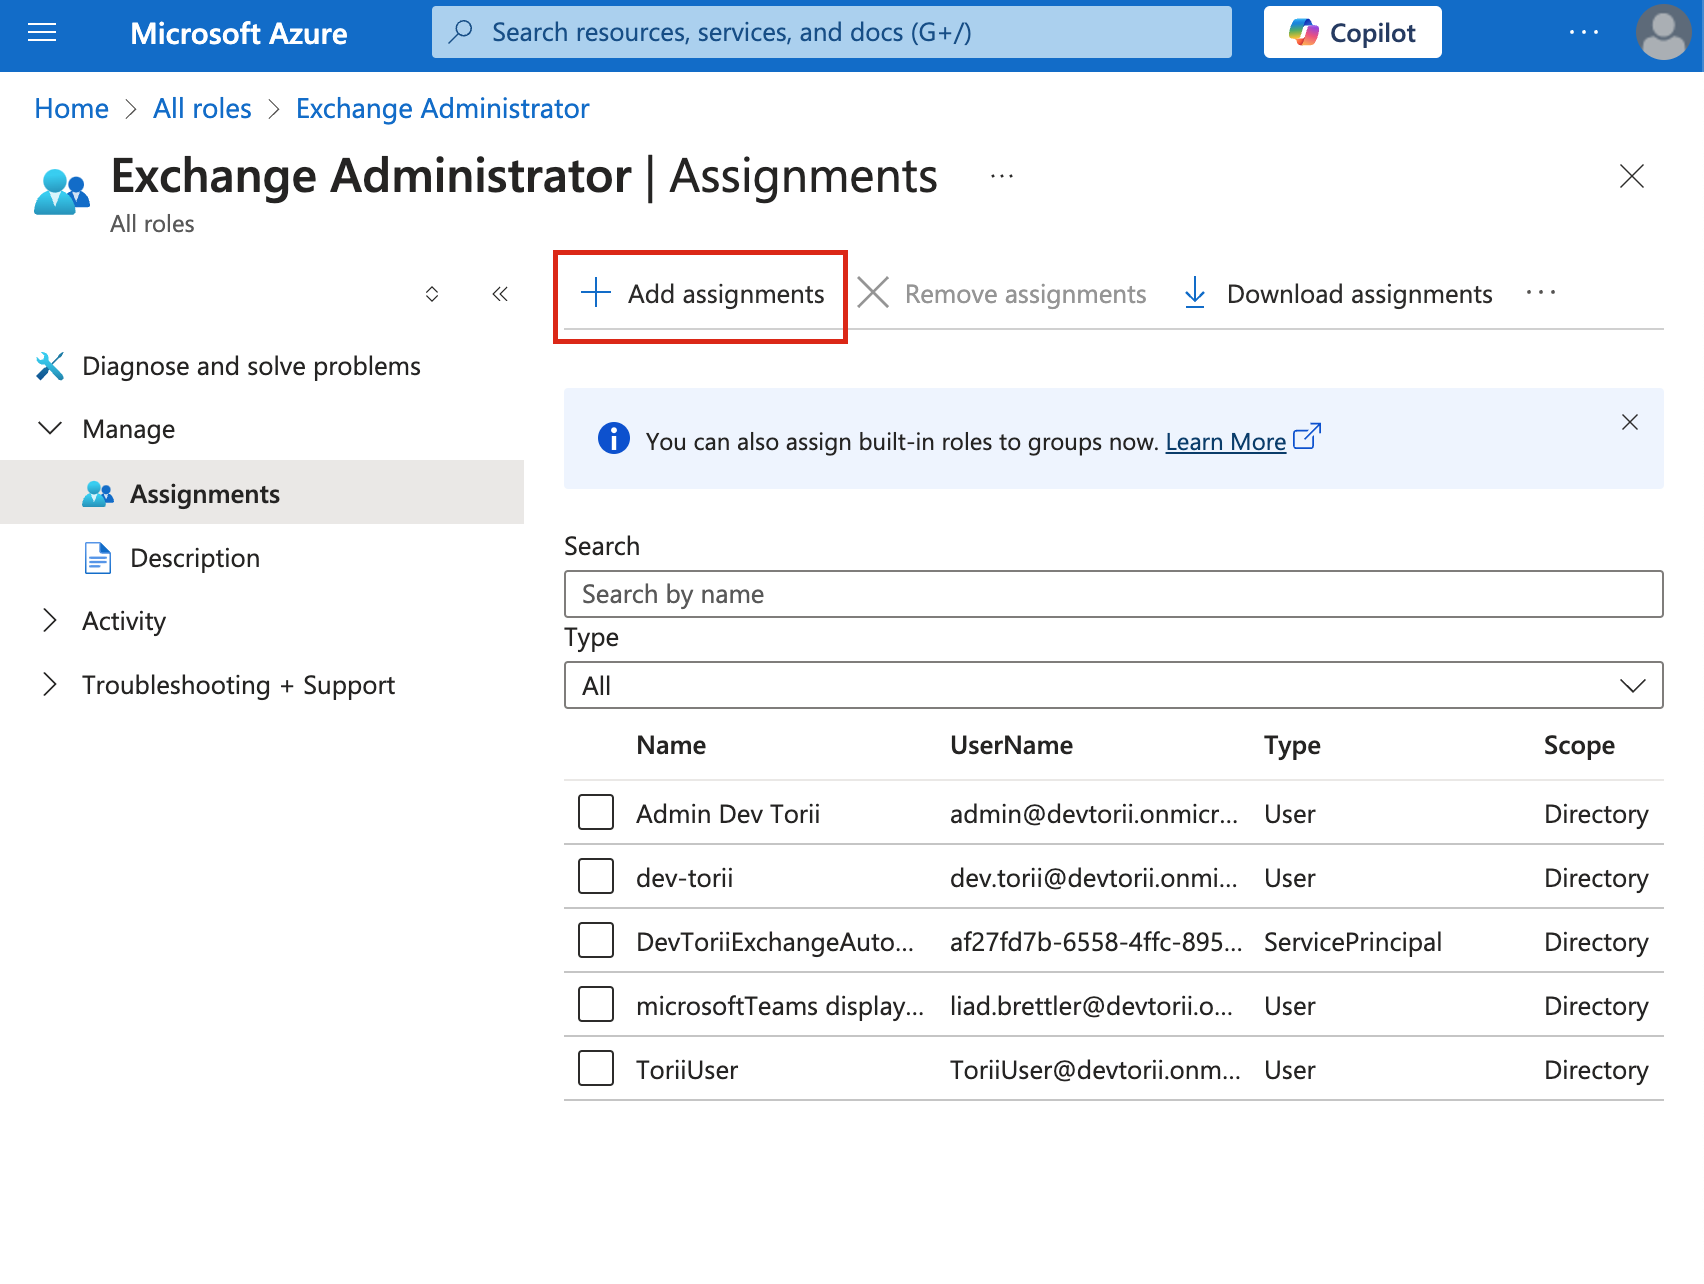
Select "Add Assignment".
-
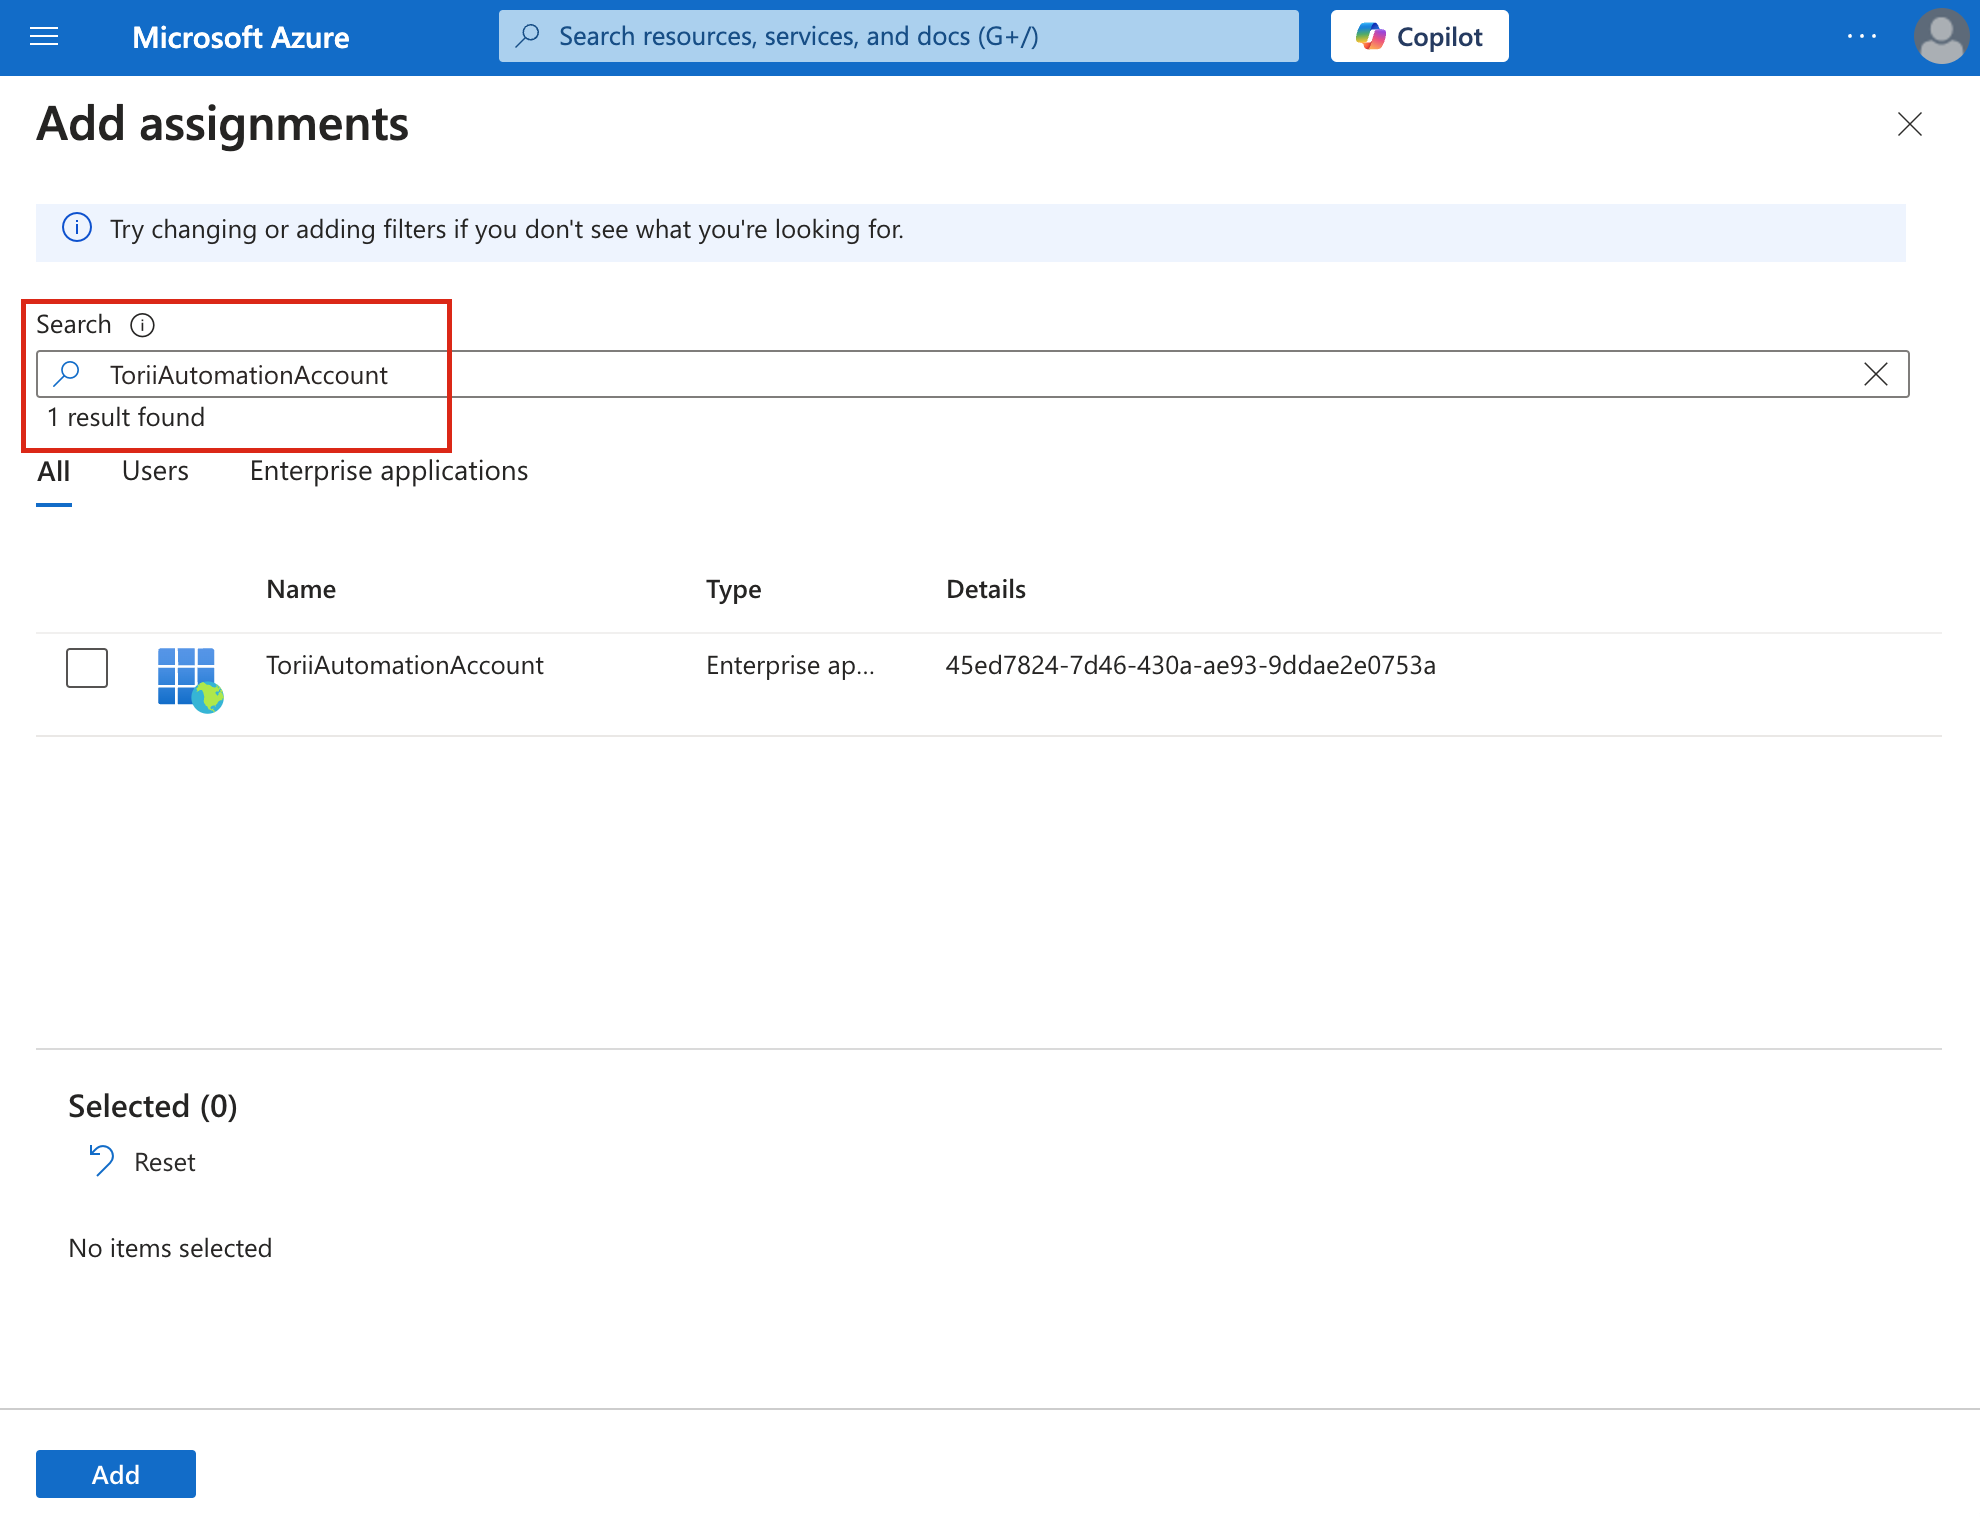
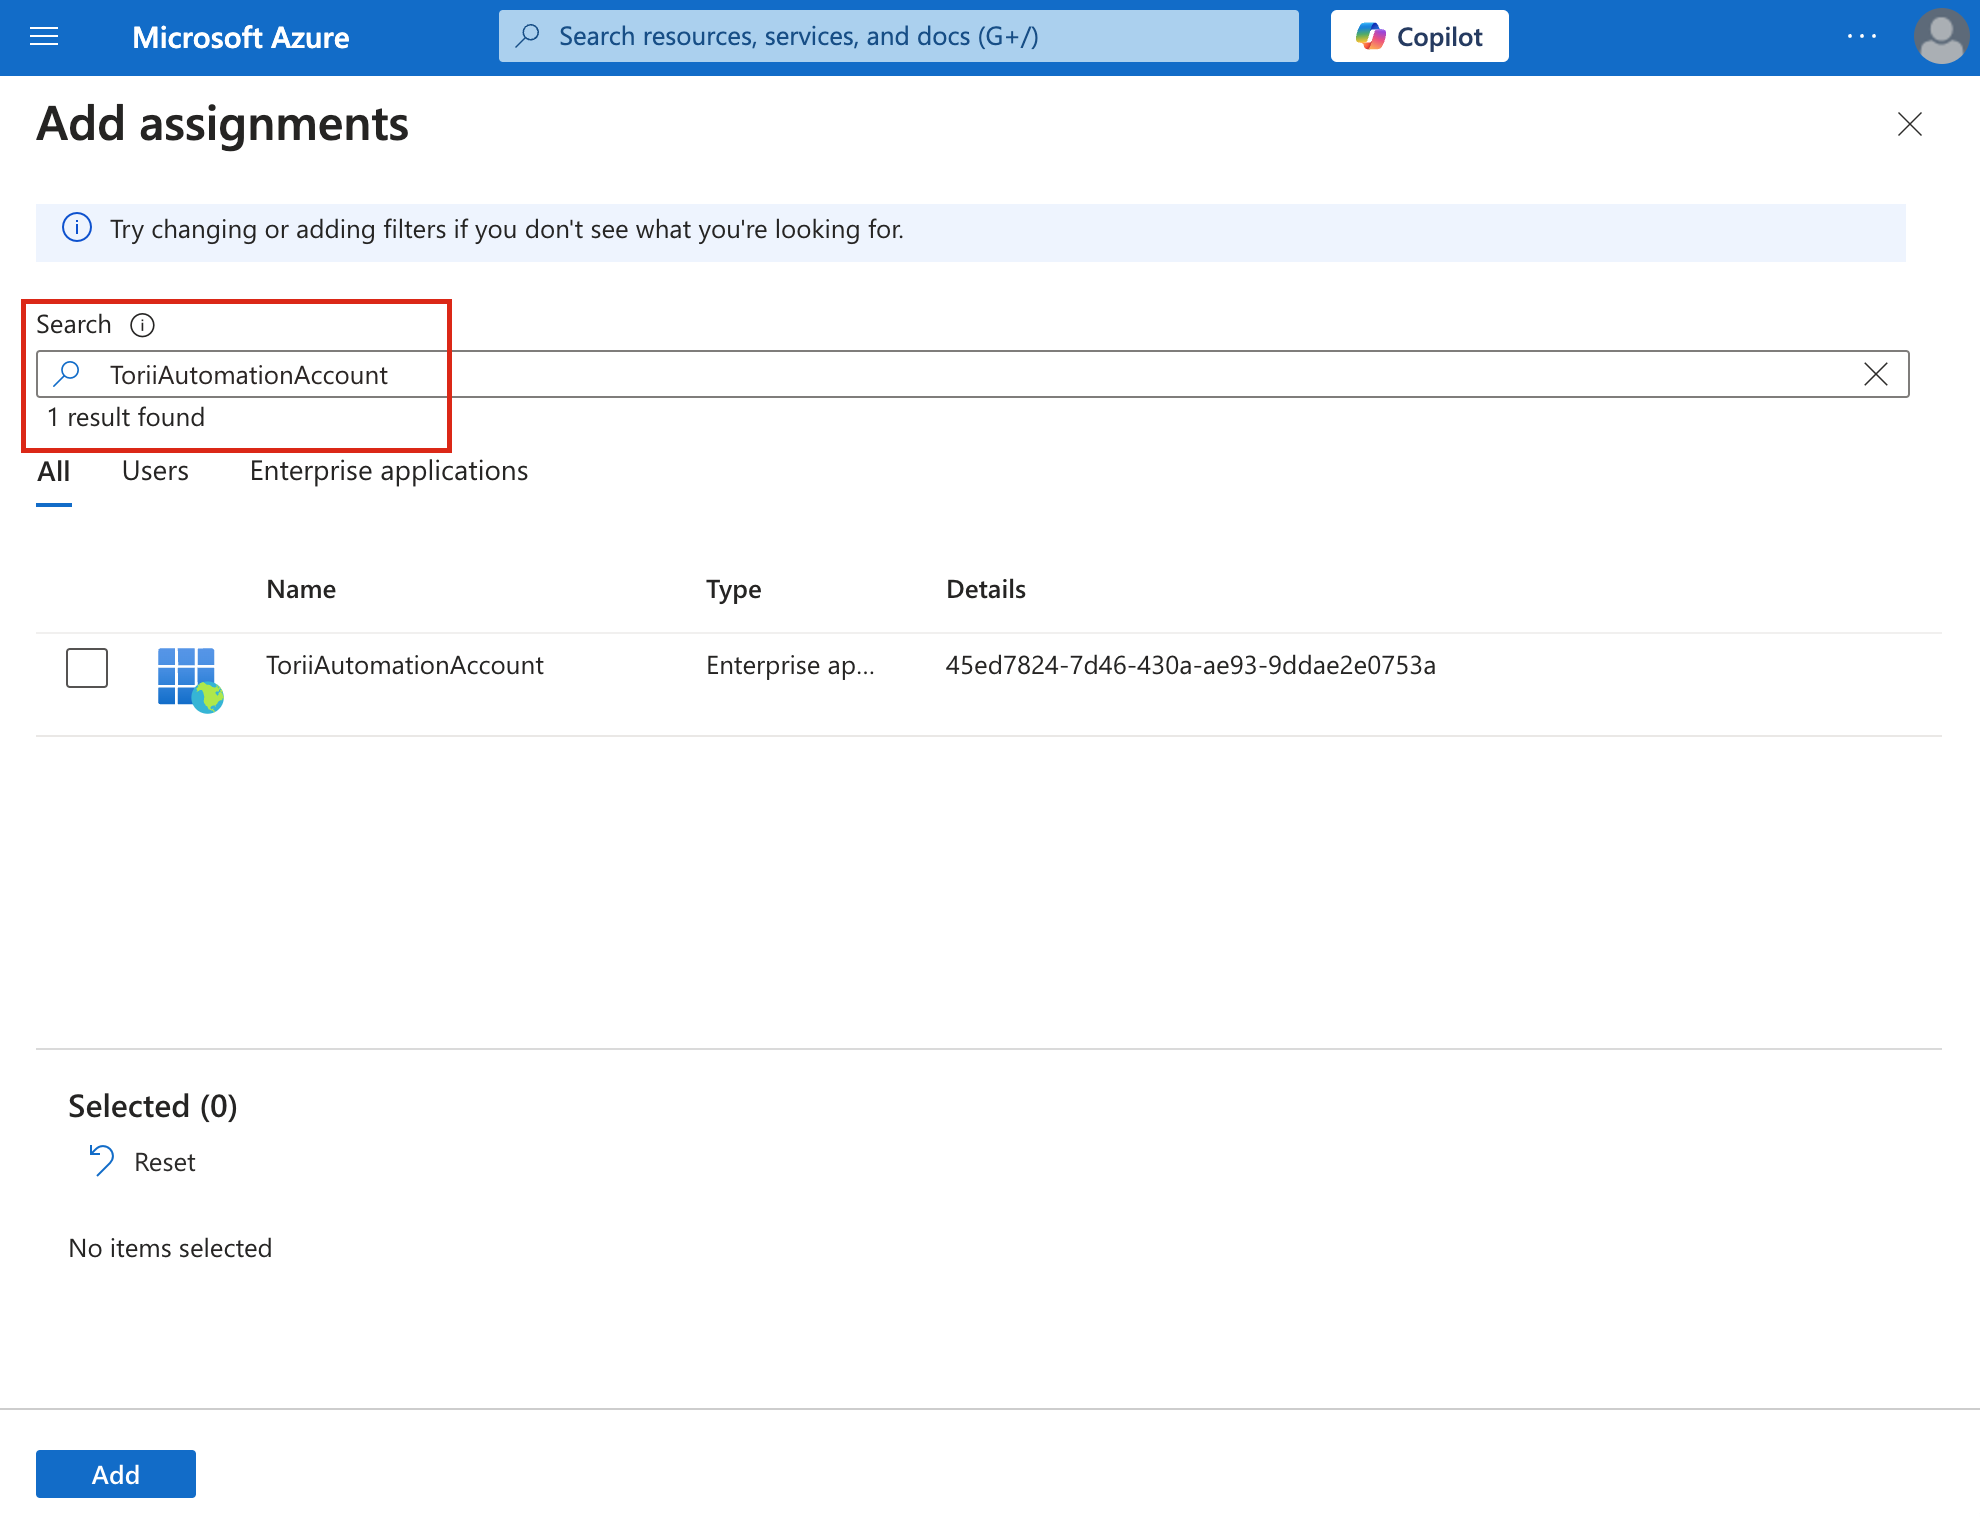
Search for your Automation account's name (e.g., "ToriiAutomationAccount").
-
Check the box next to it and click "Add".
-
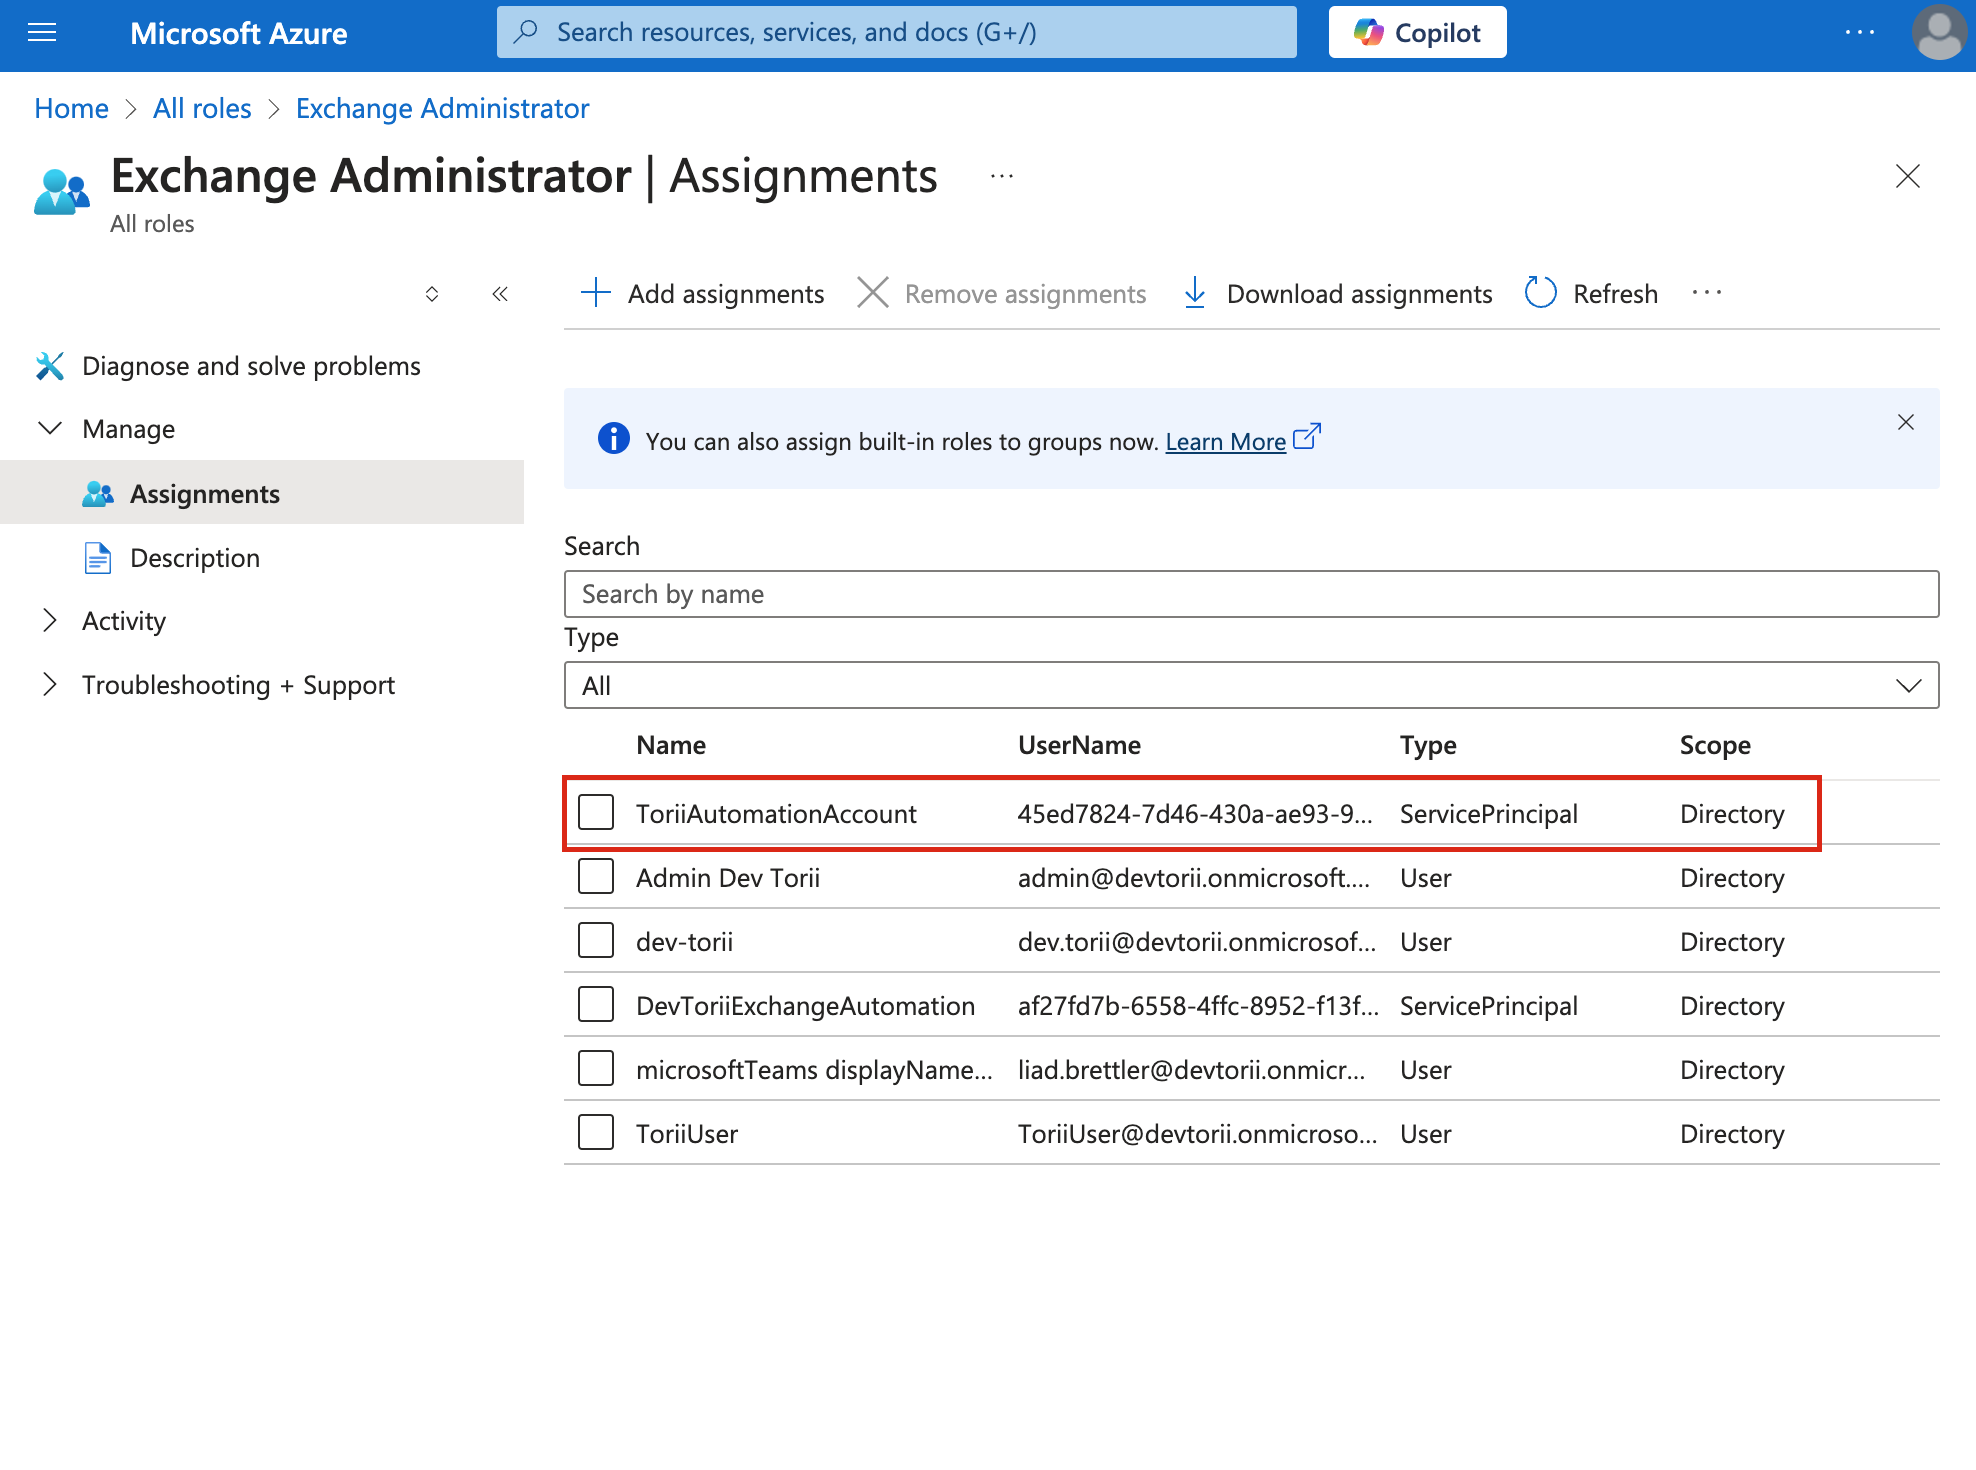
Confirm that your Automation account now appears under the
Exchange Administratorrole.
-
-
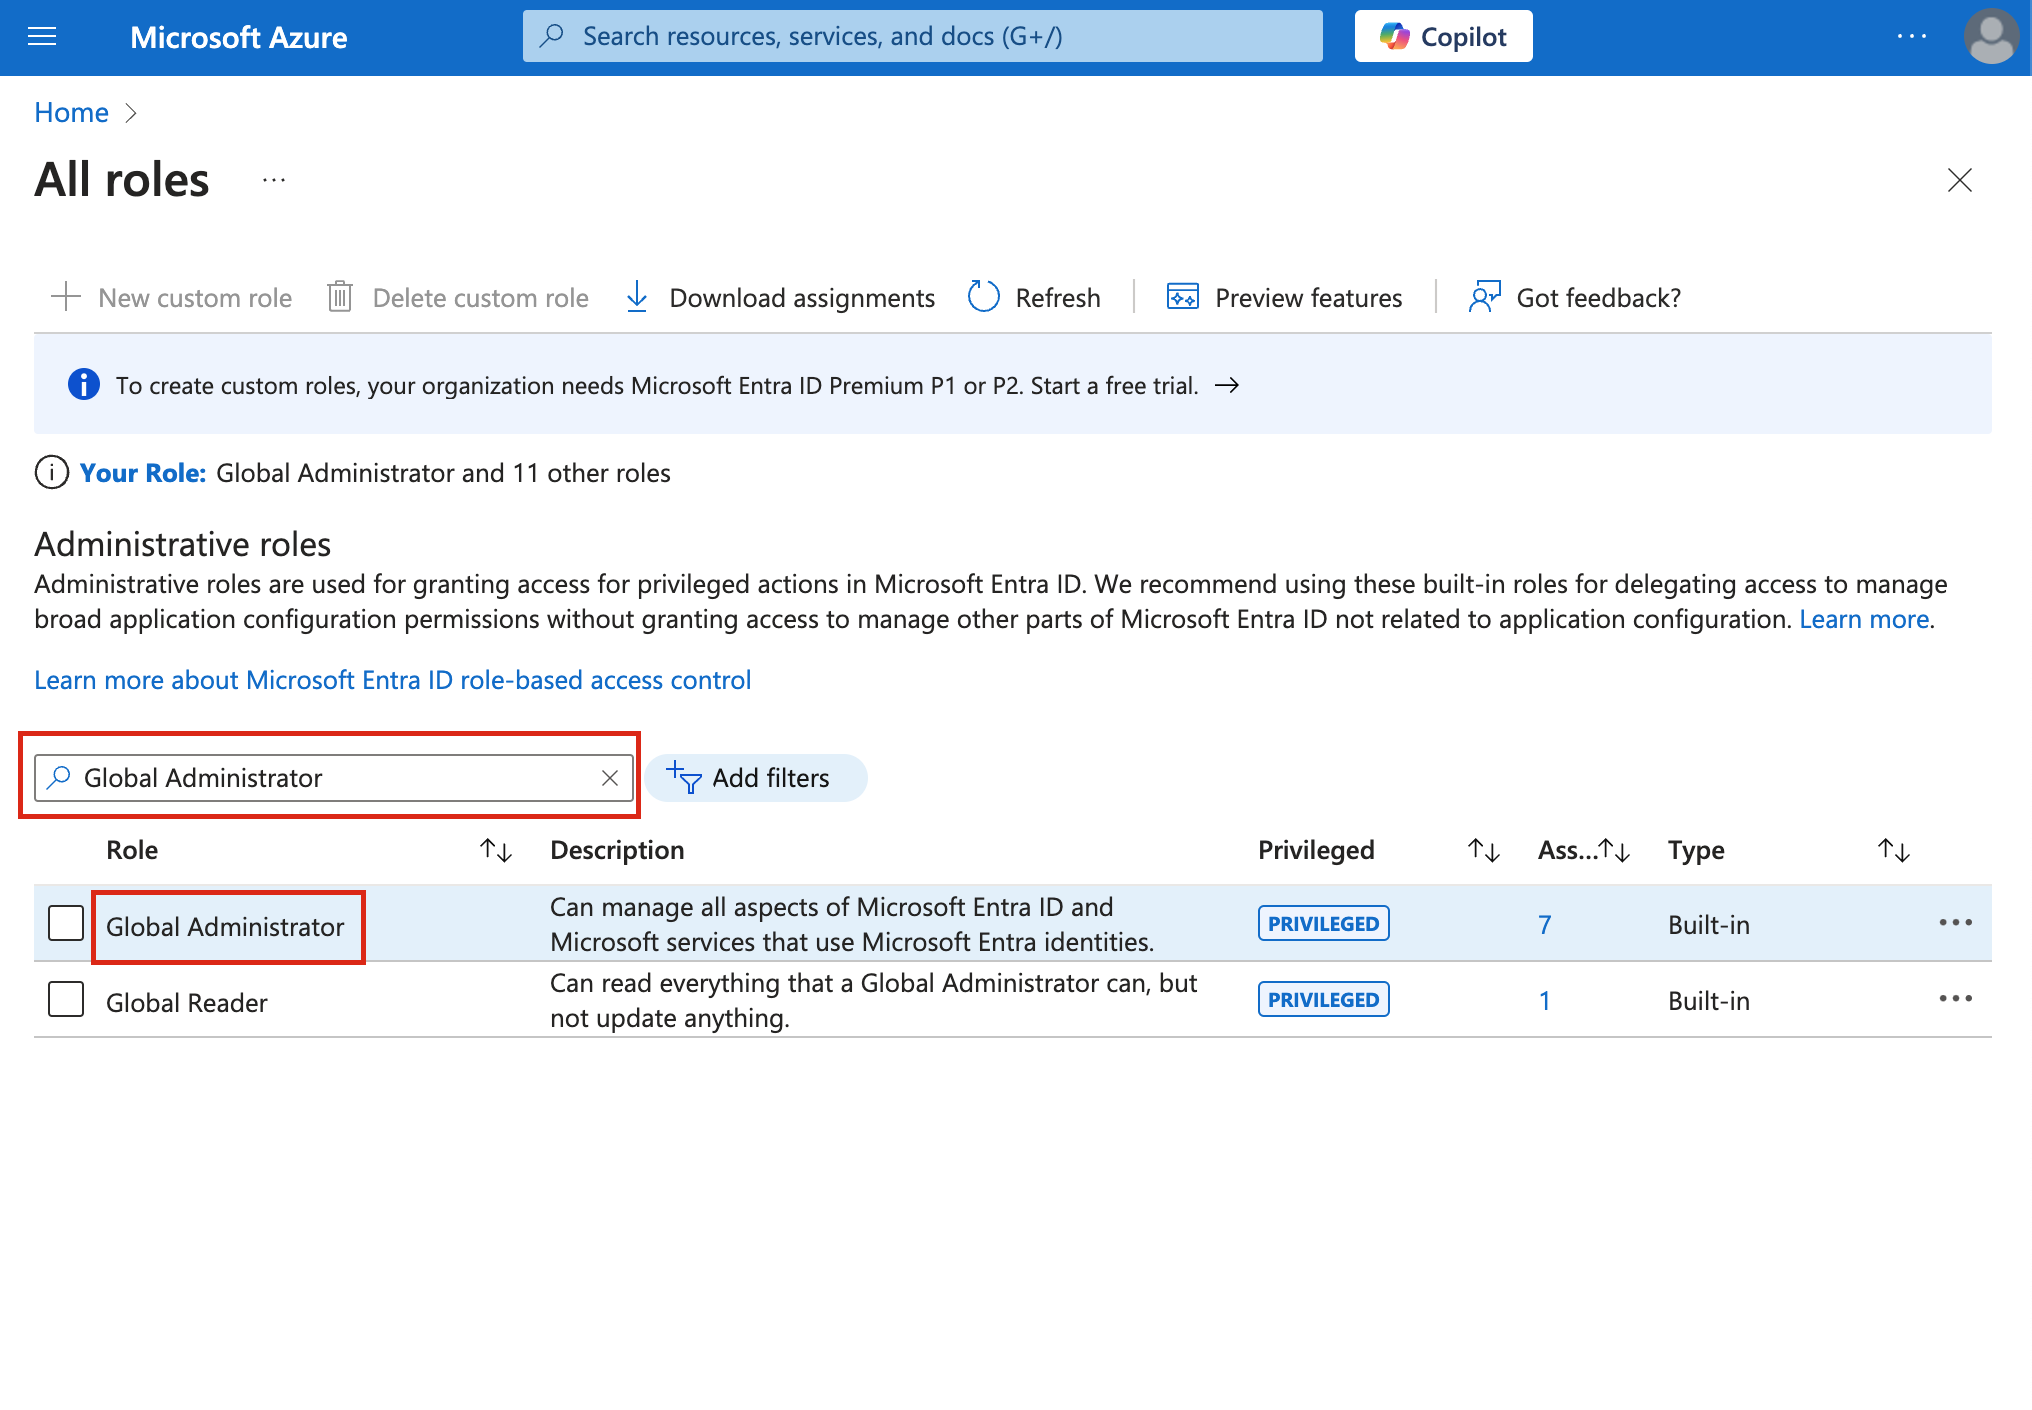
Assign the
Global AdministratorRole:- Repeat the steps above, but this time search for
Global Administrator.
- Repeat the steps above, but this time search for
4. Add PowerShell Modules to The Automation Account
-
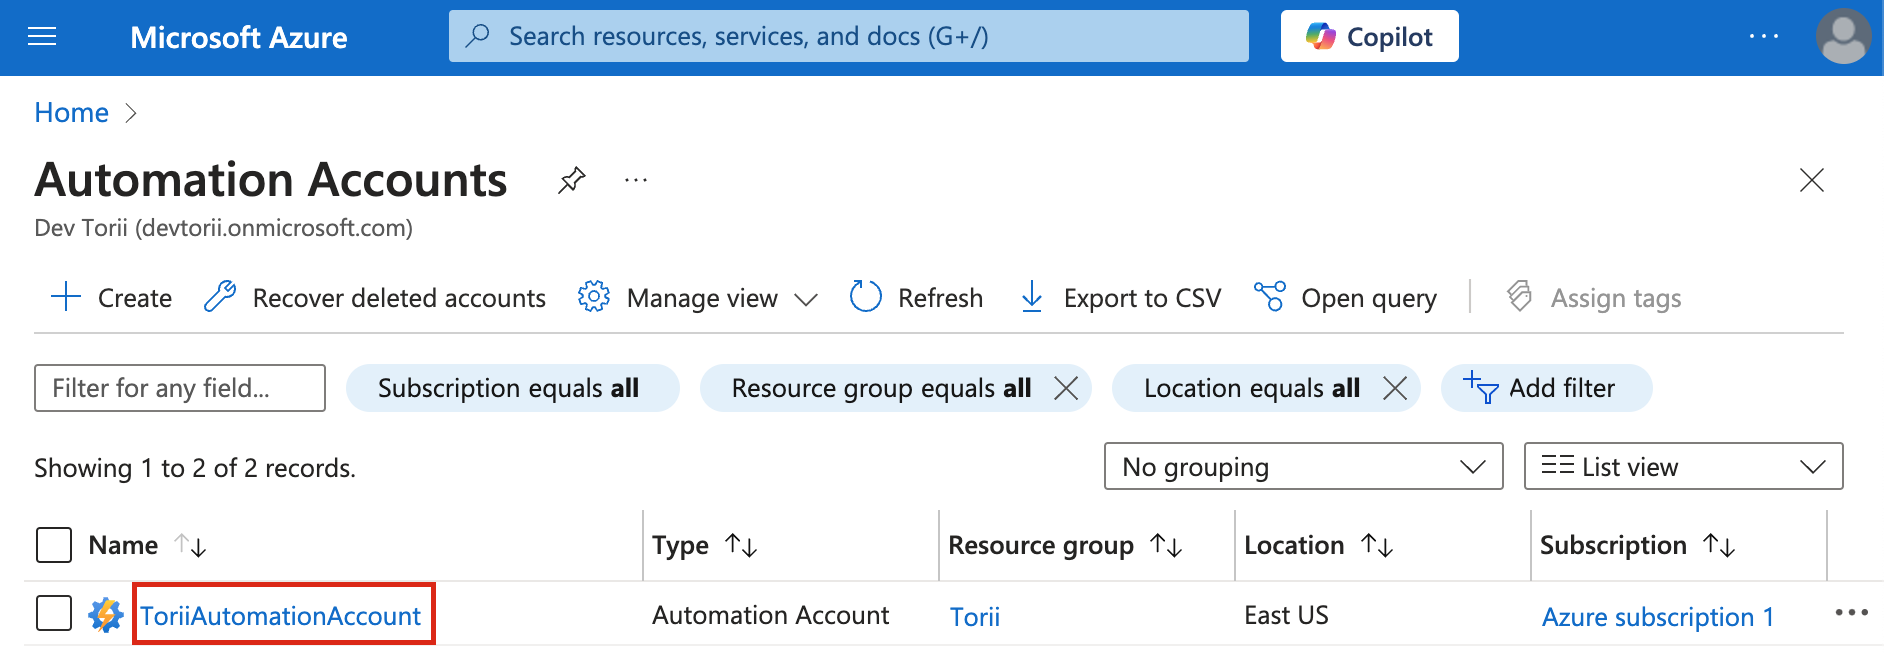
Navigate to Automation Accounts:
- Follow this link: Automation Accounts.
- Alternatively, use the search bar at the top of the Azure portal to search for Automation Accounts.
- Select the Automation Account you created in Step 2 (referred to as
ToriiAutomationAccountin these instructions).
- Follow this link: Automation Accounts.
-
Import Modules:
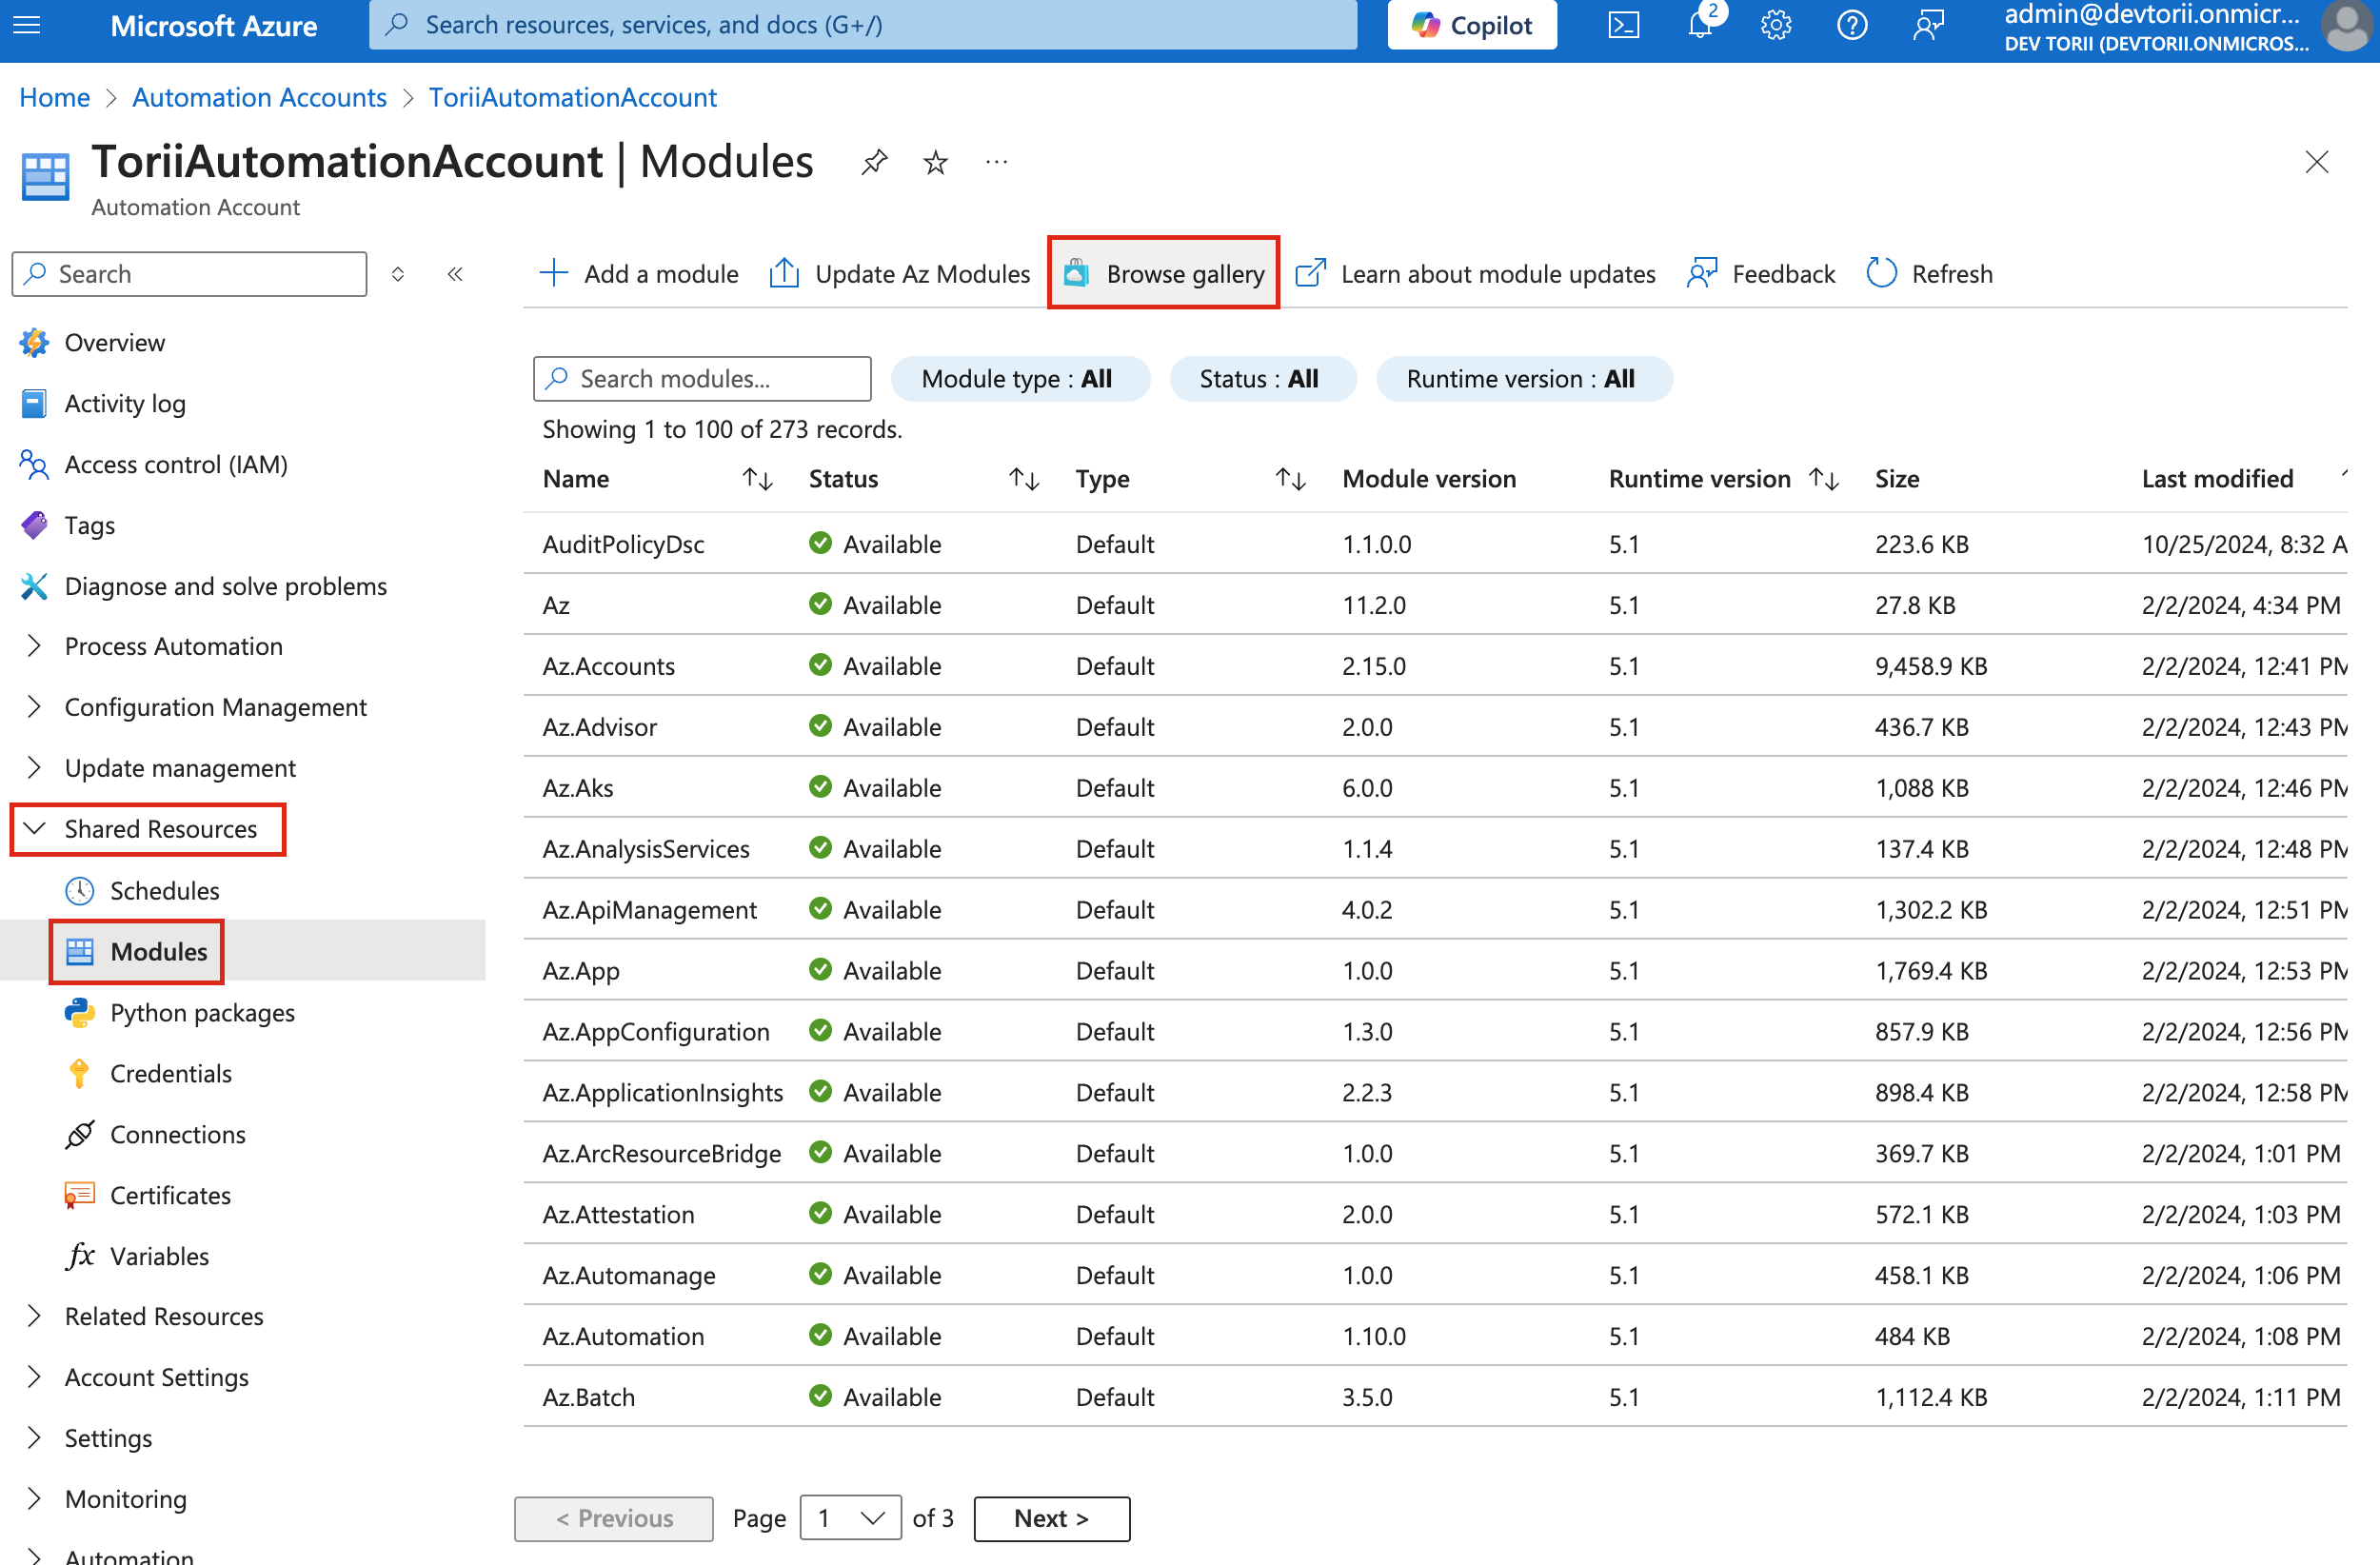
- Go to Shared Resources > Modules.
- Click on "Browse Gallery".
-
Search and Import Modules:
-
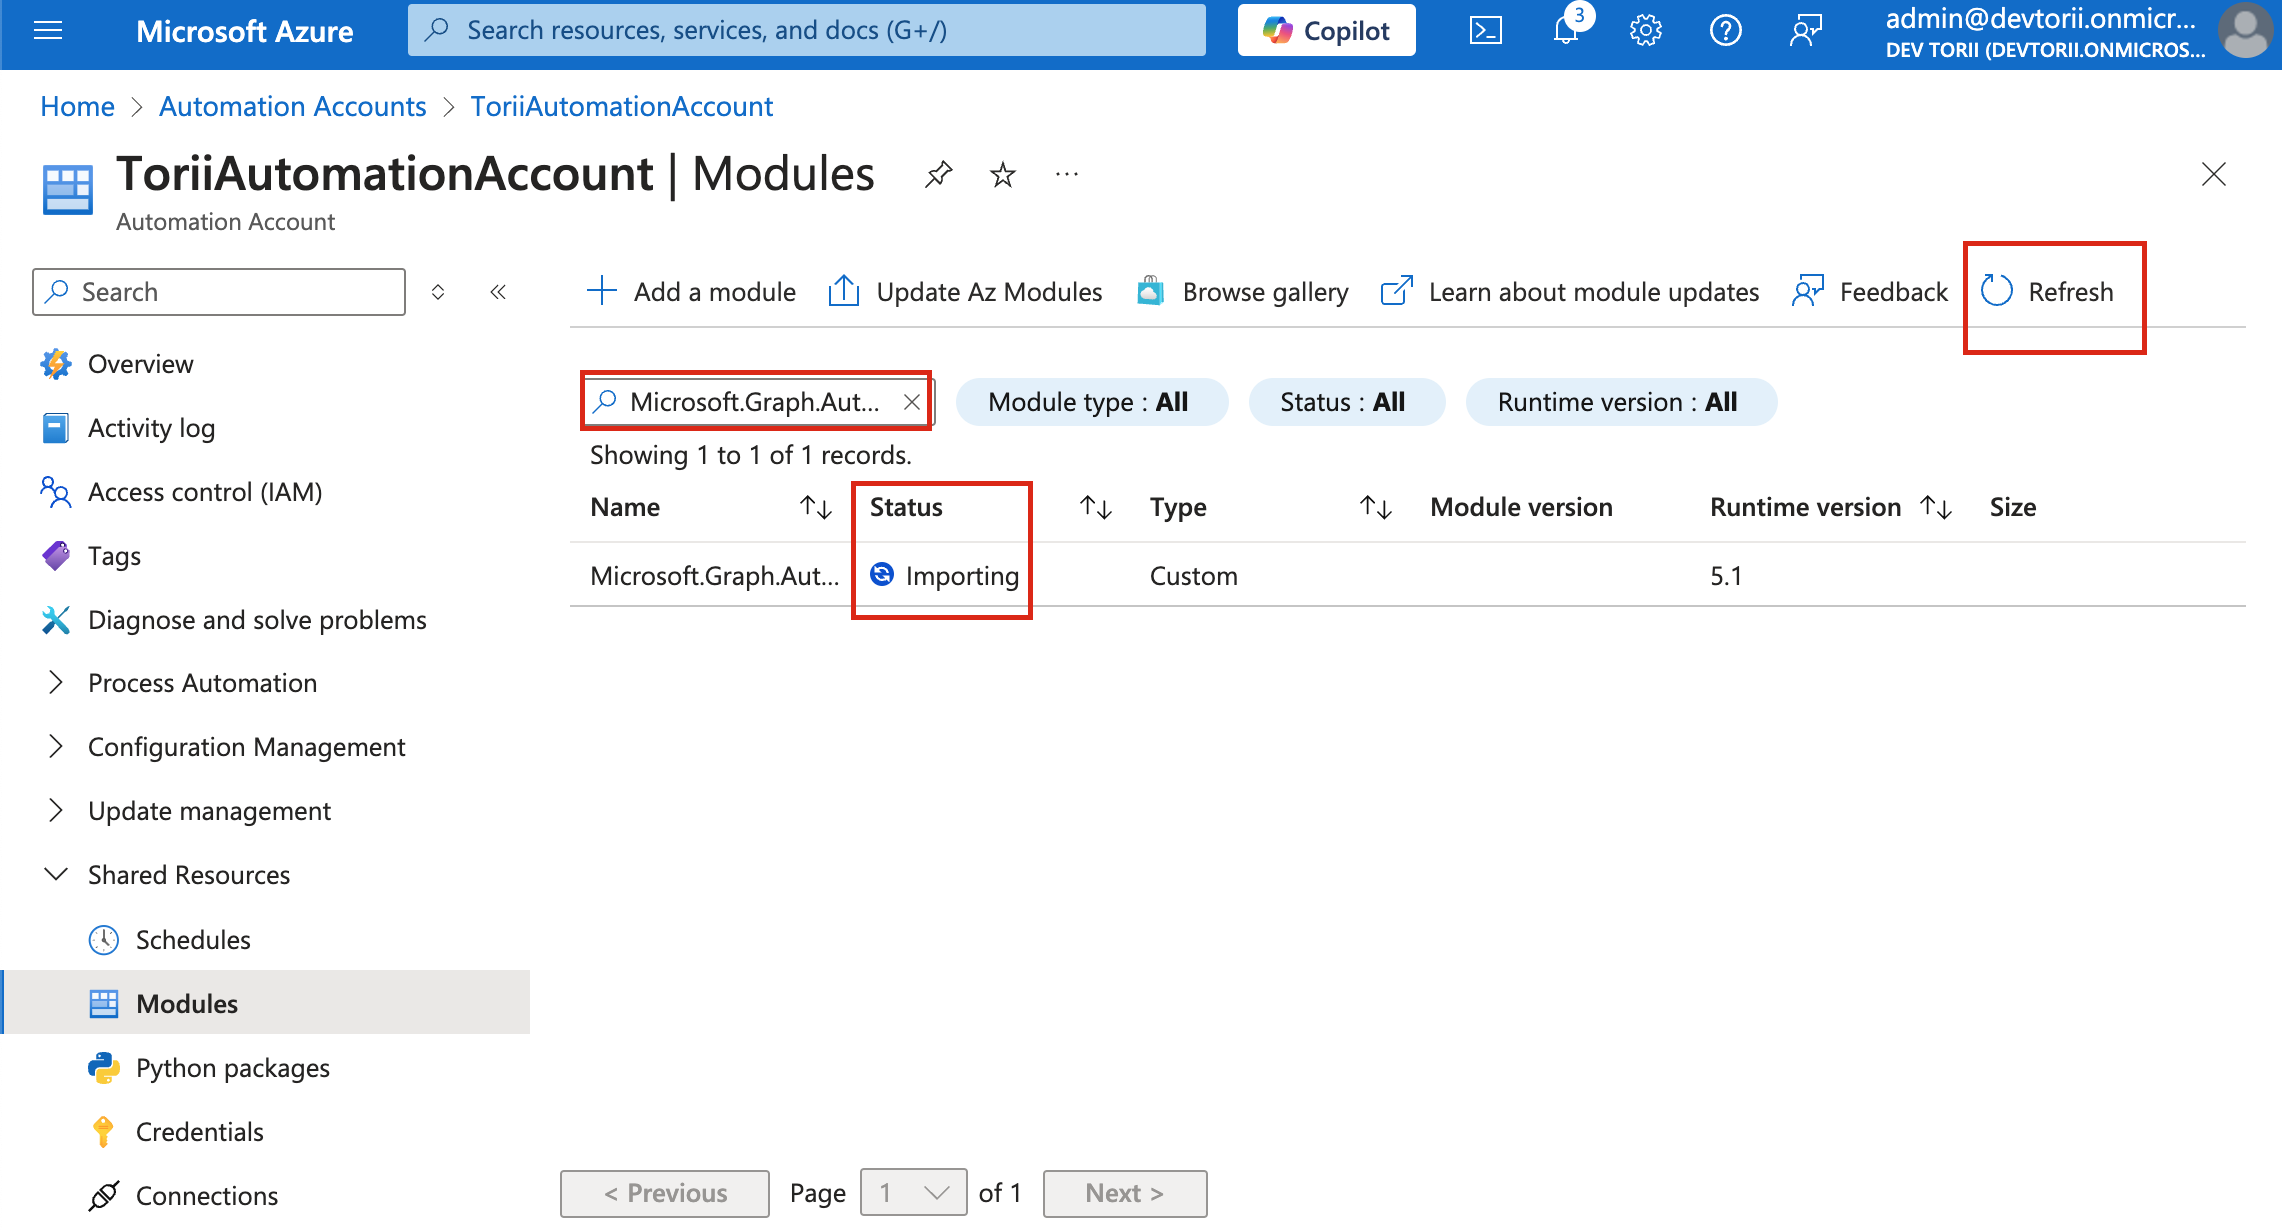
Look for the following modules and import them one by one, ensuring you set the Runtime Version to 5.1 for each:
Microsoft.Graph.AuthenticationPackageManagementPowerShellGetExchangeOnlineManagement(Ensure the module version is 3.6. Since the Browse Gallery installs the latest version by default, follow the instructions below to install the correct version)
-
Note: The order in which these modules are imported is important.
-
Import Example:
Microsoft.Graph.Authentication.-
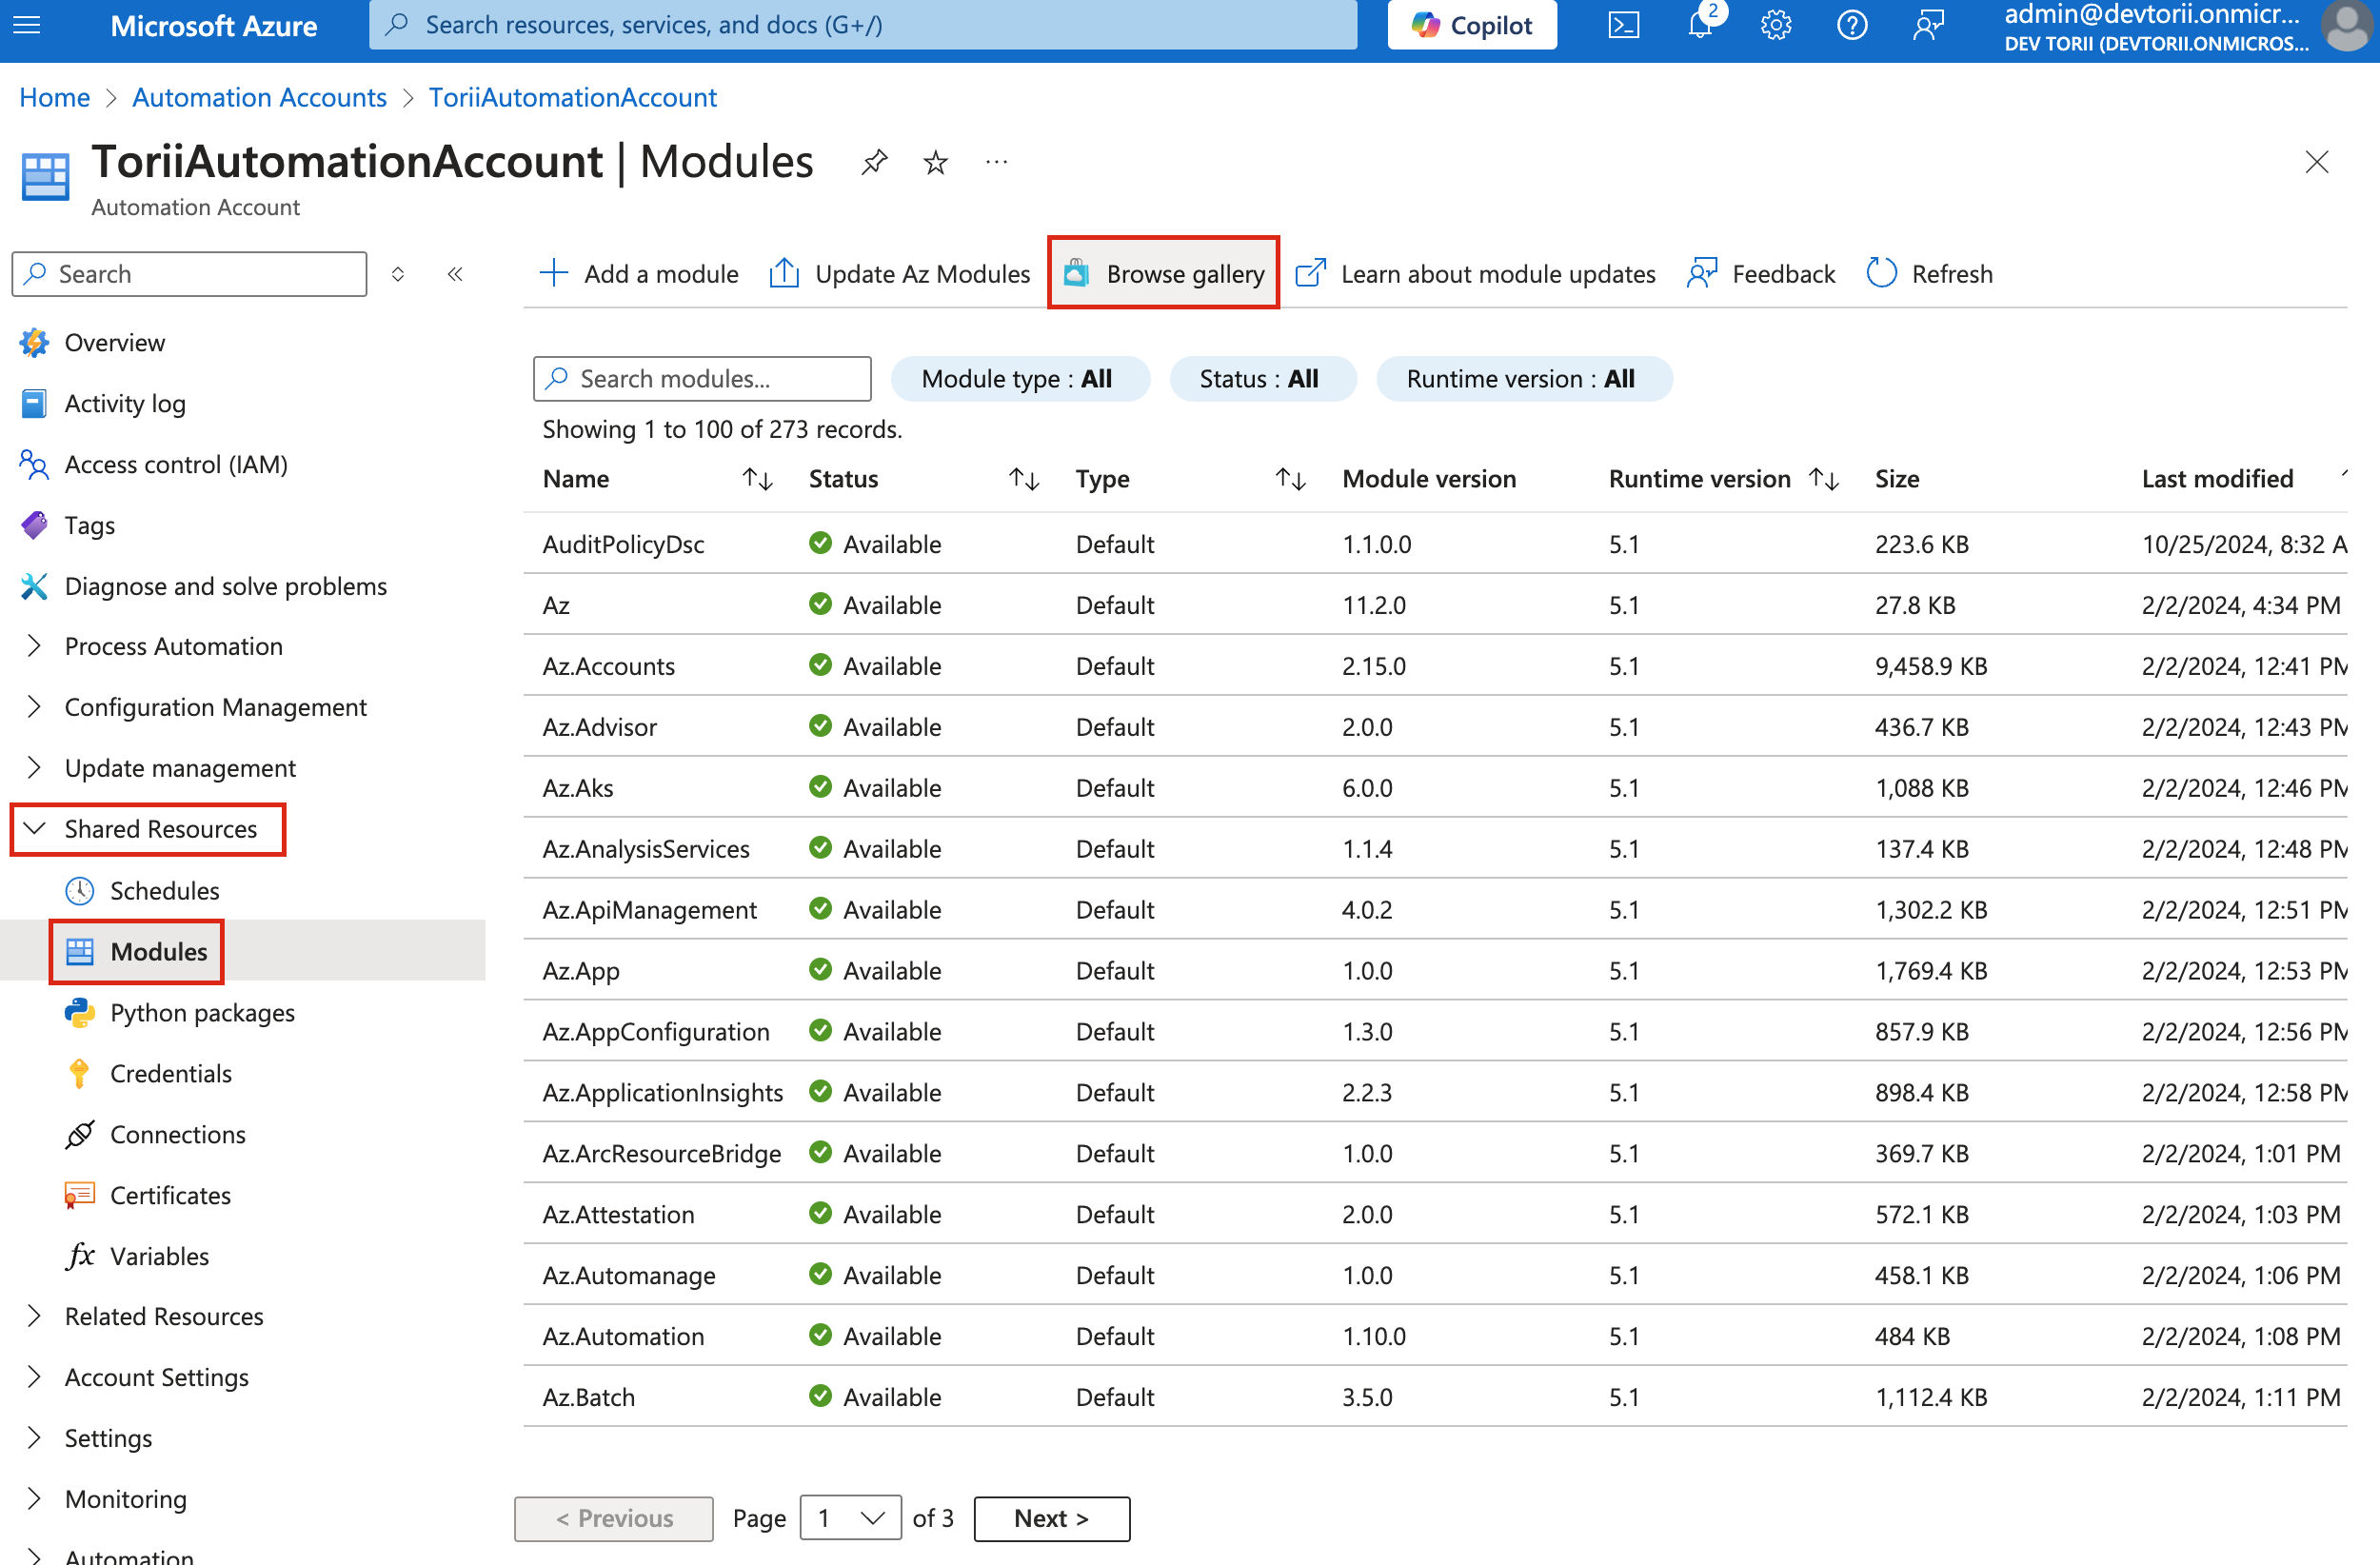
Search for the
Microsoft.Graph.Authenticationmodule and click on it.
-
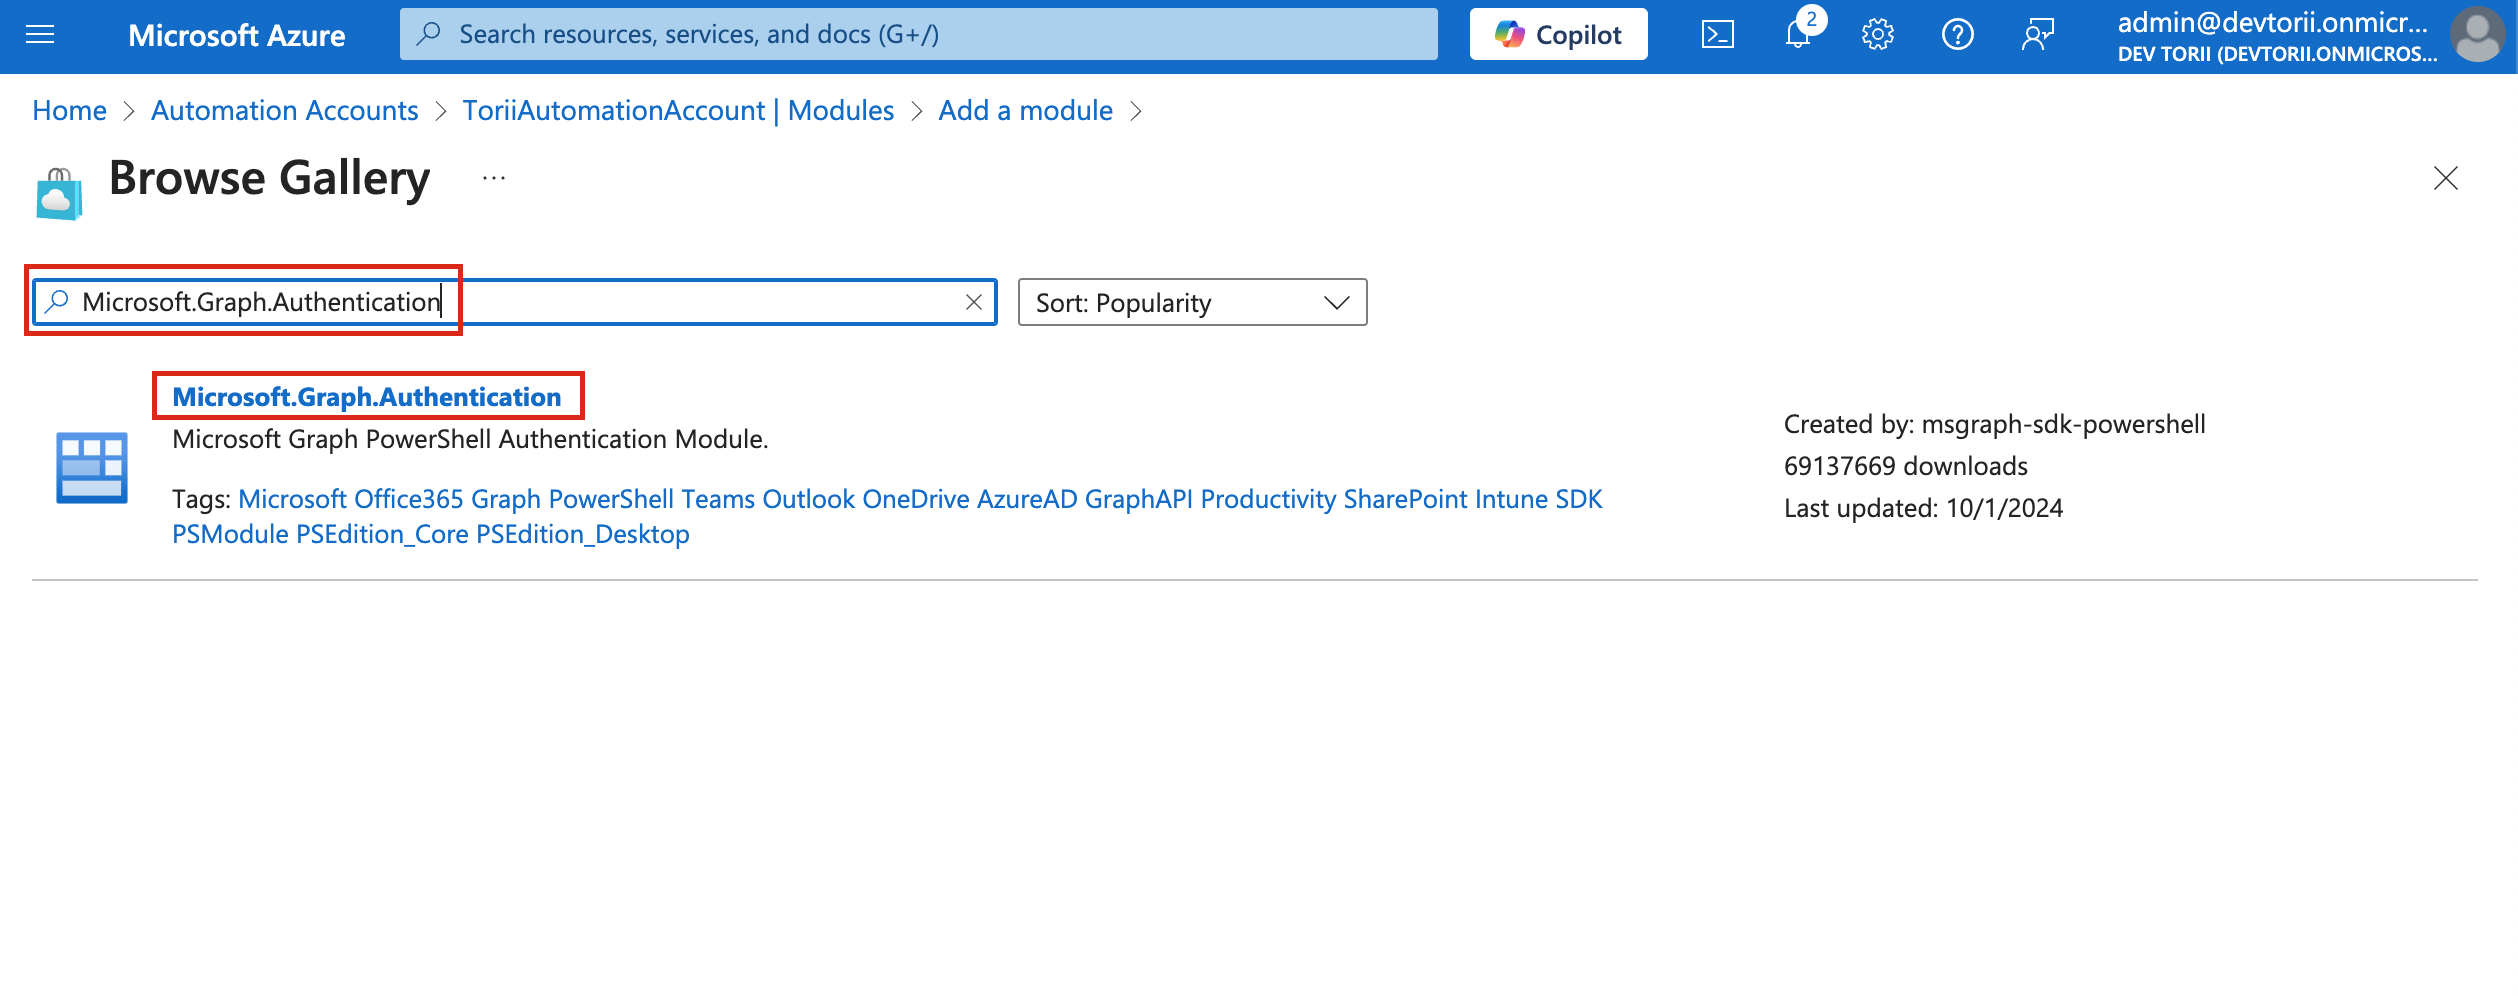
Click on “Select”
-
Set the Runtime Version to 5.1 and click Import.
- Note: Importing may take several minutes.
- Note: Importing may take several minutes.
-
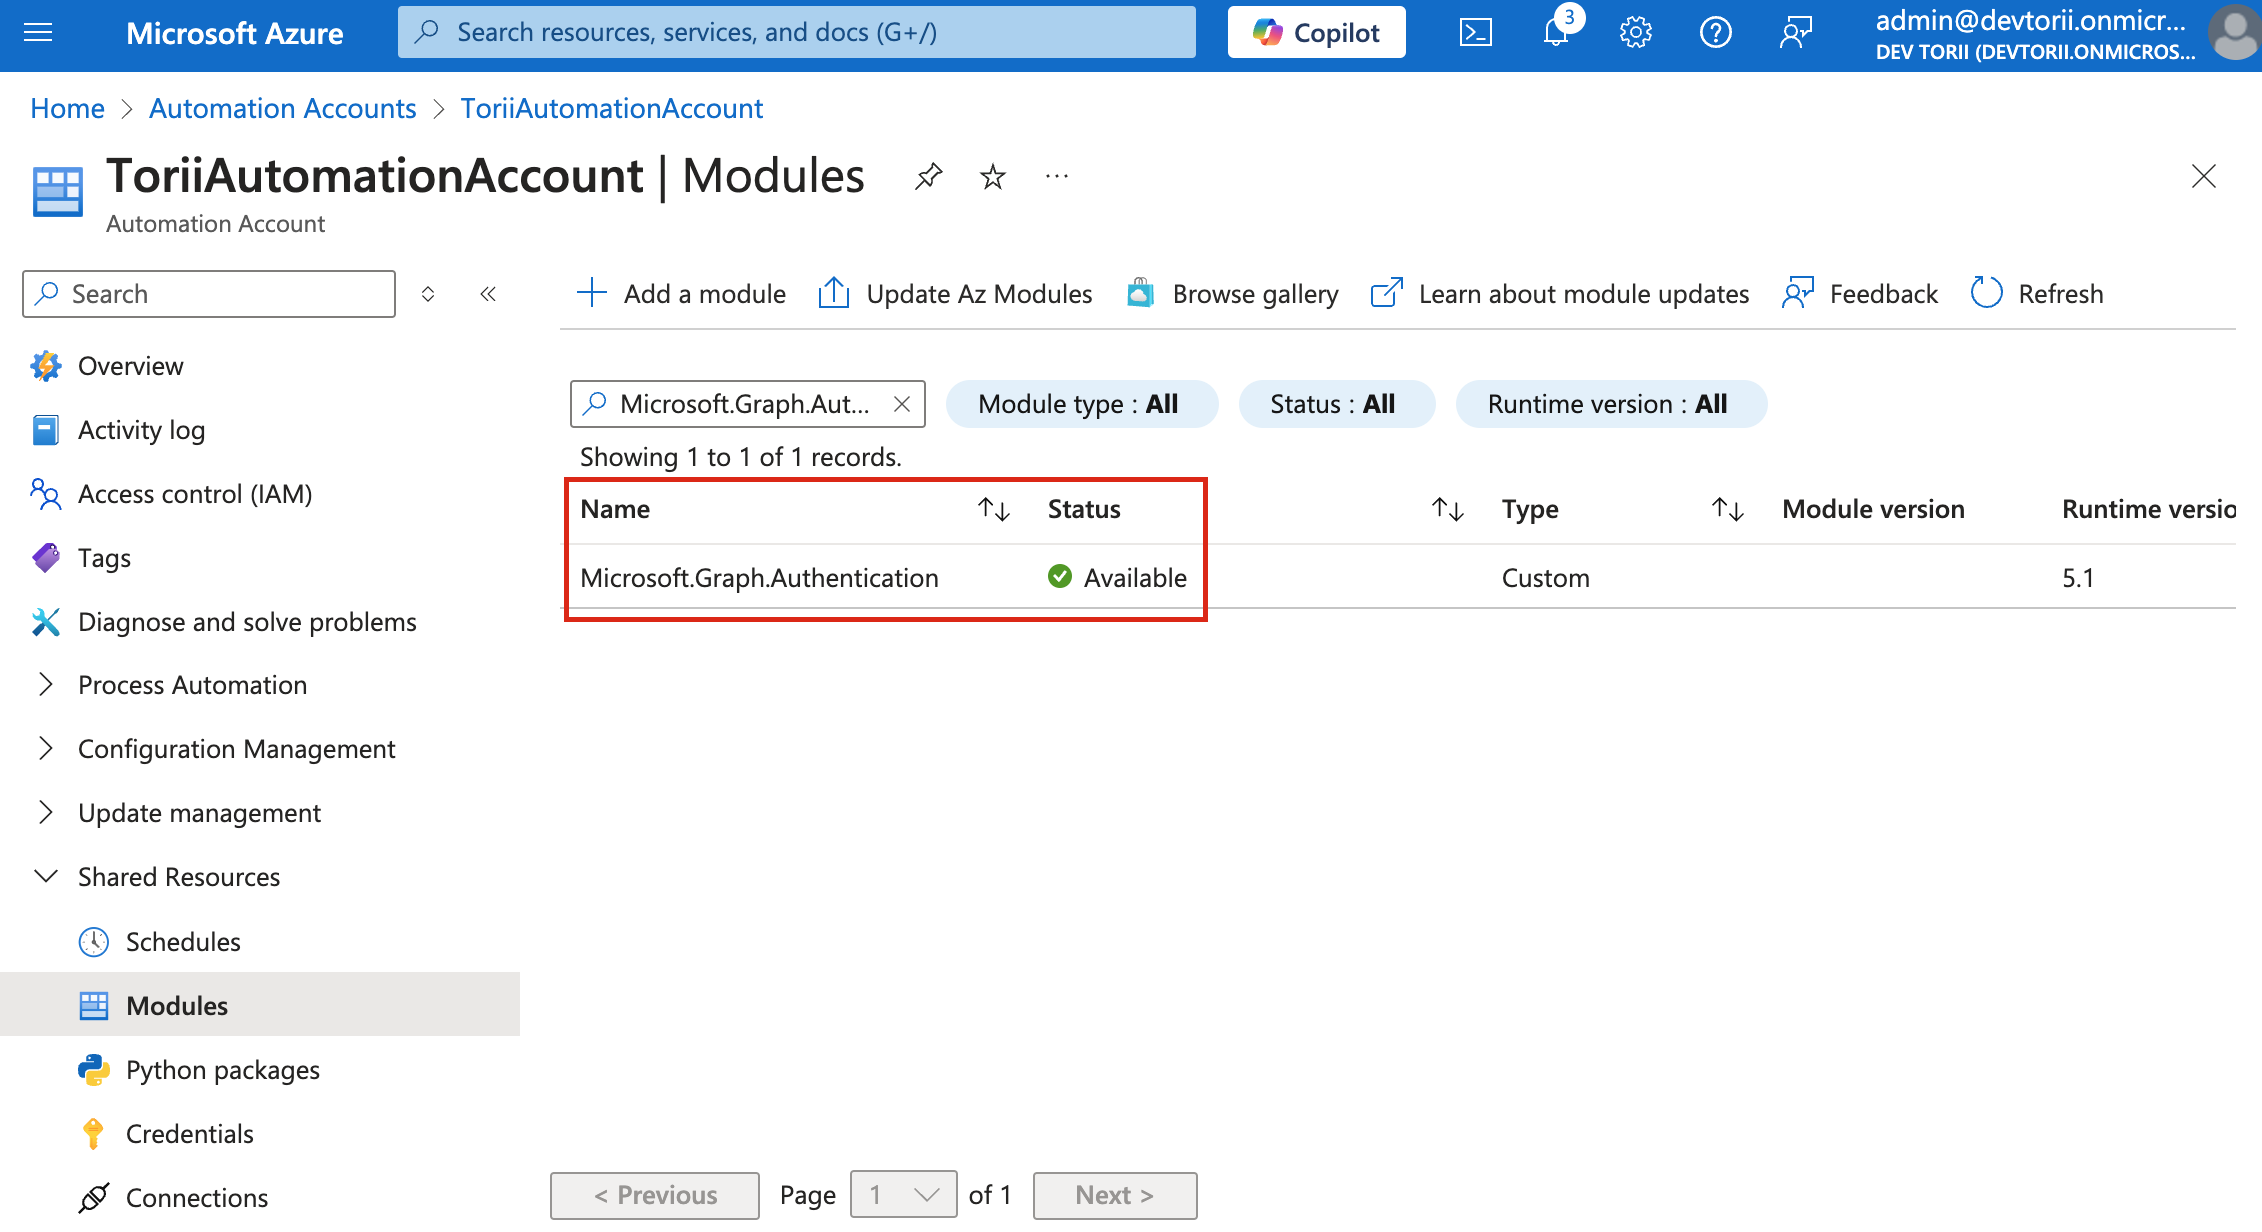
Wait until each module's status changes to "Available" before proceeding to the next.
-
-
- Now you can continue to perform the same steps for the modules:
PackageManagement,PowerShellGet(Remember: The order is important!):


Steps to Install ExchangeOnlineManagement Module (Version 3.6)
ExchangeOnlineManagement Module (Version 3.6)-
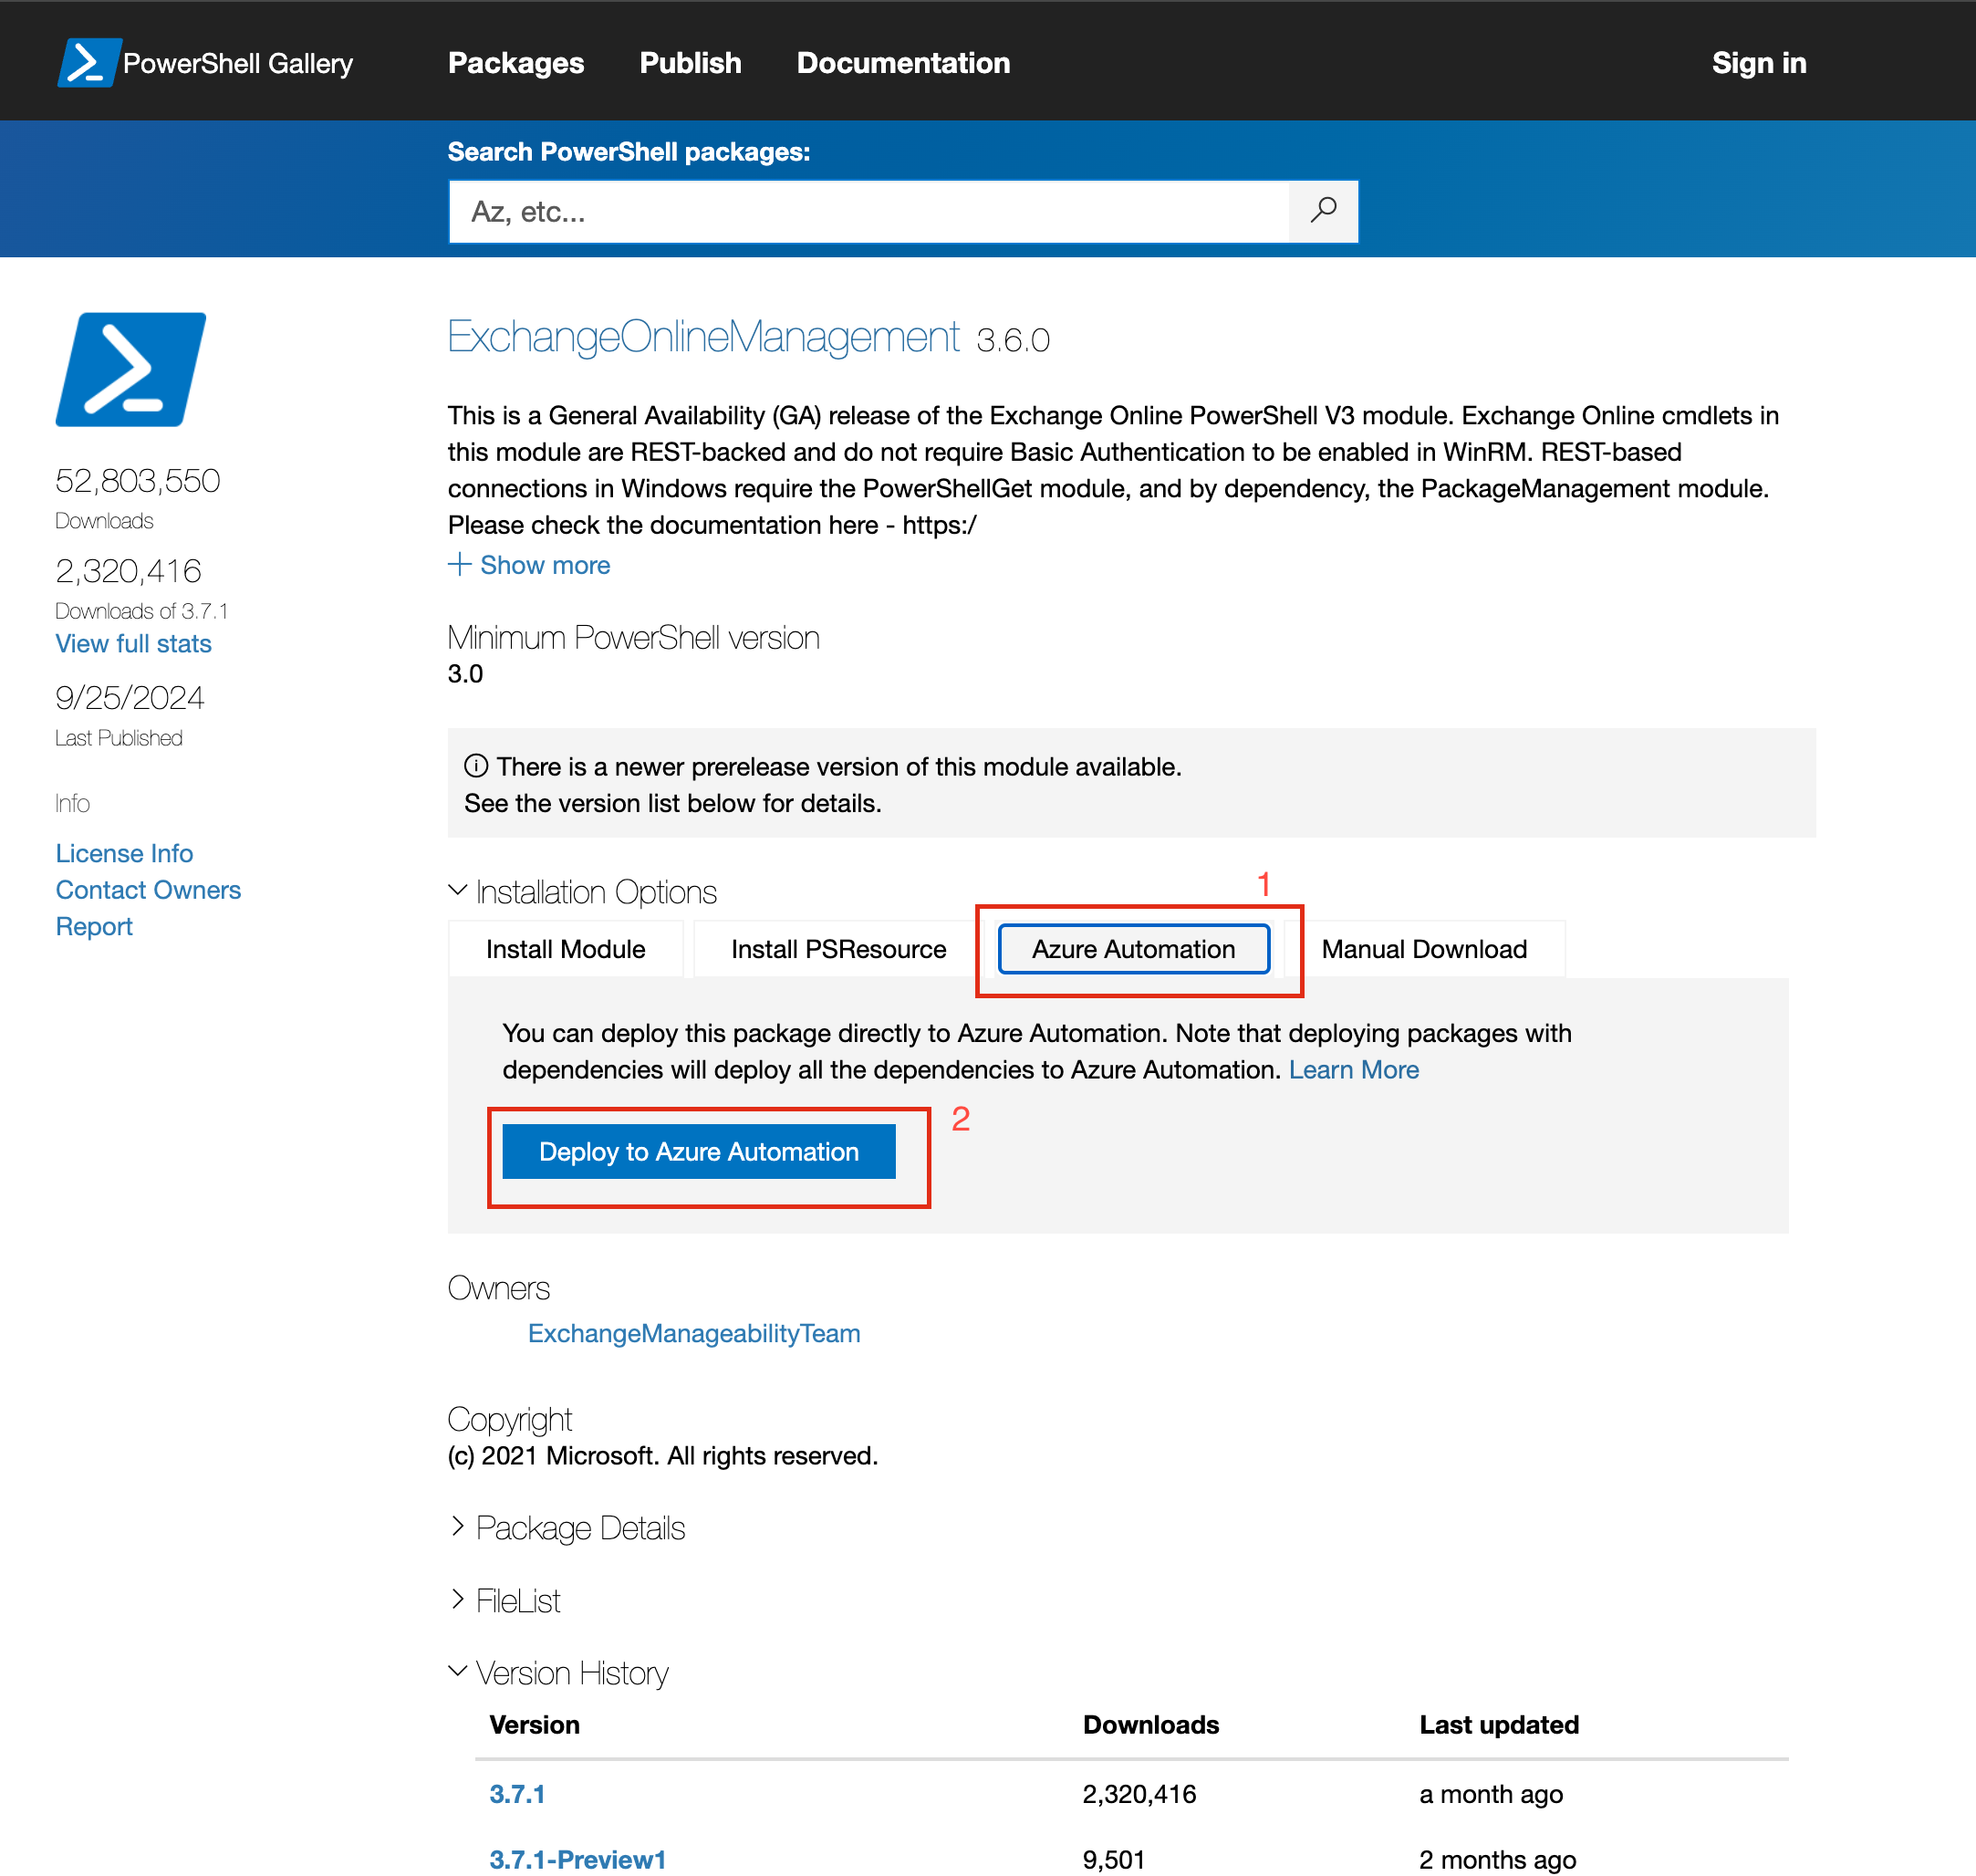
Open the Installation Link
- Install
ExchangeOnlineManagementversion 3.6 using this link.
- Install
-
Deploy the Module in Azure Automation
- Click "Azure Automation".
- Click "Deploy to Azure Automation"
-
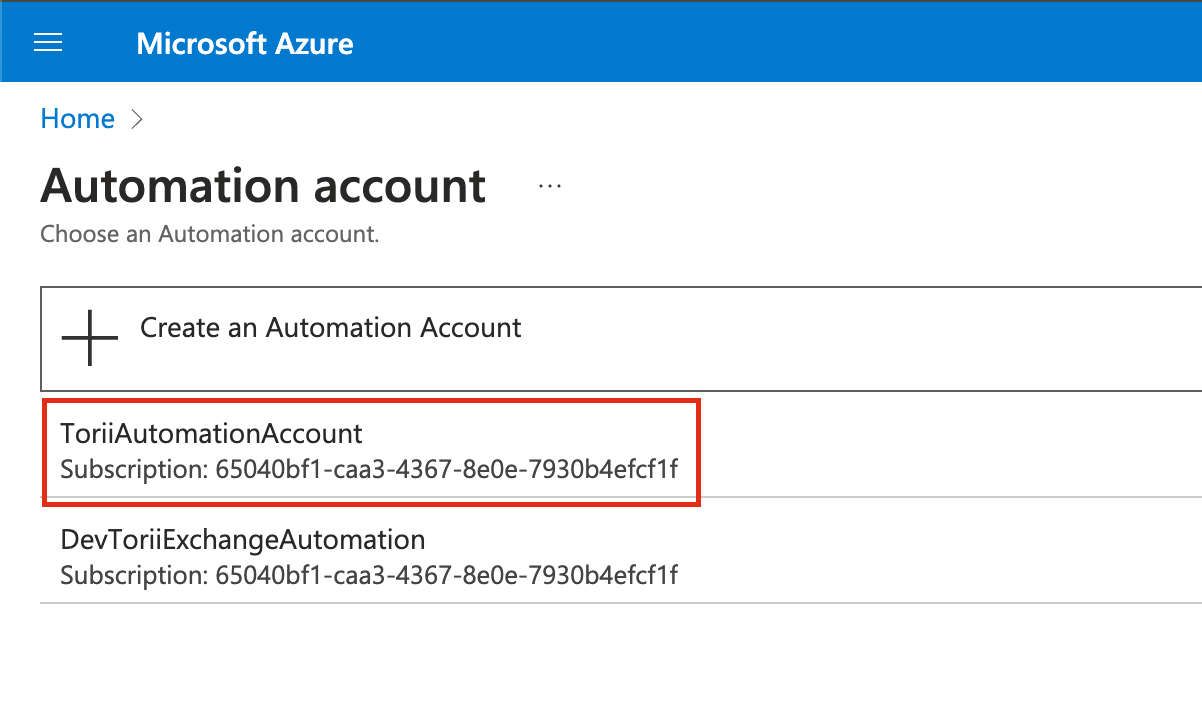
Select Your Automation Account
- Choose your automation account in Entra ID
- Choose your automation account in Entra ID
-
Confirm and Start the Import
-
Click OK to begin the import process.
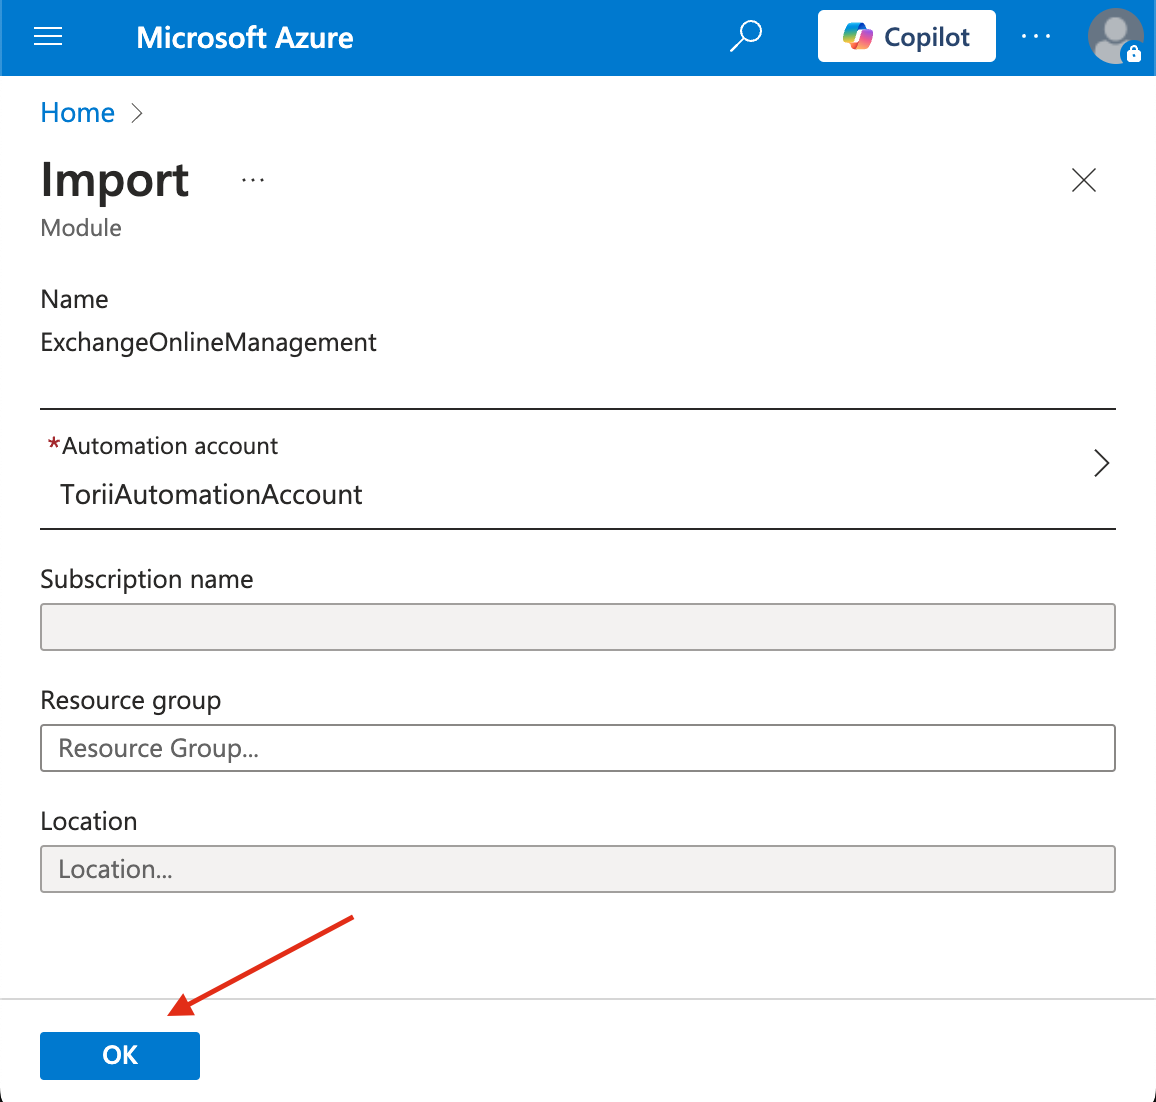
-
Wait for the Import to Complete
- The import process takes approximately 3 minutes

- The import process takes approximately 3 minutes
-
Verify the Module Version
-
Ensure that the module version is 3.6 and the Runtime Version is set to 5.1.
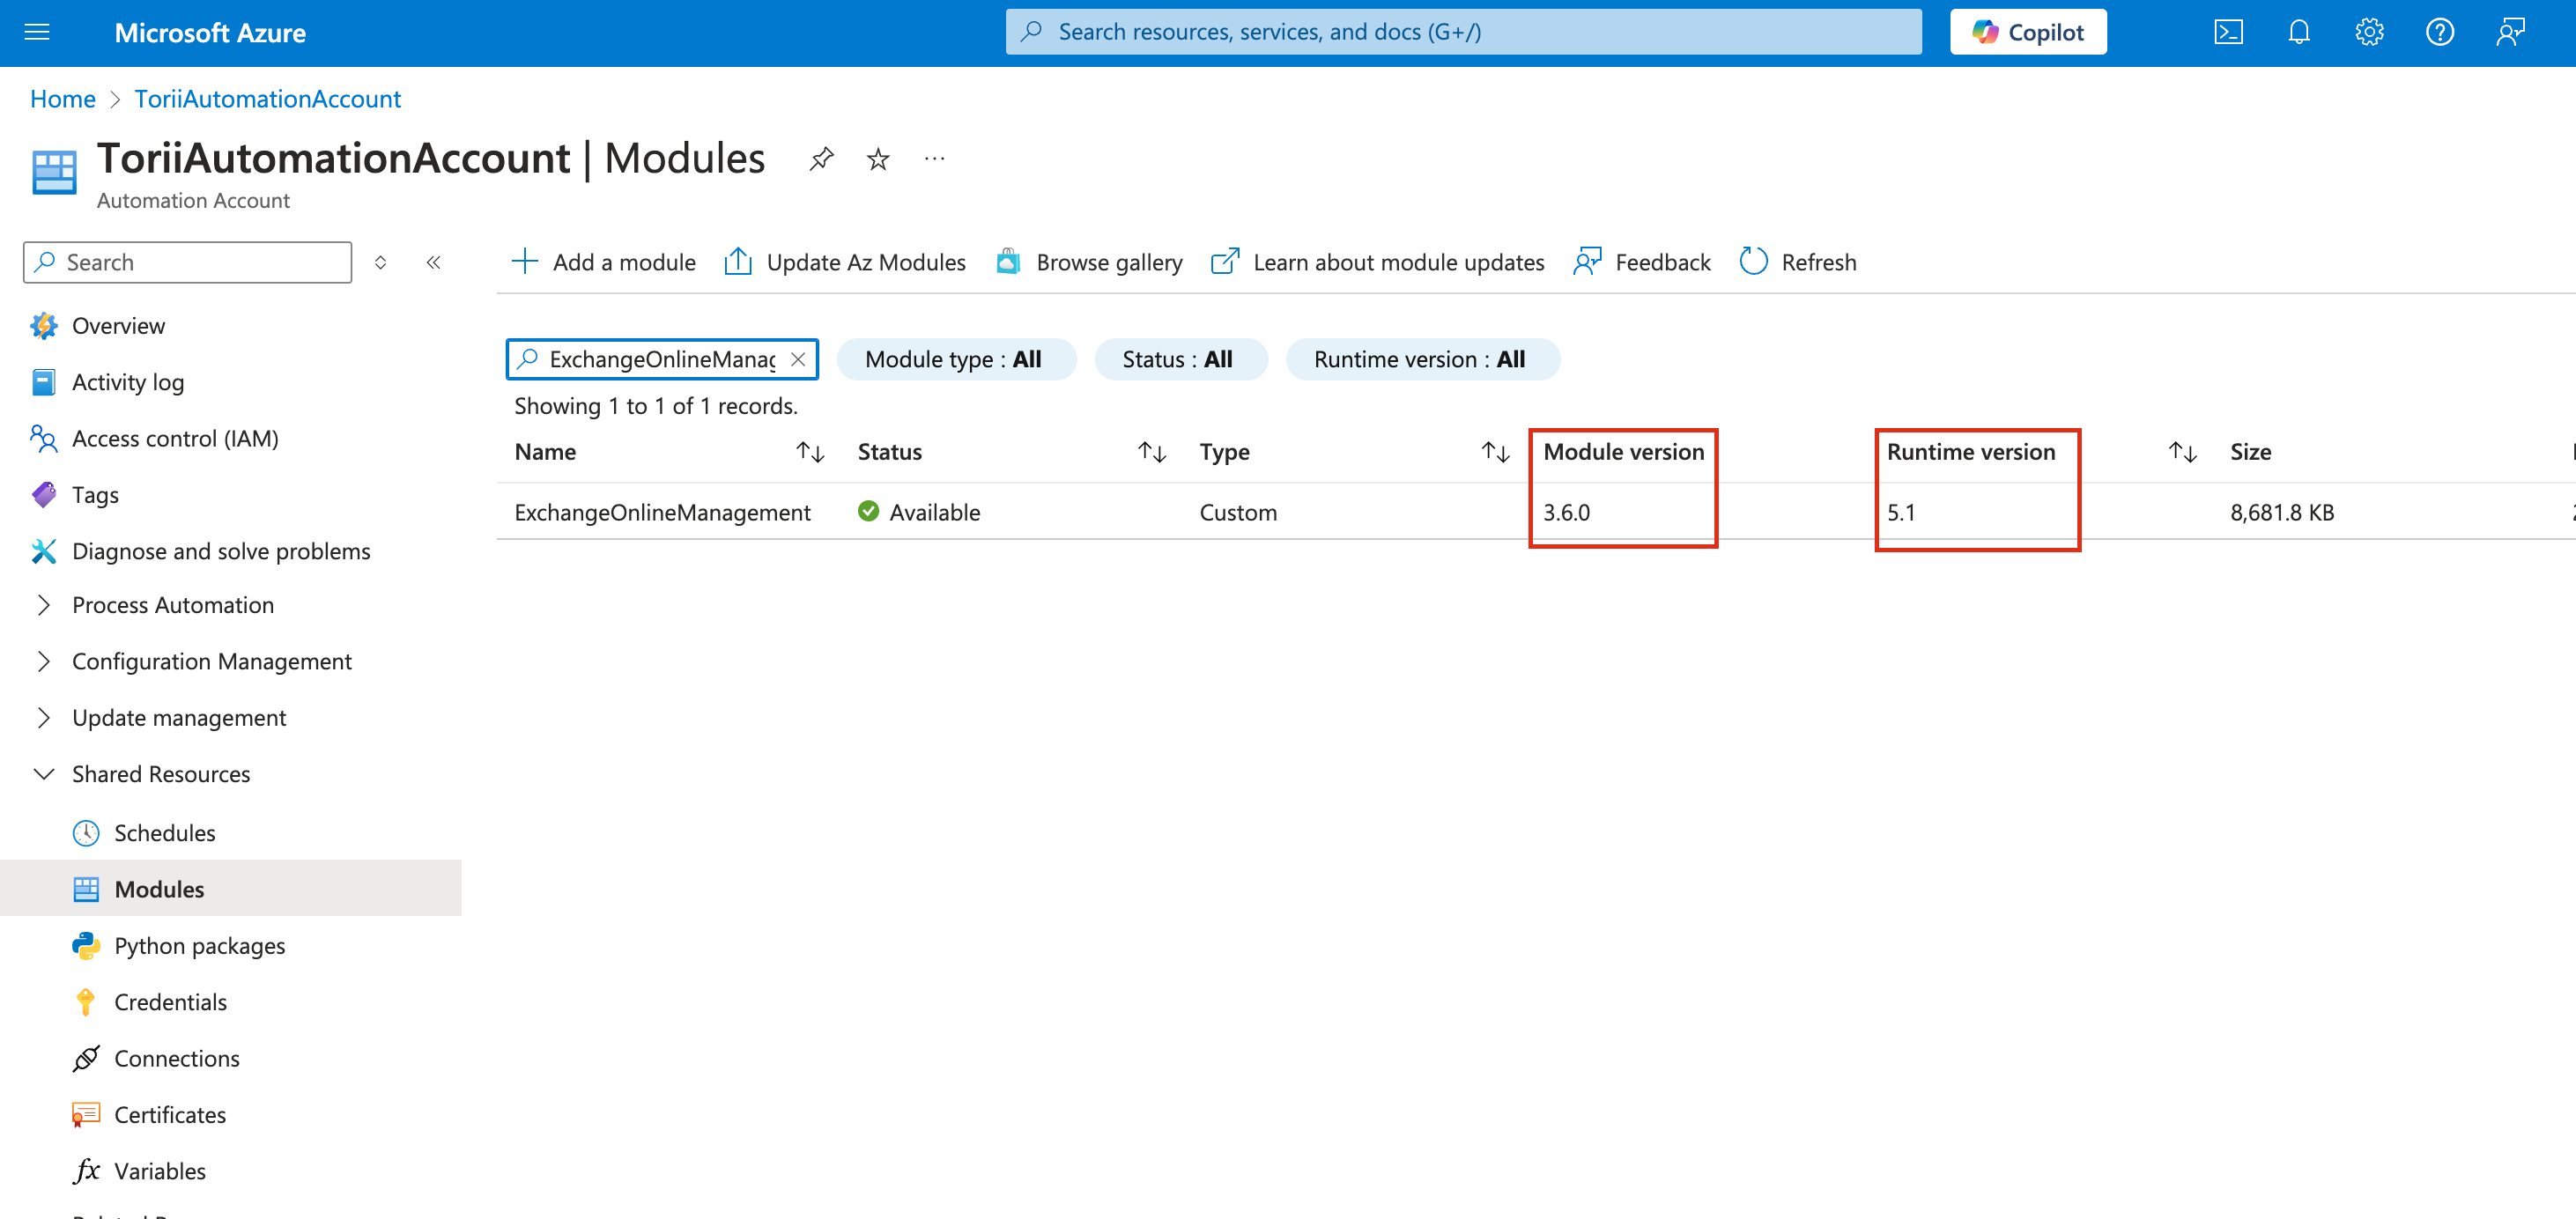
-
5. Create Credential
- Navigate to Automation Accounts:
- Follow this link: Automation Accounts.
- Alternatively, use the search bar at the top of the Azure portal to search for Automation Accounts.
- Select the Automation Account you created in Step 2 (referred to as
ToriiAutomationAccountin these instructions).
- Follow this link: Automation Accounts.
2. Access Credentials:
- In your Automation account, go to Shared Resources > Credentials.
- Click on "Add a credential".
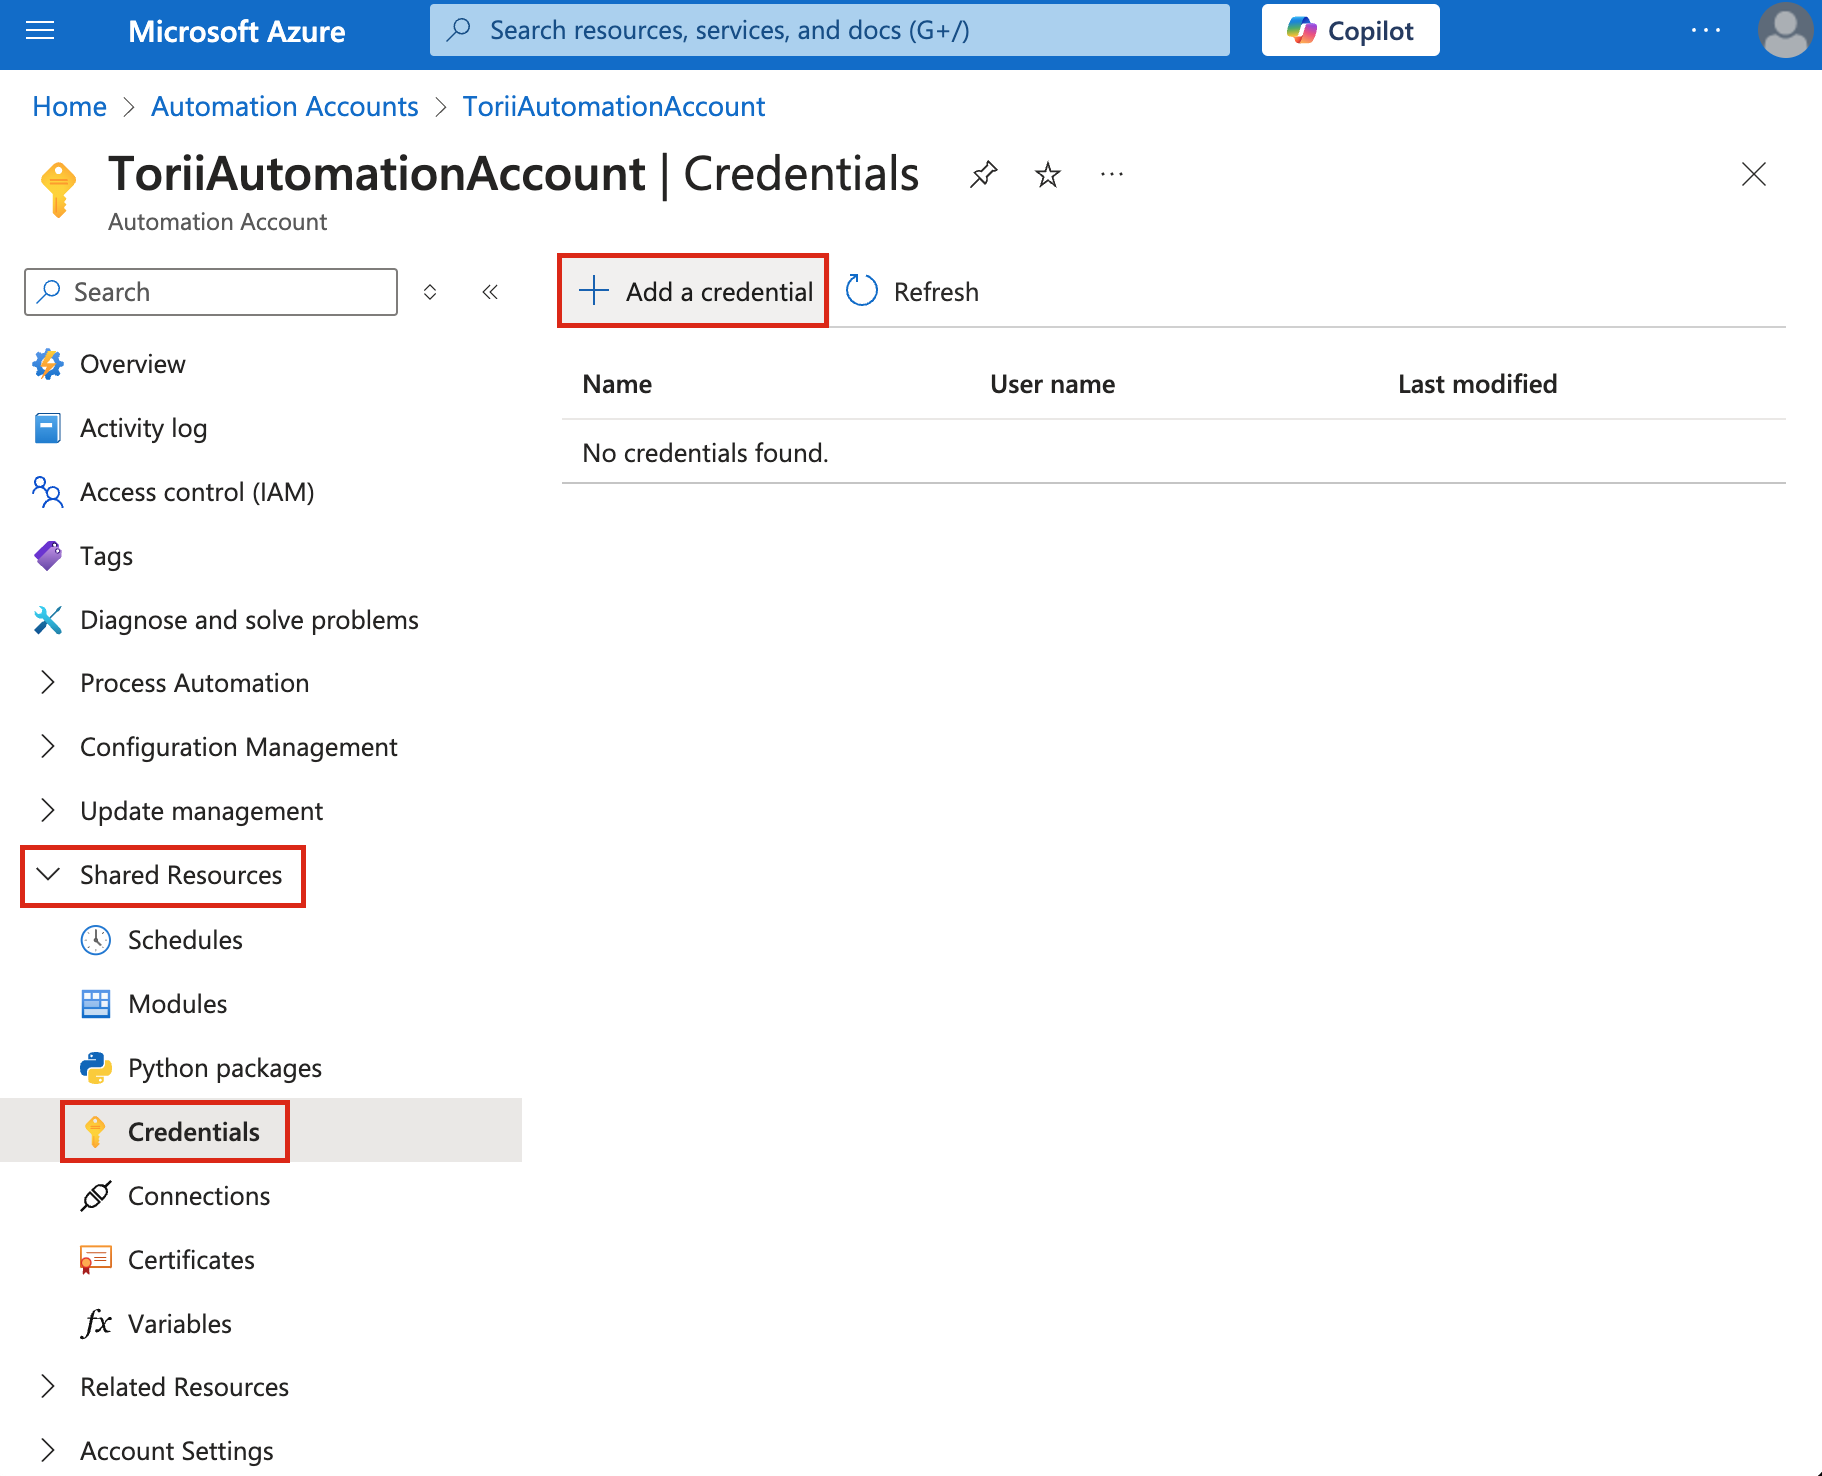
-
Enter Credential Details:
Use the service account credentials created in Step 1 (Service Account Setup).
- Click "Create" to save the credential.
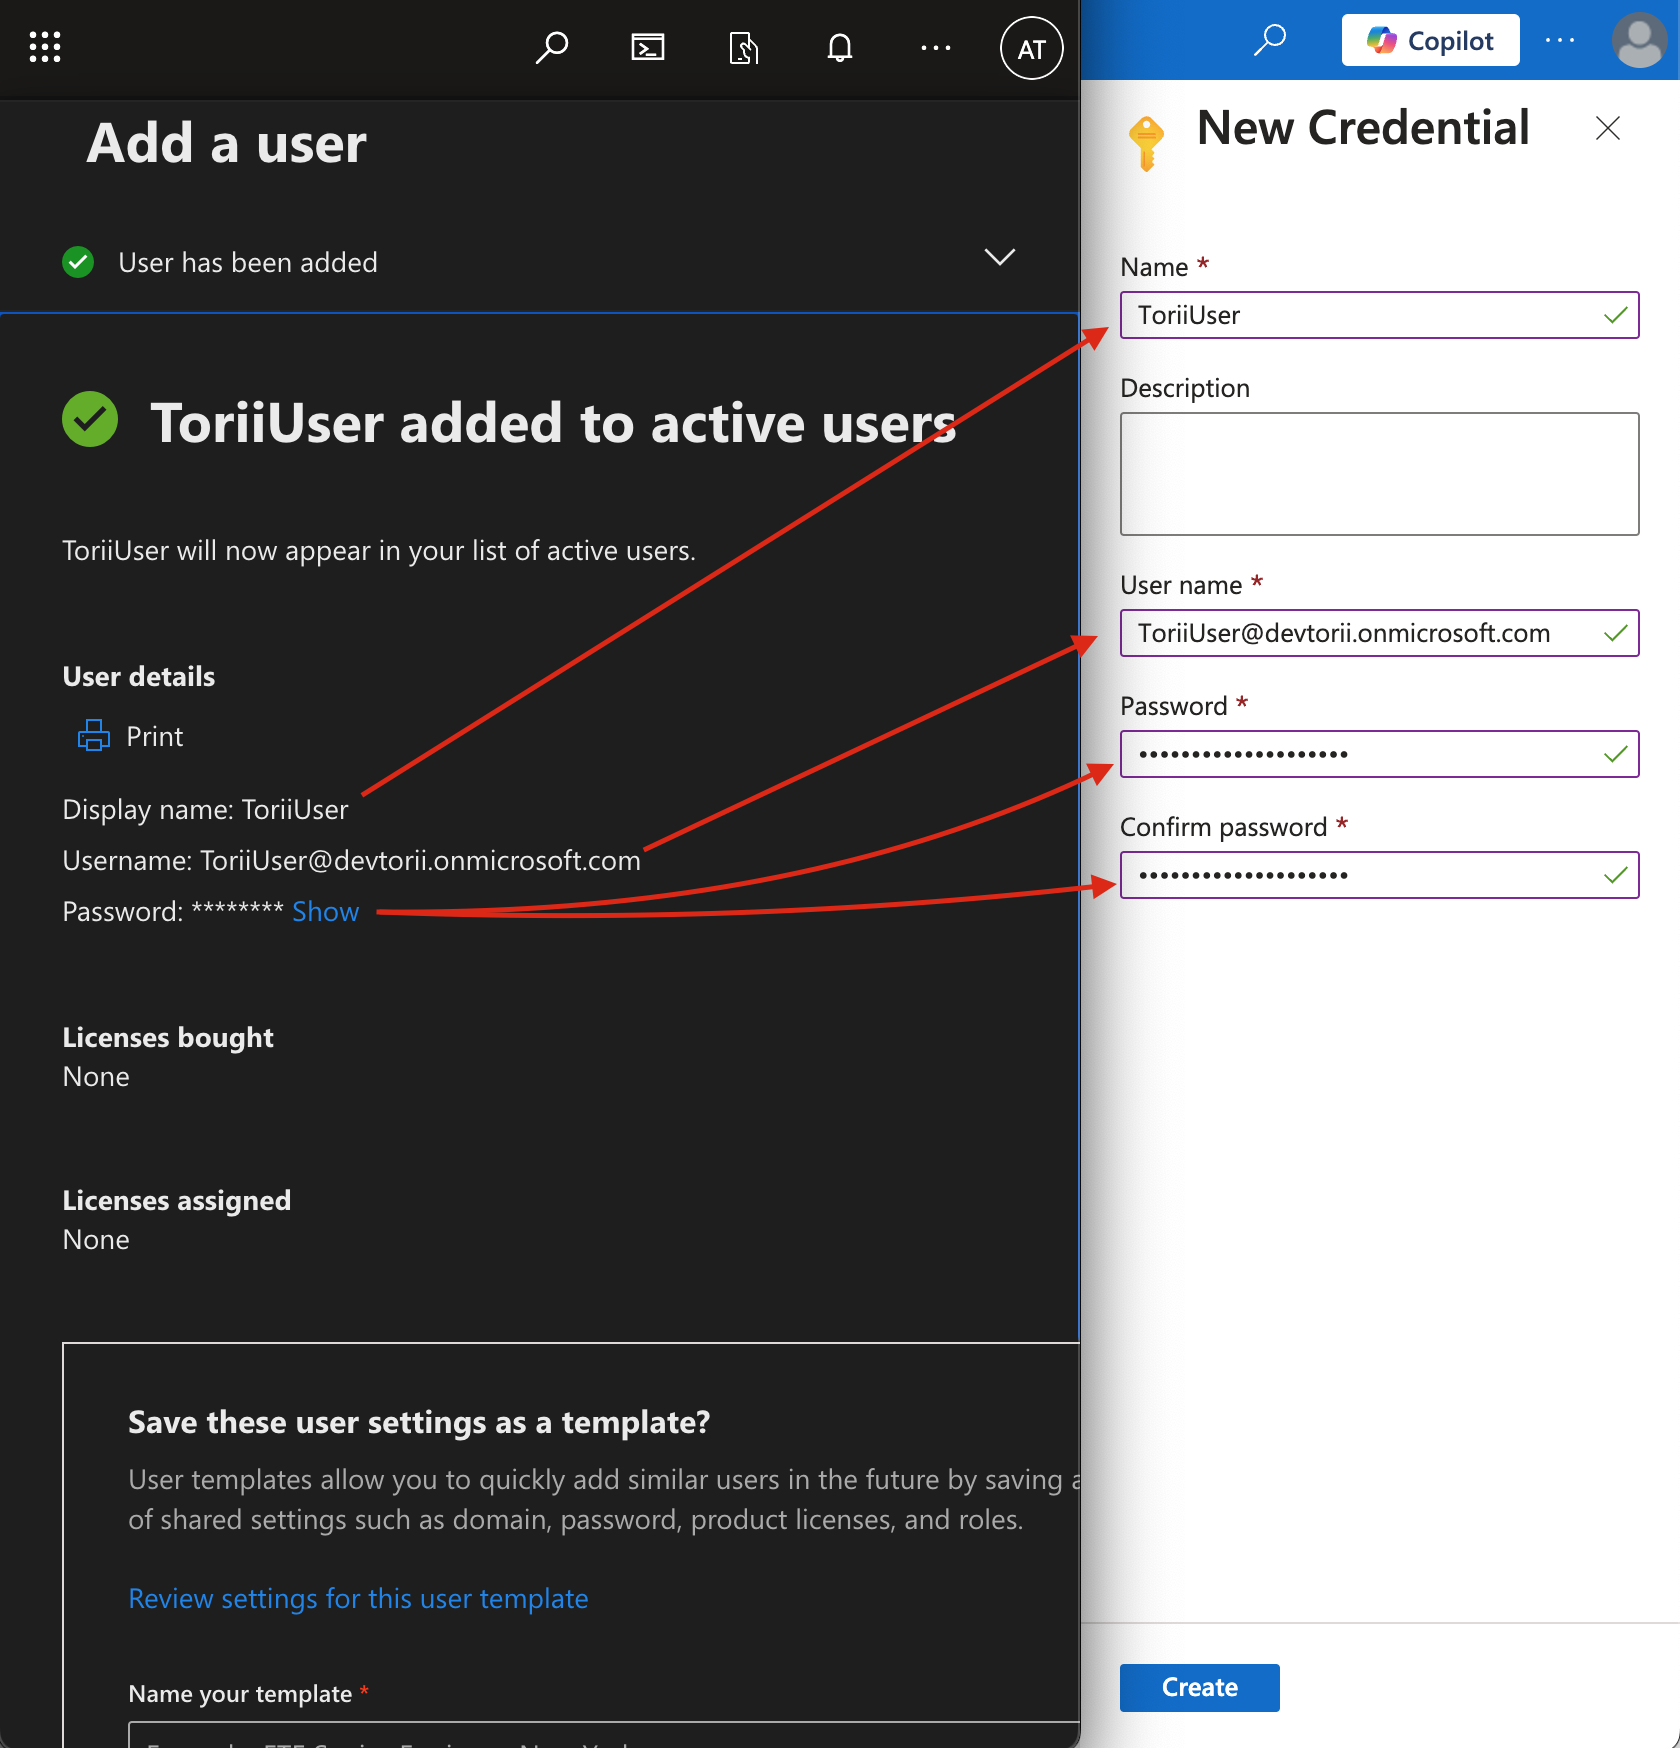
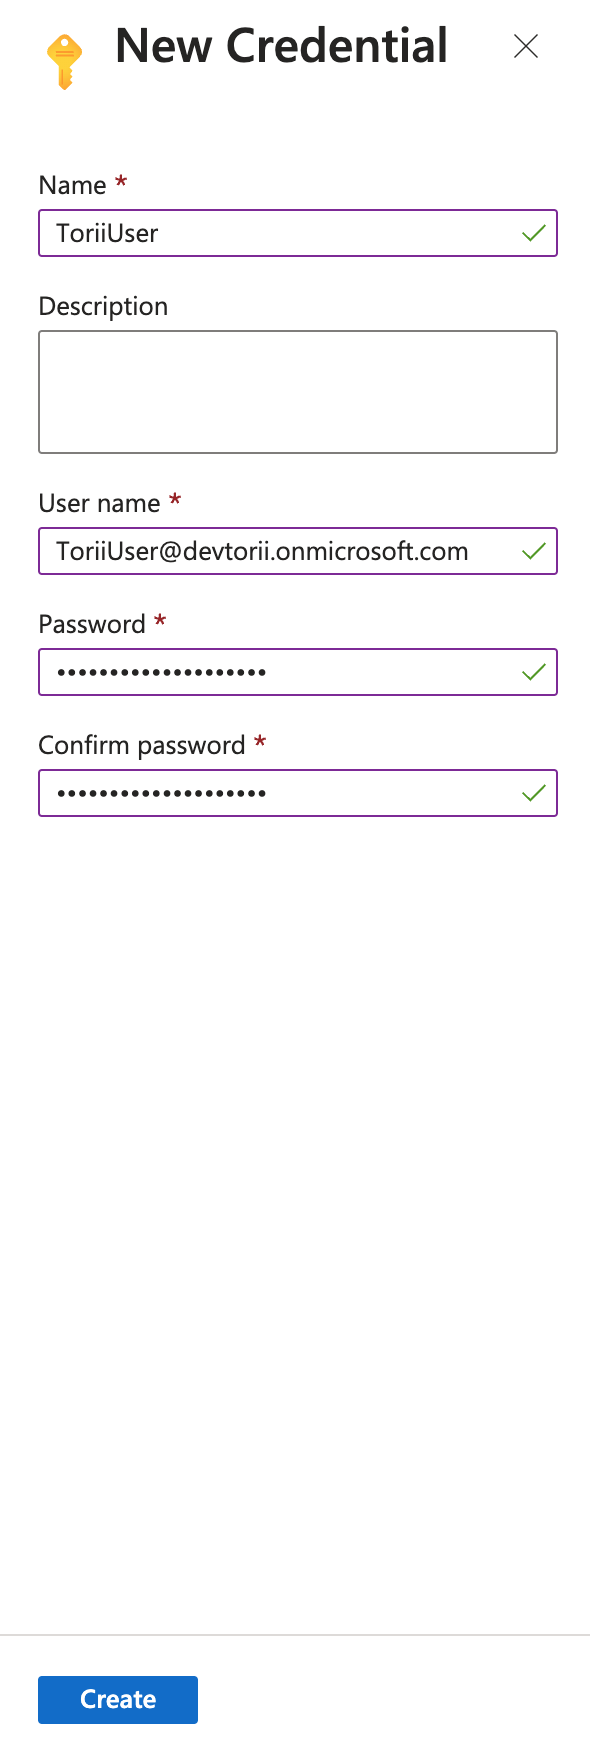
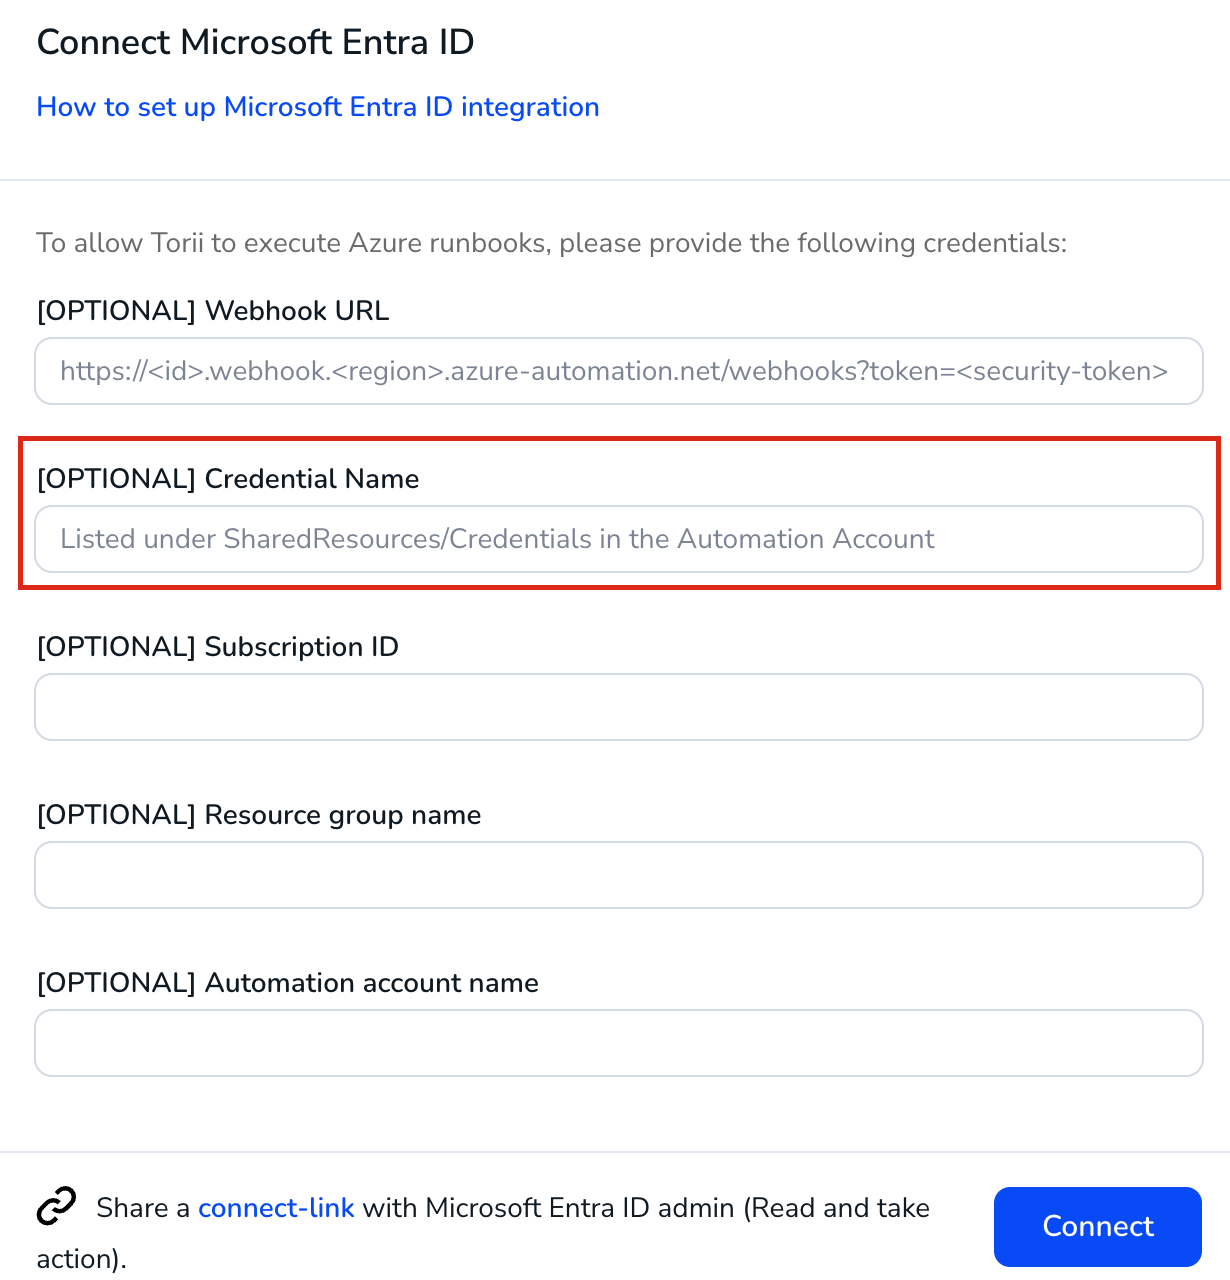
- The value entered in the Name field will be used later to connect the Microsoft Entra ID integration to Torii.
6. Create a Runbook
-
Navigate to Automation Accounts:
- Follow this link: Automation Accounts.
- Alternatively, use the search bar at the top of the Azure portal to search for Automation Accounts.
- Follow this link: Automation Accounts.
-
Select the Automation Account you created in Step 2 (referred to as
ToriiAutomationAccountin these instructions). -
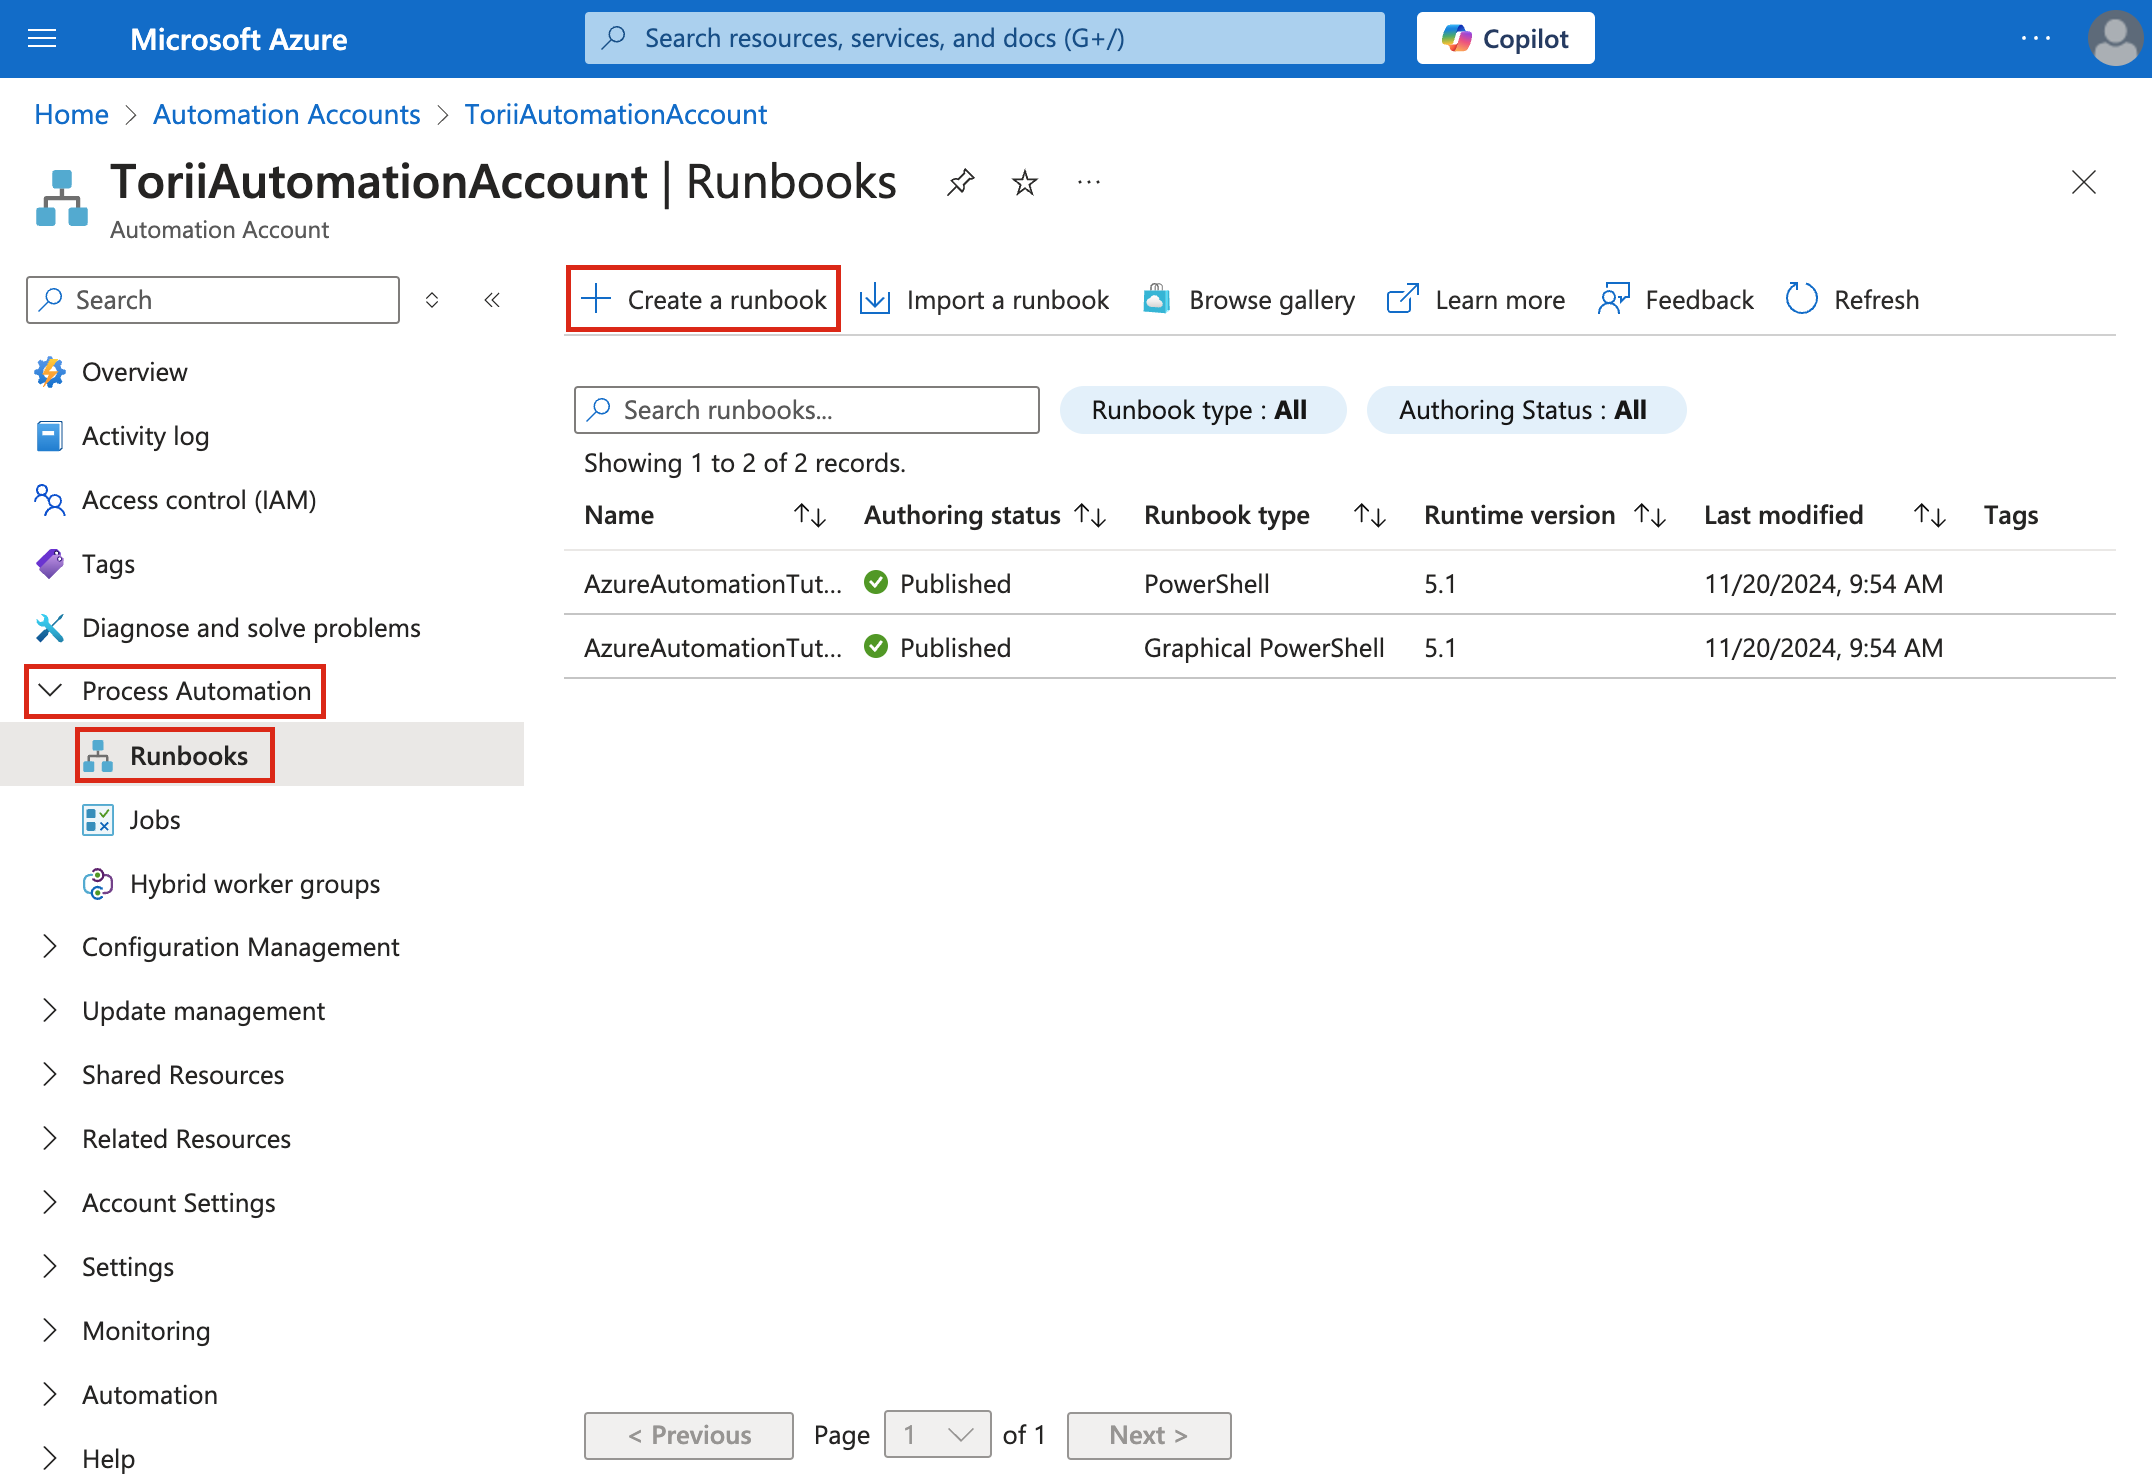
In the Automation Account, navigate to Process Automation, select Runbooks, and then click Create a runbook.
-
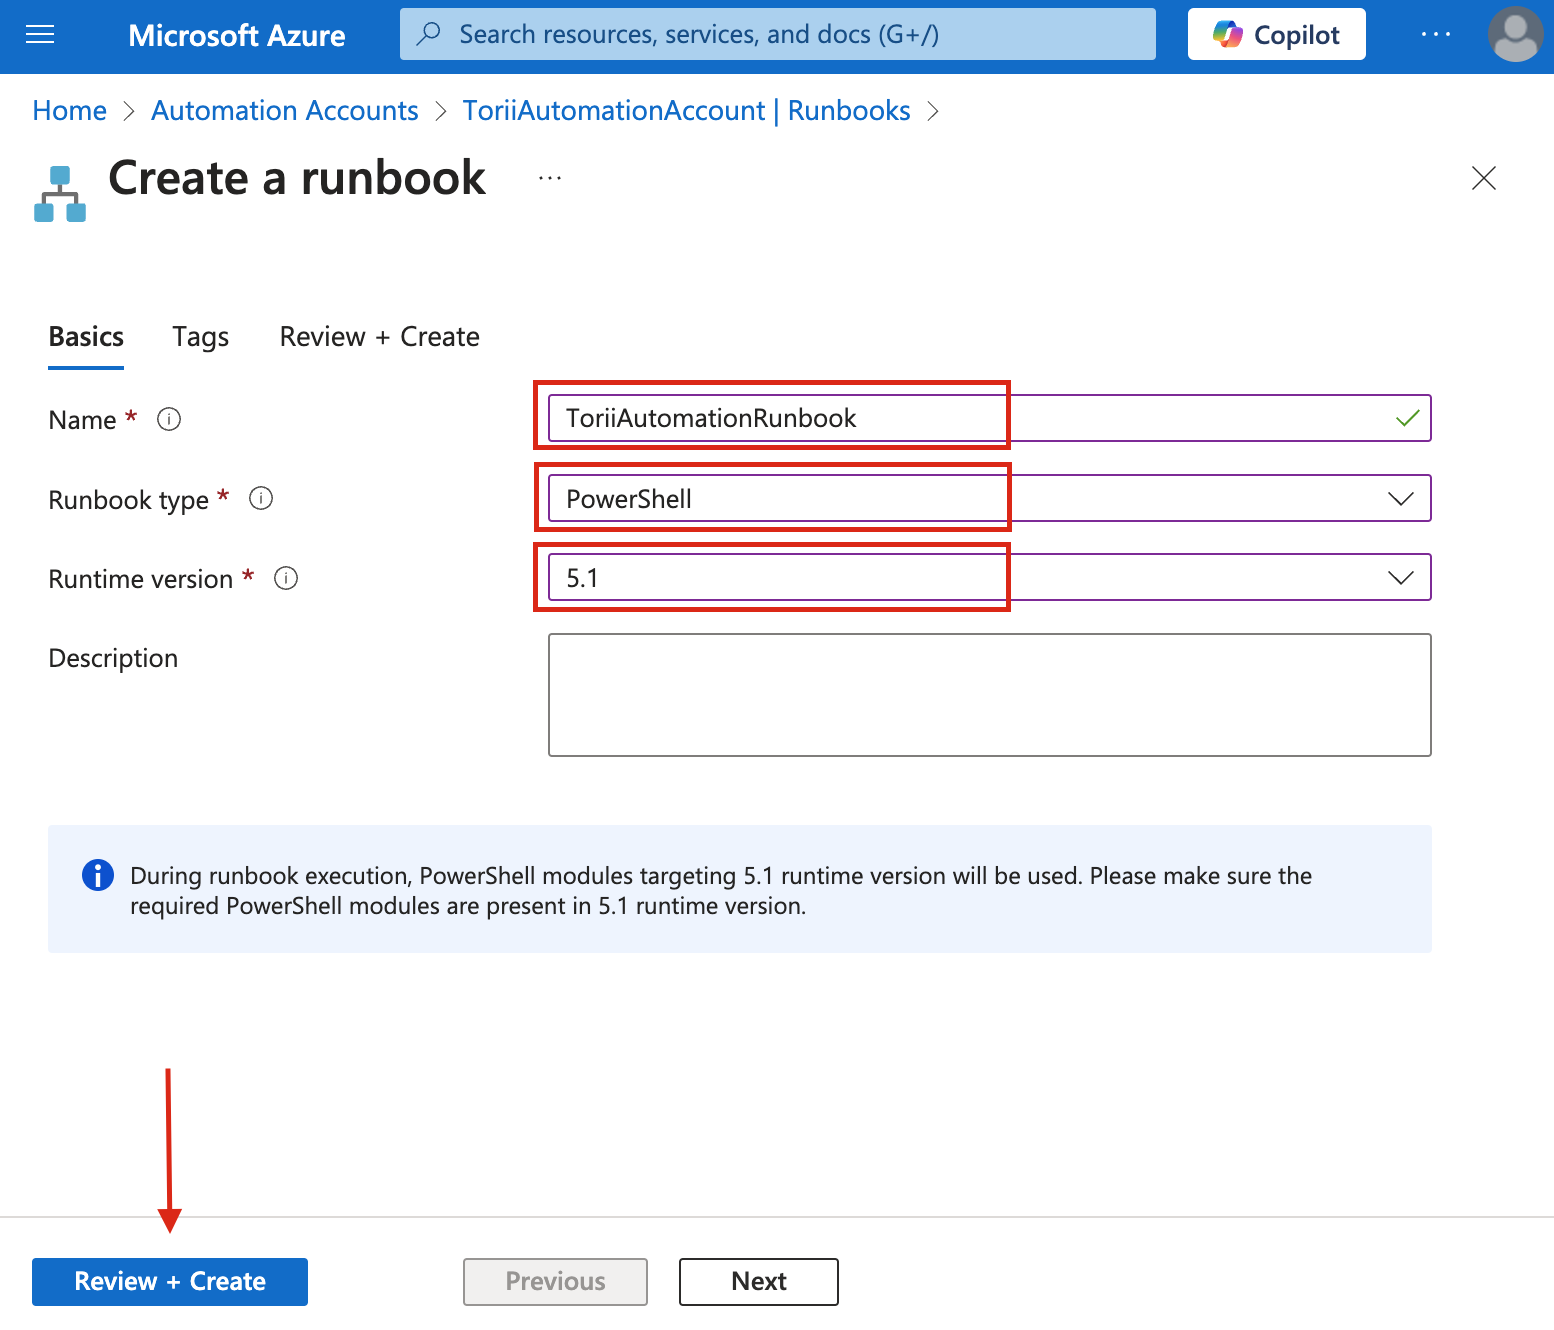
Configure Runbook Settings:
- Name: Enter "ToriiAutomationRunbook".
- Runbook Type: Select "PowerShell".
- Runtime Version: Choose "5.1".
- Click "Review + Create"
- Click “Create”
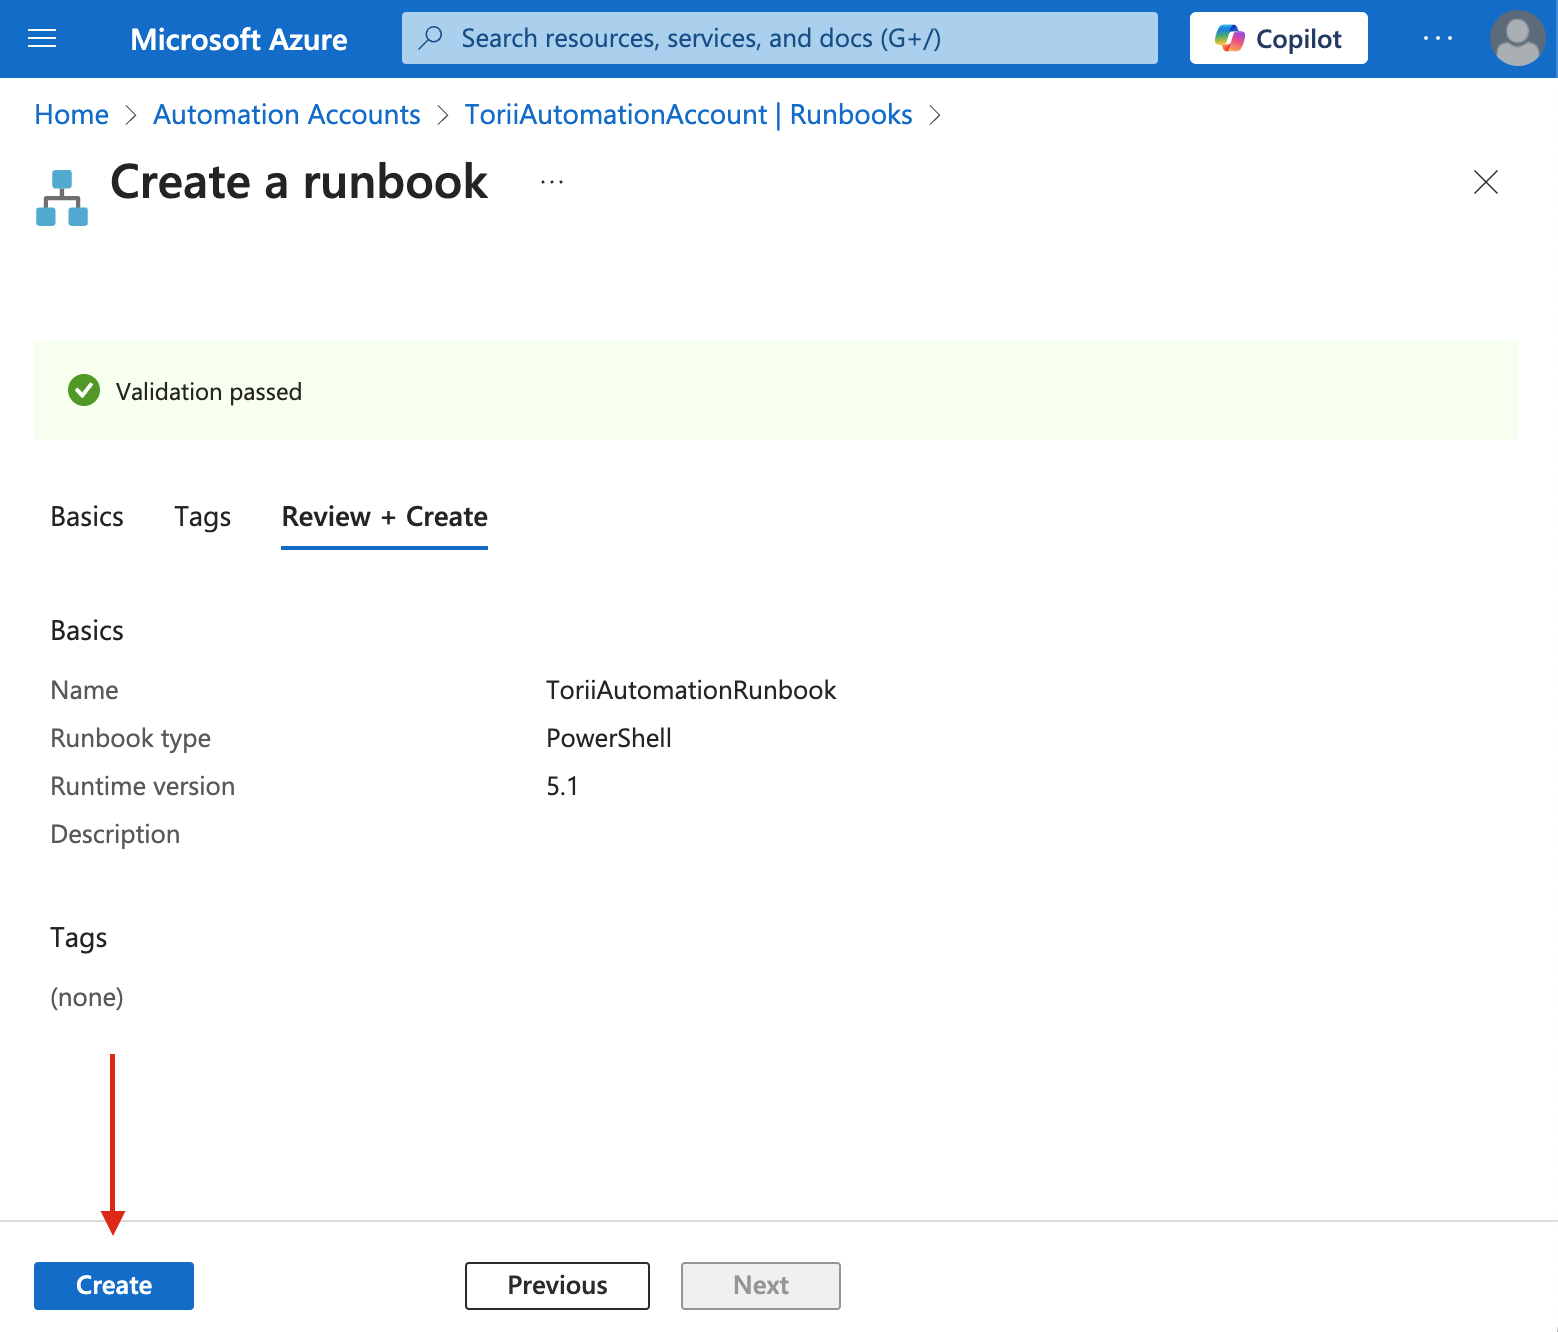
- After creating the Runbook, you'll be directed to the PowerShell editor.
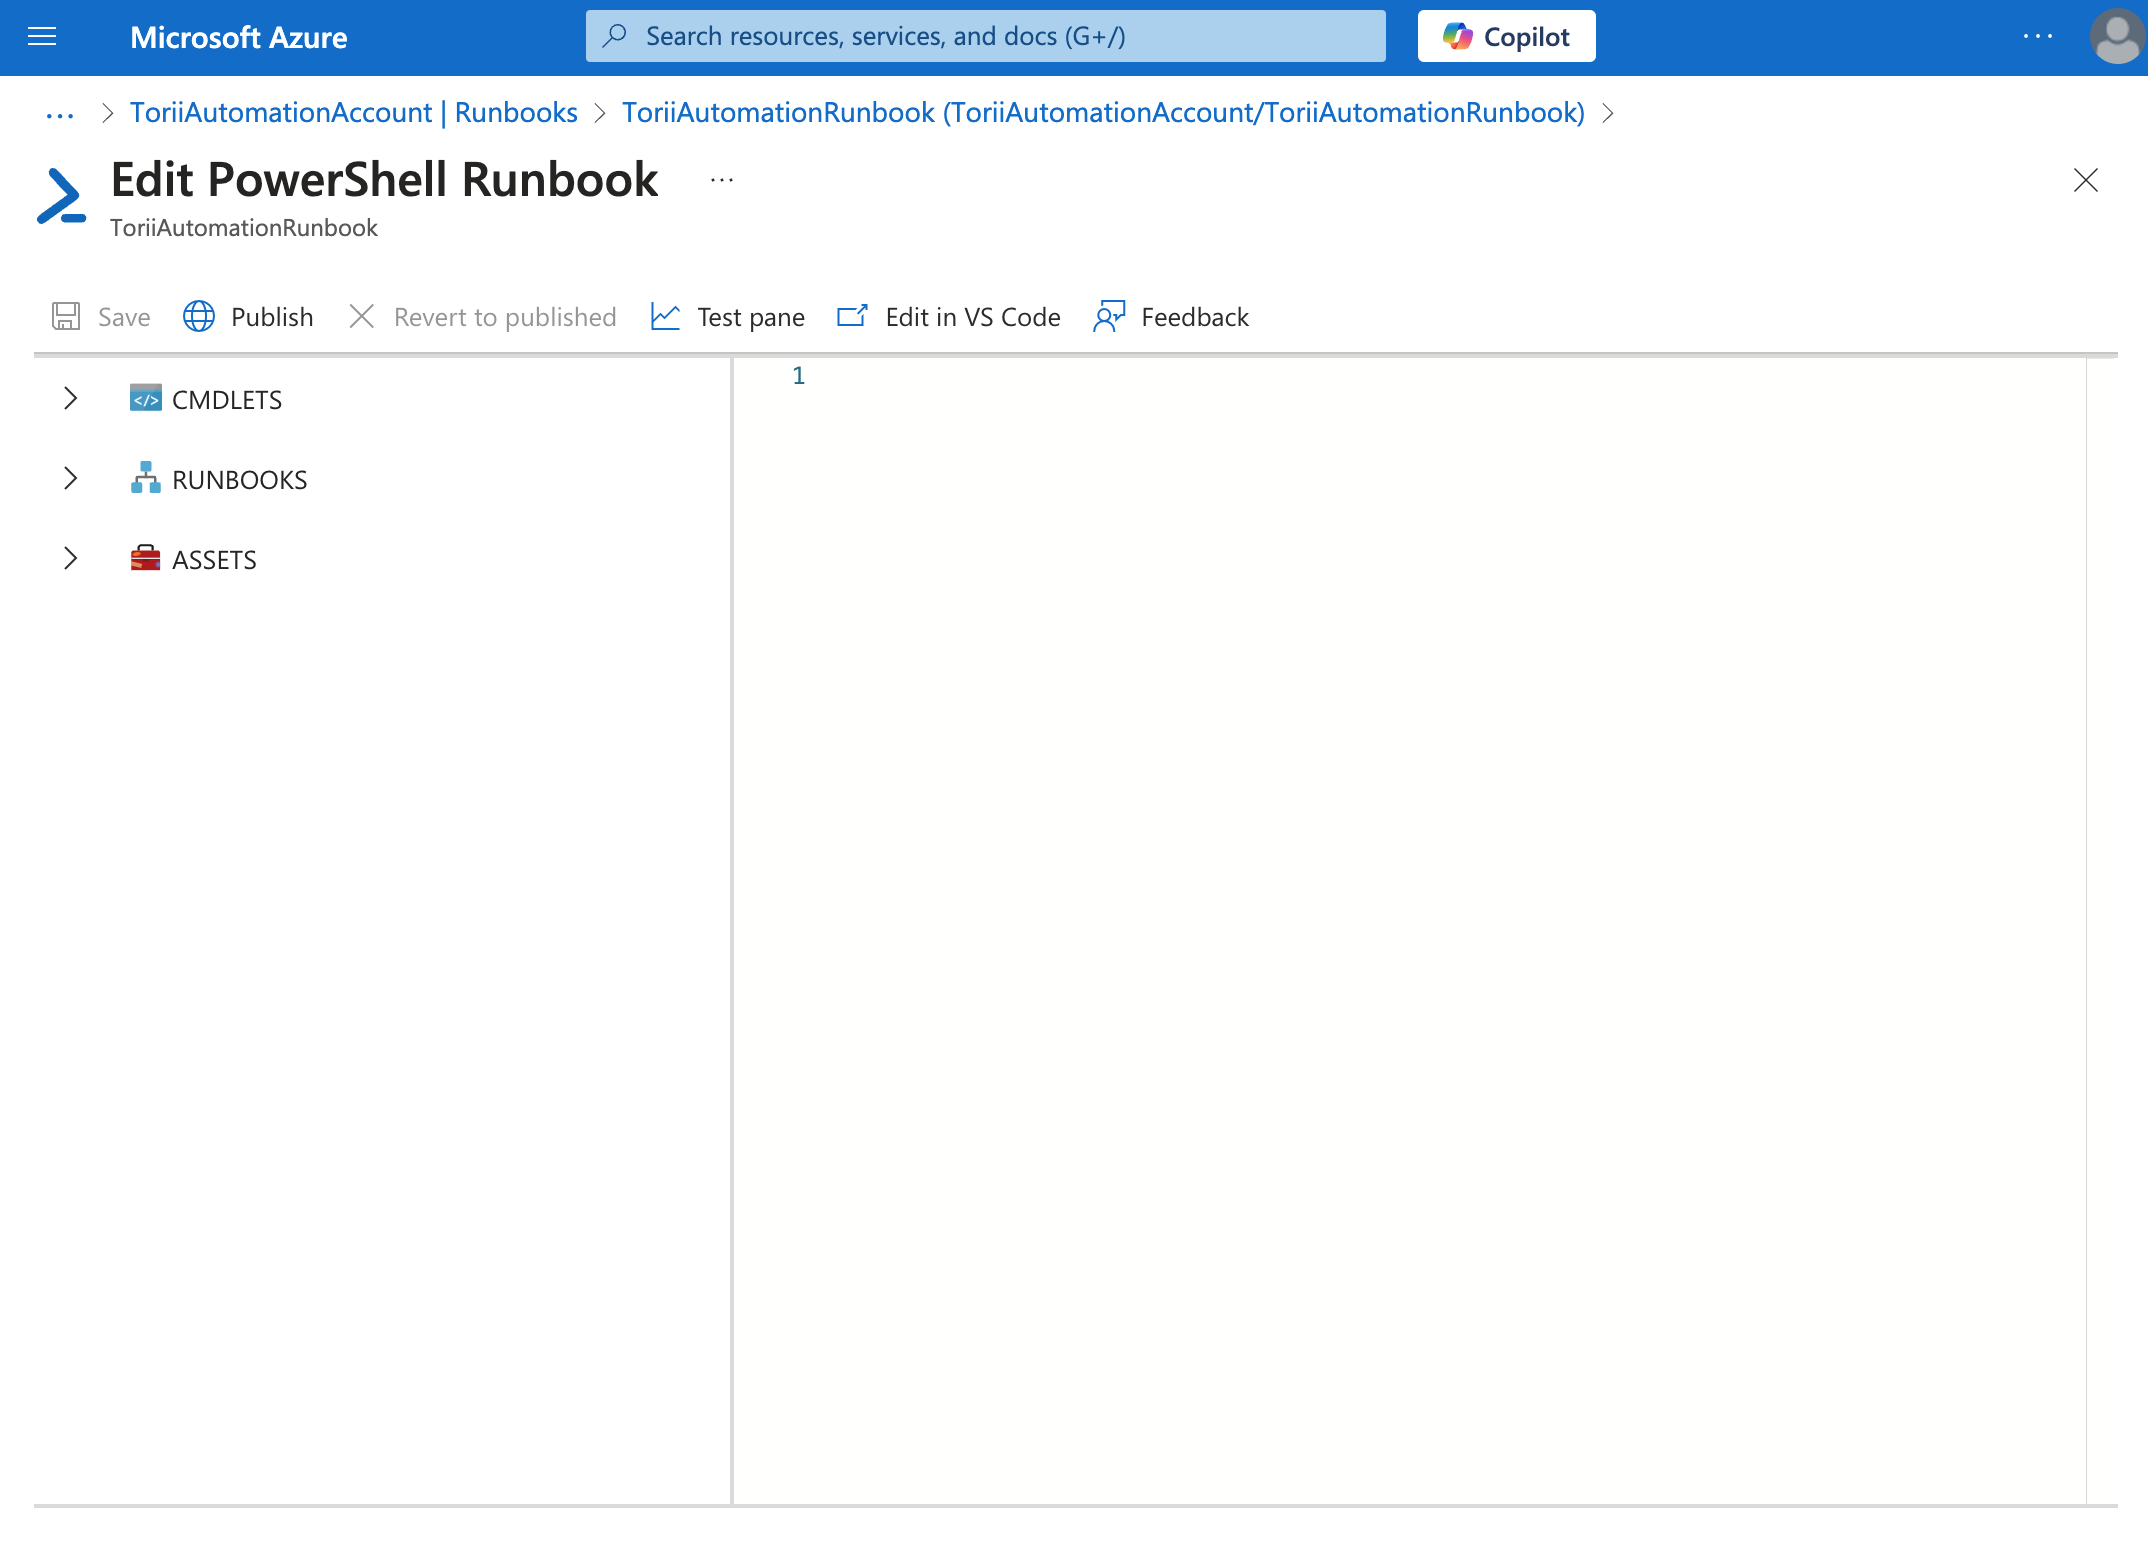
7. Add a PowerShell Script
-
Open the Editor
-
Insert the Script:
- Copy your PowerShell script and paste it into the editor.
- Note - as Torii adds more Powershell-based actions, this script may change.
Param ( [object]$WebhookData ) function Logger { param ( [string]$Level, [string]$Message ) $timestamp = Get-Date -Format "yyyy-MM-dd HH:mm:ss" Write-Output "$timestamp [$Level] - $Message" } function ConvertMailboxToShared { param ( [string]$Email ) Logger -Level "INFO" -Message "Starting conversion of mailbox '$Email' to shared mailbox." # Convert mailbox type Set-Mailbox -Identity $Email -Type Shared -ErrorAction Stop Logger -Level "INFO" -Message "Set-Mailbox command executed successfully for '$Email'." Logger -Level "INFO" -Message "Waiting 60 seconds before verifying mailbox conversion..." Start-Sleep -Seconds 60 # Verify conversion $mailbox = Get-Mailbox -Identity $Email -ErrorAction Stop if ($mailbox.RecipientTypeDetails -eq "SharedMailbox") { Logger -Level "INFO" -Message "Successfully converted mailbox '$Email' to shared mailbox." } else { $errorMessage = "Verification failed: Mailbox '$Email' is not a shared mailbox. Current Type: $($mailbox.RecipientTypeDetails)" Logger -Level "ERROR" -Message $errorMessage throw "Mailbox conversion failed - $errorMessage" } } function AddUserToExchangeGroups { param ( [string]$UserEmail, [string[]]$GroupsEmailsList ) $TotalGroups = $GroupsEmailsList.Count Logger -Level "INFO" -Message "Starting adding user '$UserEmail' to '$TotalGroups' groups." $Results = @{} foreach ($groupEmail in $GroupsEmailsList) { try { # Attempt to add the user to the current group Add-DistributionGroupMember -Identity $groupEmail -Member $UserEmail -BypassSecurityGroupManagerCheck -Confirm:$false -ErrorAction Stop Logger -Level "INFO" -Message "User ($UserEmail) successfully added to group ($groupEmail)." $Results[$groupEmail] = "Success" } catch { # Capture any errors for each group and continue Logger -Level "ERROR" -Message "Failed to add user ($UserEmail) to group ($groupEmail). Error: $_" $Results[$groupEmail] = "Failed. Error: $_" } } $ResultsJson = $Results | ConvertTo-Json -Depth 5 -Compress Logger -Level "INFO" -Message "AddUserToExchangeGroups function completed with the results: $ResultsJson" } function RemoveUserFromExchangeGroups { param ( [string]$UserEmail, [string[]]$GroupsEmailsList ) $TotalGroups = $GroupsEmailsList.Count Logger -Level "INFO" -Message "Starting removing user '$UserEmail' from '$TotalGroups' groups." $Results = @{} foreach ($groupEmail in $GroupsEmailsList) { try { # Attempt to remove the user from the current group Remove-DistributionGroupMember -Identity $groupEmail -Member $UserEmail -BypassSecurityGroupManagerCheck -Confirm:$false -ErrorAction Stop Logger -Level "INFO" -Message "User ($UserEmail) successfully remove from group ($groupEmail)." $Results[$groupEmail] = "Success" } catch { # Capture any errors for each group and continue Logger -Level "ERROR" -Message "Failed to remove user ($UserEmail) from group ($groupEmail). Error: $_" $Results[$groupEmail] = "Failed. Error: $_" } } $ResultsJson = $Results | ConvertTo-Json -Depth 5 -Compress Logger -Level "INFO" -Message "RemoveUserFromExchangeGroups function completed with the results: $ResultsJson" } # Initialize logging Logger -Level "INFO" -Message "Runbook execution started." # Validate and parse webhook data if (-not $WebhookData) { Logger -Level "ERROR" -Message "No WebhookData provided. Exiting runbook." throw "Missing WebhookData." } Logger -Level "INFO" -Message "Webhook data received. Parsing request body." $WebhookBody = ConvertFrom-Json -InputObject $WebhookData.RequestBody $UserEmail = $WebhookBody.email $Operation = $WebhookBody.operation $CredentialName = $WebhookBody.credentialName Logger -Level "INFO" -Message "Parsed UserEmail: $UserEmail, Operation: $Operation, CredentialName: $CredentialName" # Validate required fields if (-not $UserEmail -or -not $Operation -or -not $CredentialName) { Logger -Level "ERROR" -Message "Invalid webhook data: Missing 'email', 'operation' or 'credentialName'." throw "Invalid webhook data." } # Disconnect existing PowerShell sessions Logger -Level "INFO" -Message "Disconnecting existing PowerShell sessions." Get-PSSession | Remove-PSSession -ErrorAction SilentlyContinue # Authentication Logger -Level "INFO" -Message "Authenticating to Exchange Online and Microsoft Graph." $UserCredential = Get-AutomationPSCredential -Name $CredentialName if (-not $UserCredential) { throw "Failed to retrieve credentials from Automation Account." } Connect-ExchangeOnline -Credential $UserCredential -ShowProgress $false Logger -Level "INFO" -Message "Successfully authenticated to Exchange Online and Microsoft Graph." switch ($Operation) { "CONVERT_MAILBOX_TO_SHARED" { ConvertMailboxToShared -Email $UserEmail } "ADD_USER_TO_EXCHANGE_GROUPS" { $GroupsEmailsList = $WebhookBody.exchangeGroupsEmailsList AddUserToExchangeGroups -UserEmail $UserEmail -GroupsEmailsList $GroupsEmailsList } "REMOVE_USER_FROM_EXCHANGE_GROUPS" { $GroupsEmailsList = $WebhookBody.exchangeGroupsEmailsList RemoveUserFromExchangeGroups -UserEmail $UserEmail -GroupsEmailsList $GroupsEmailsList } default { Logger -Level "WARNING" -Message "Unsupported operation '$Operation' requested." throw "Unsupported operation." } } Logger -Level "INFO" -Message "Disconnecting from Exchange Online." Disconnect-ExchangeOnline -Confirm:$false -ErrorAction SilentlyContinue Get-PSSession | Remove-PSSession -ErrorAction SilentlyContinue Logger -Level "INFO" -Message "Runbook execution completed successfully." - Copy your PowerShell script and paste it into the editor.
3. Save and Publish:
-
Click "Save" to store your changes.
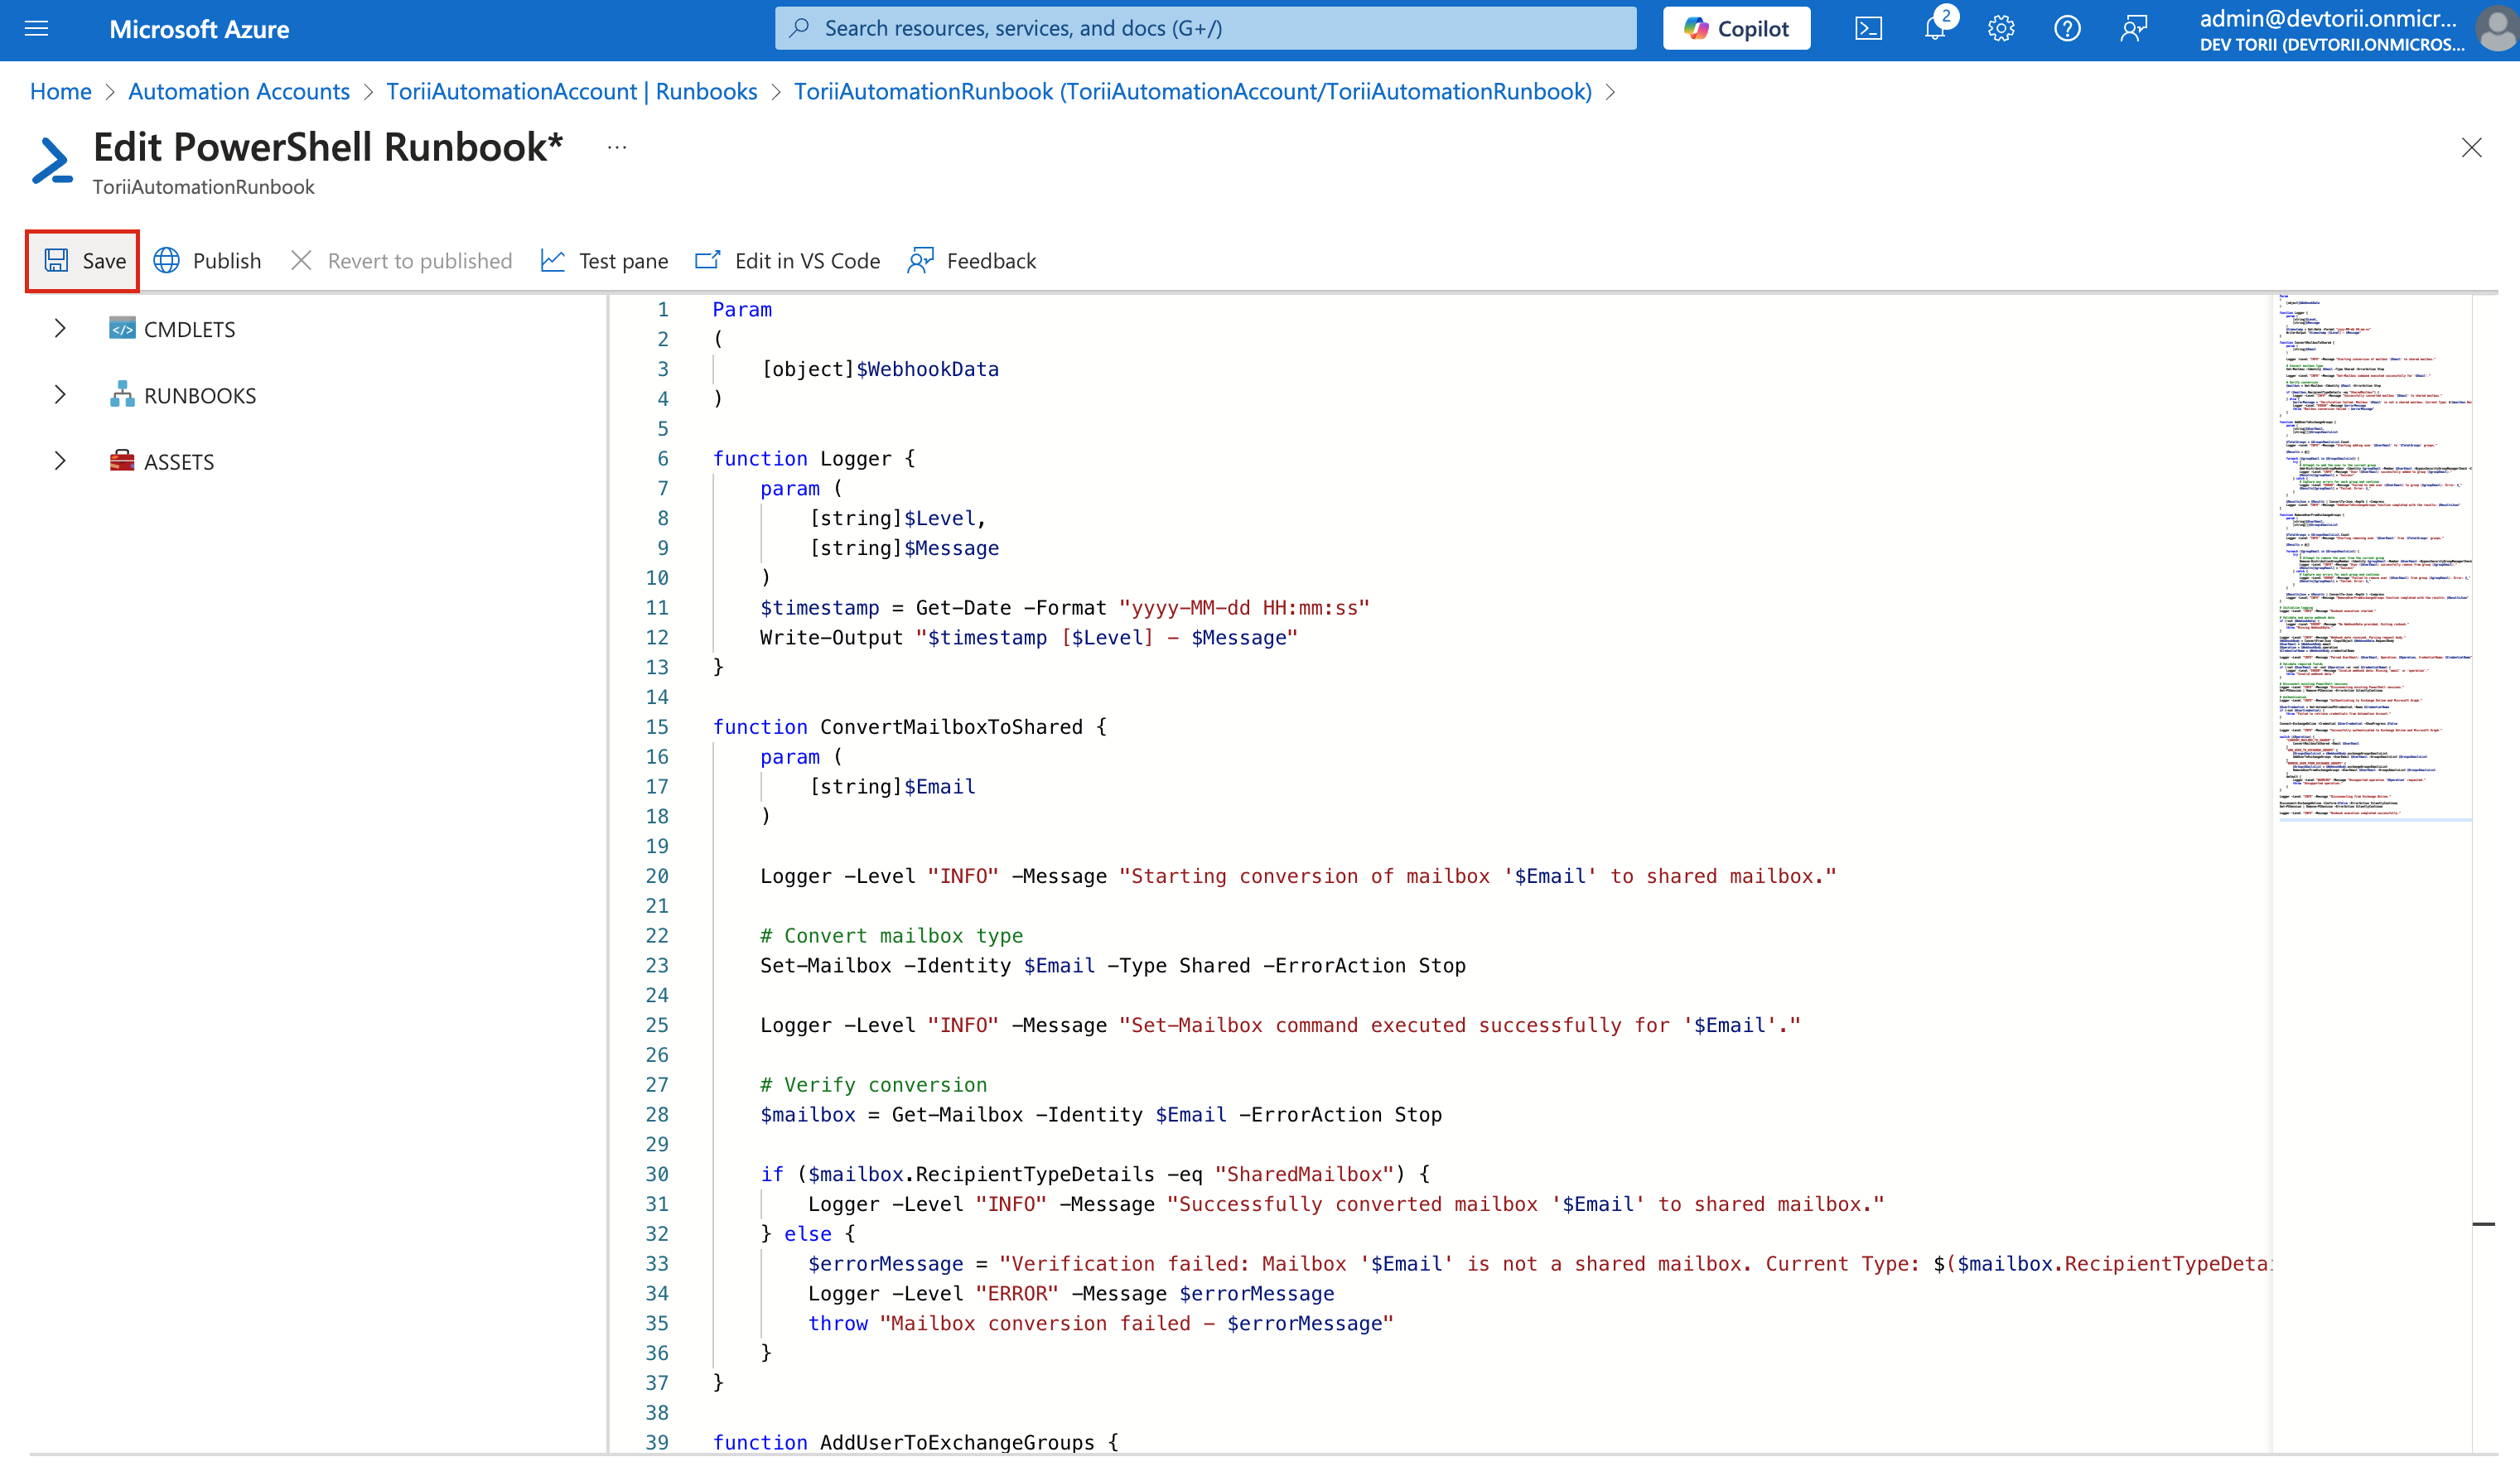
-
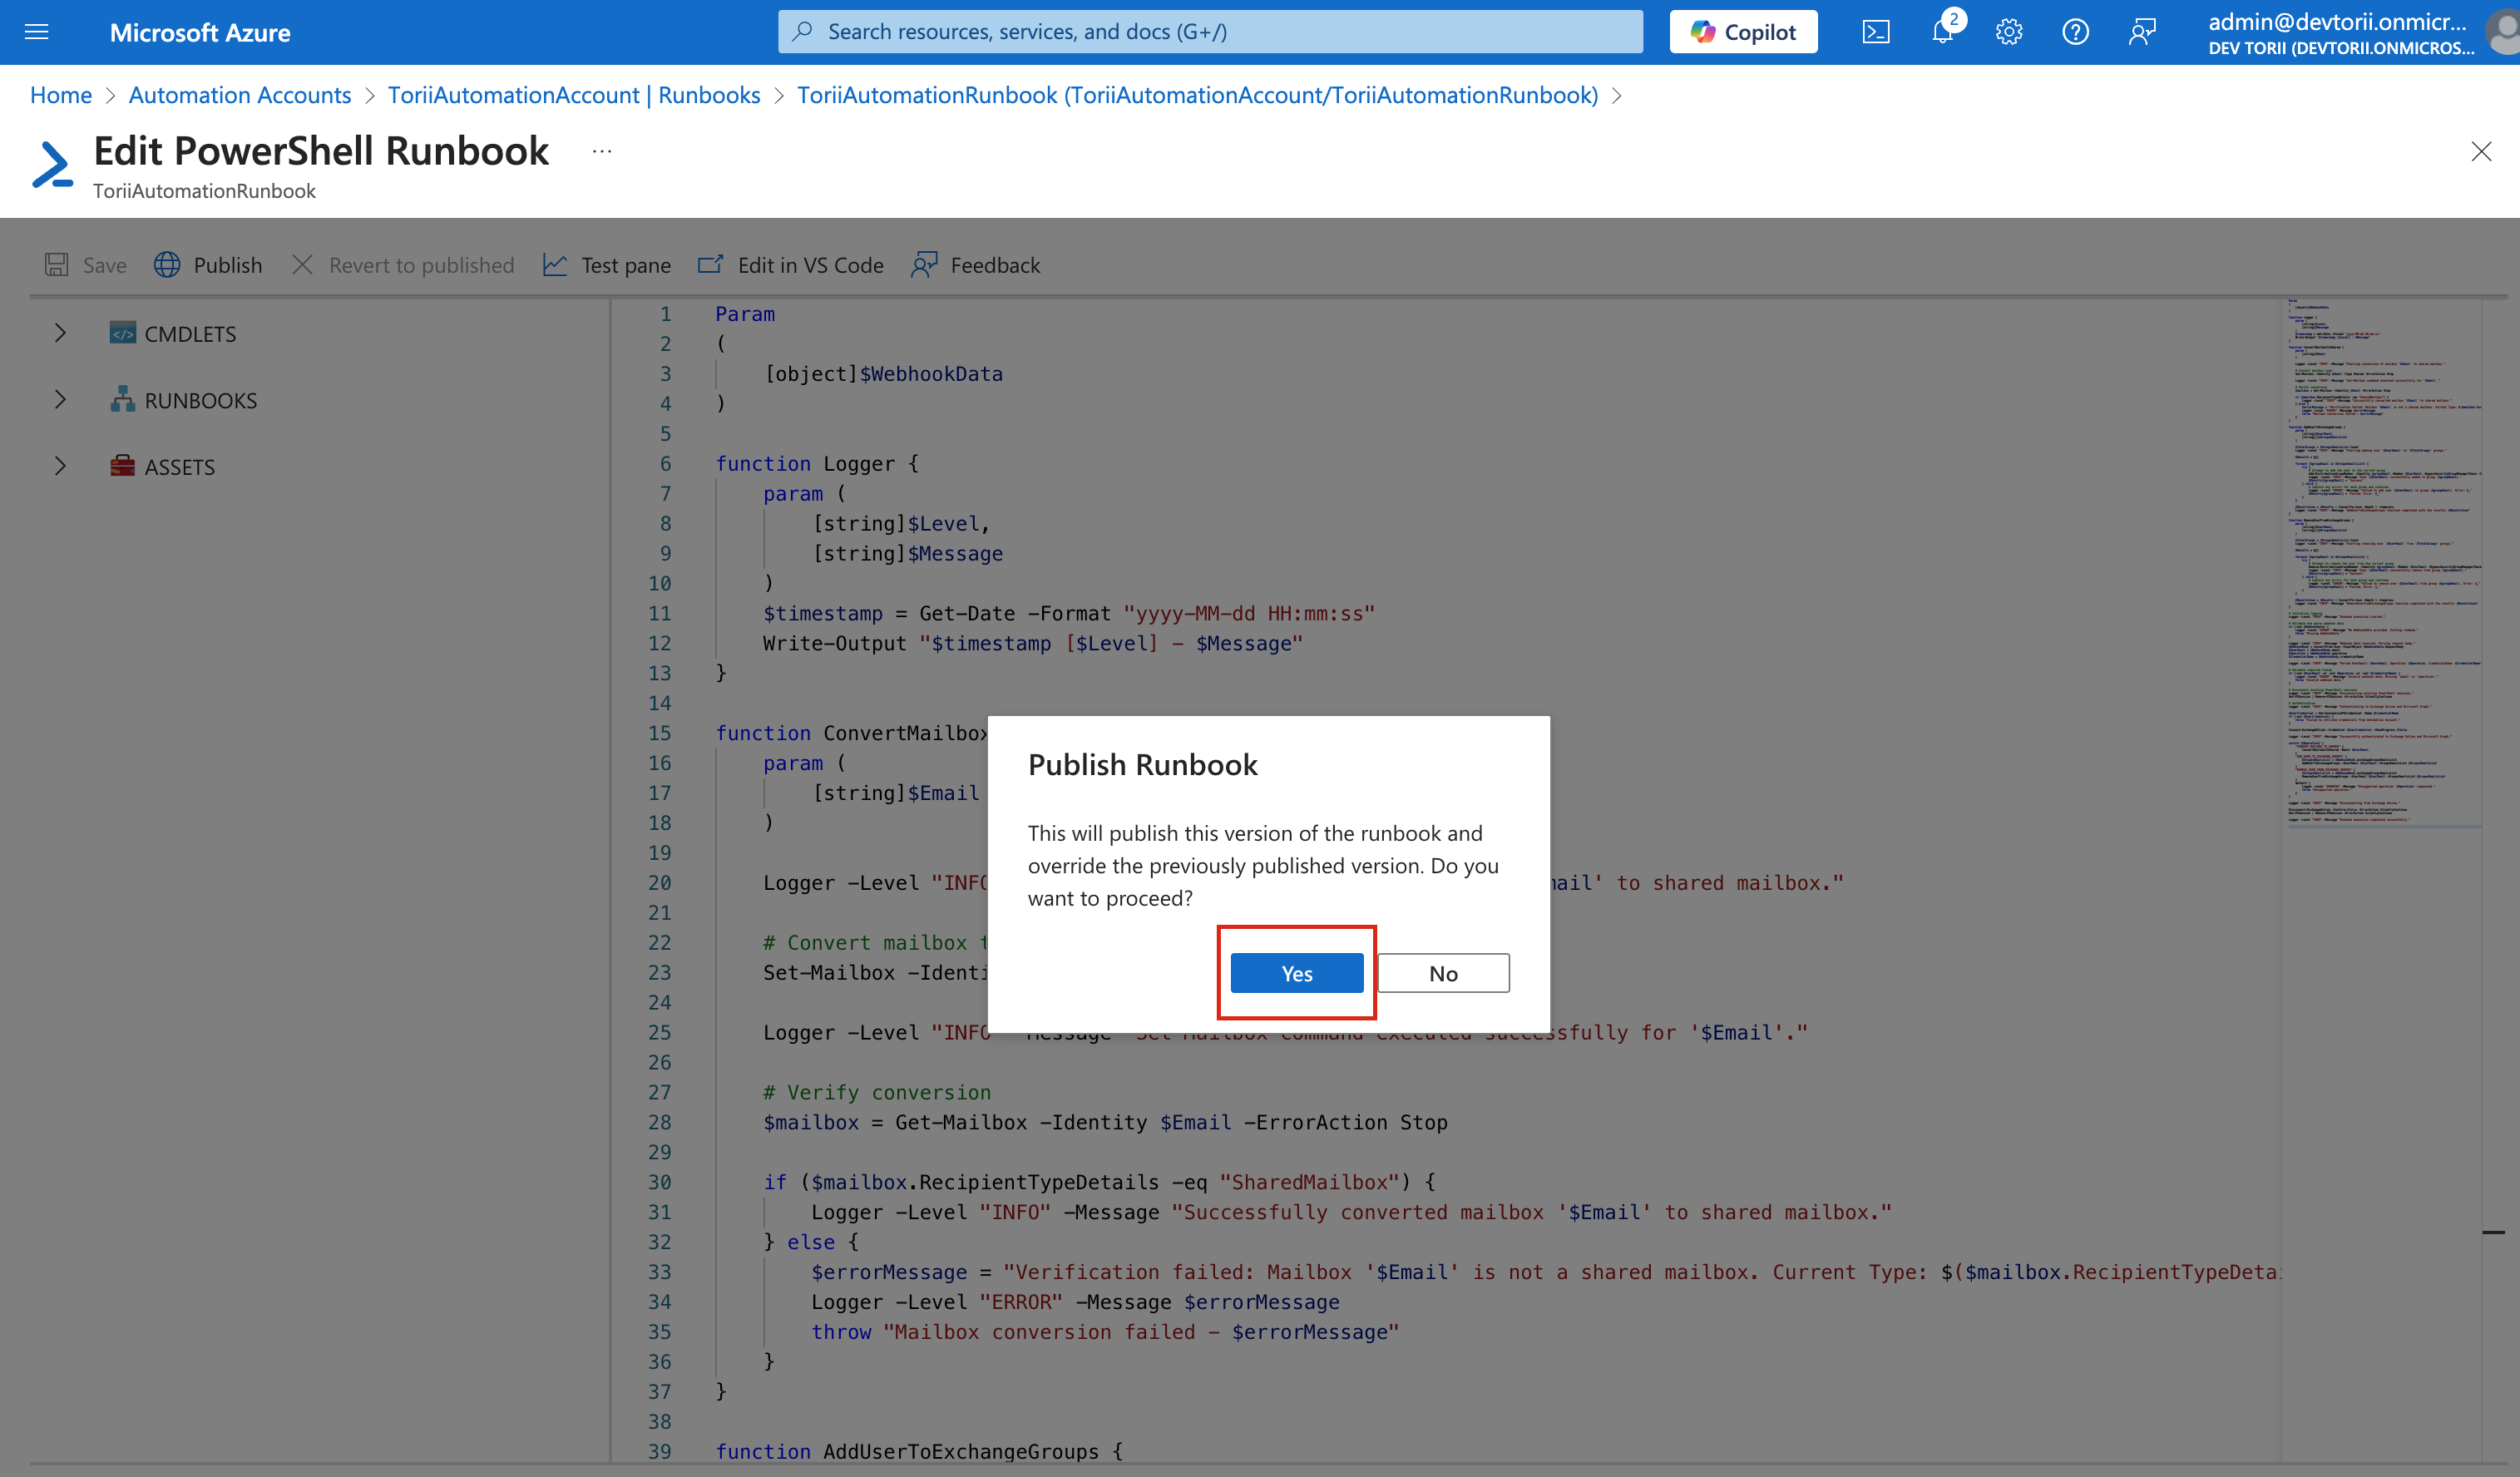
Then, click "Publish" to make the Runbook active.
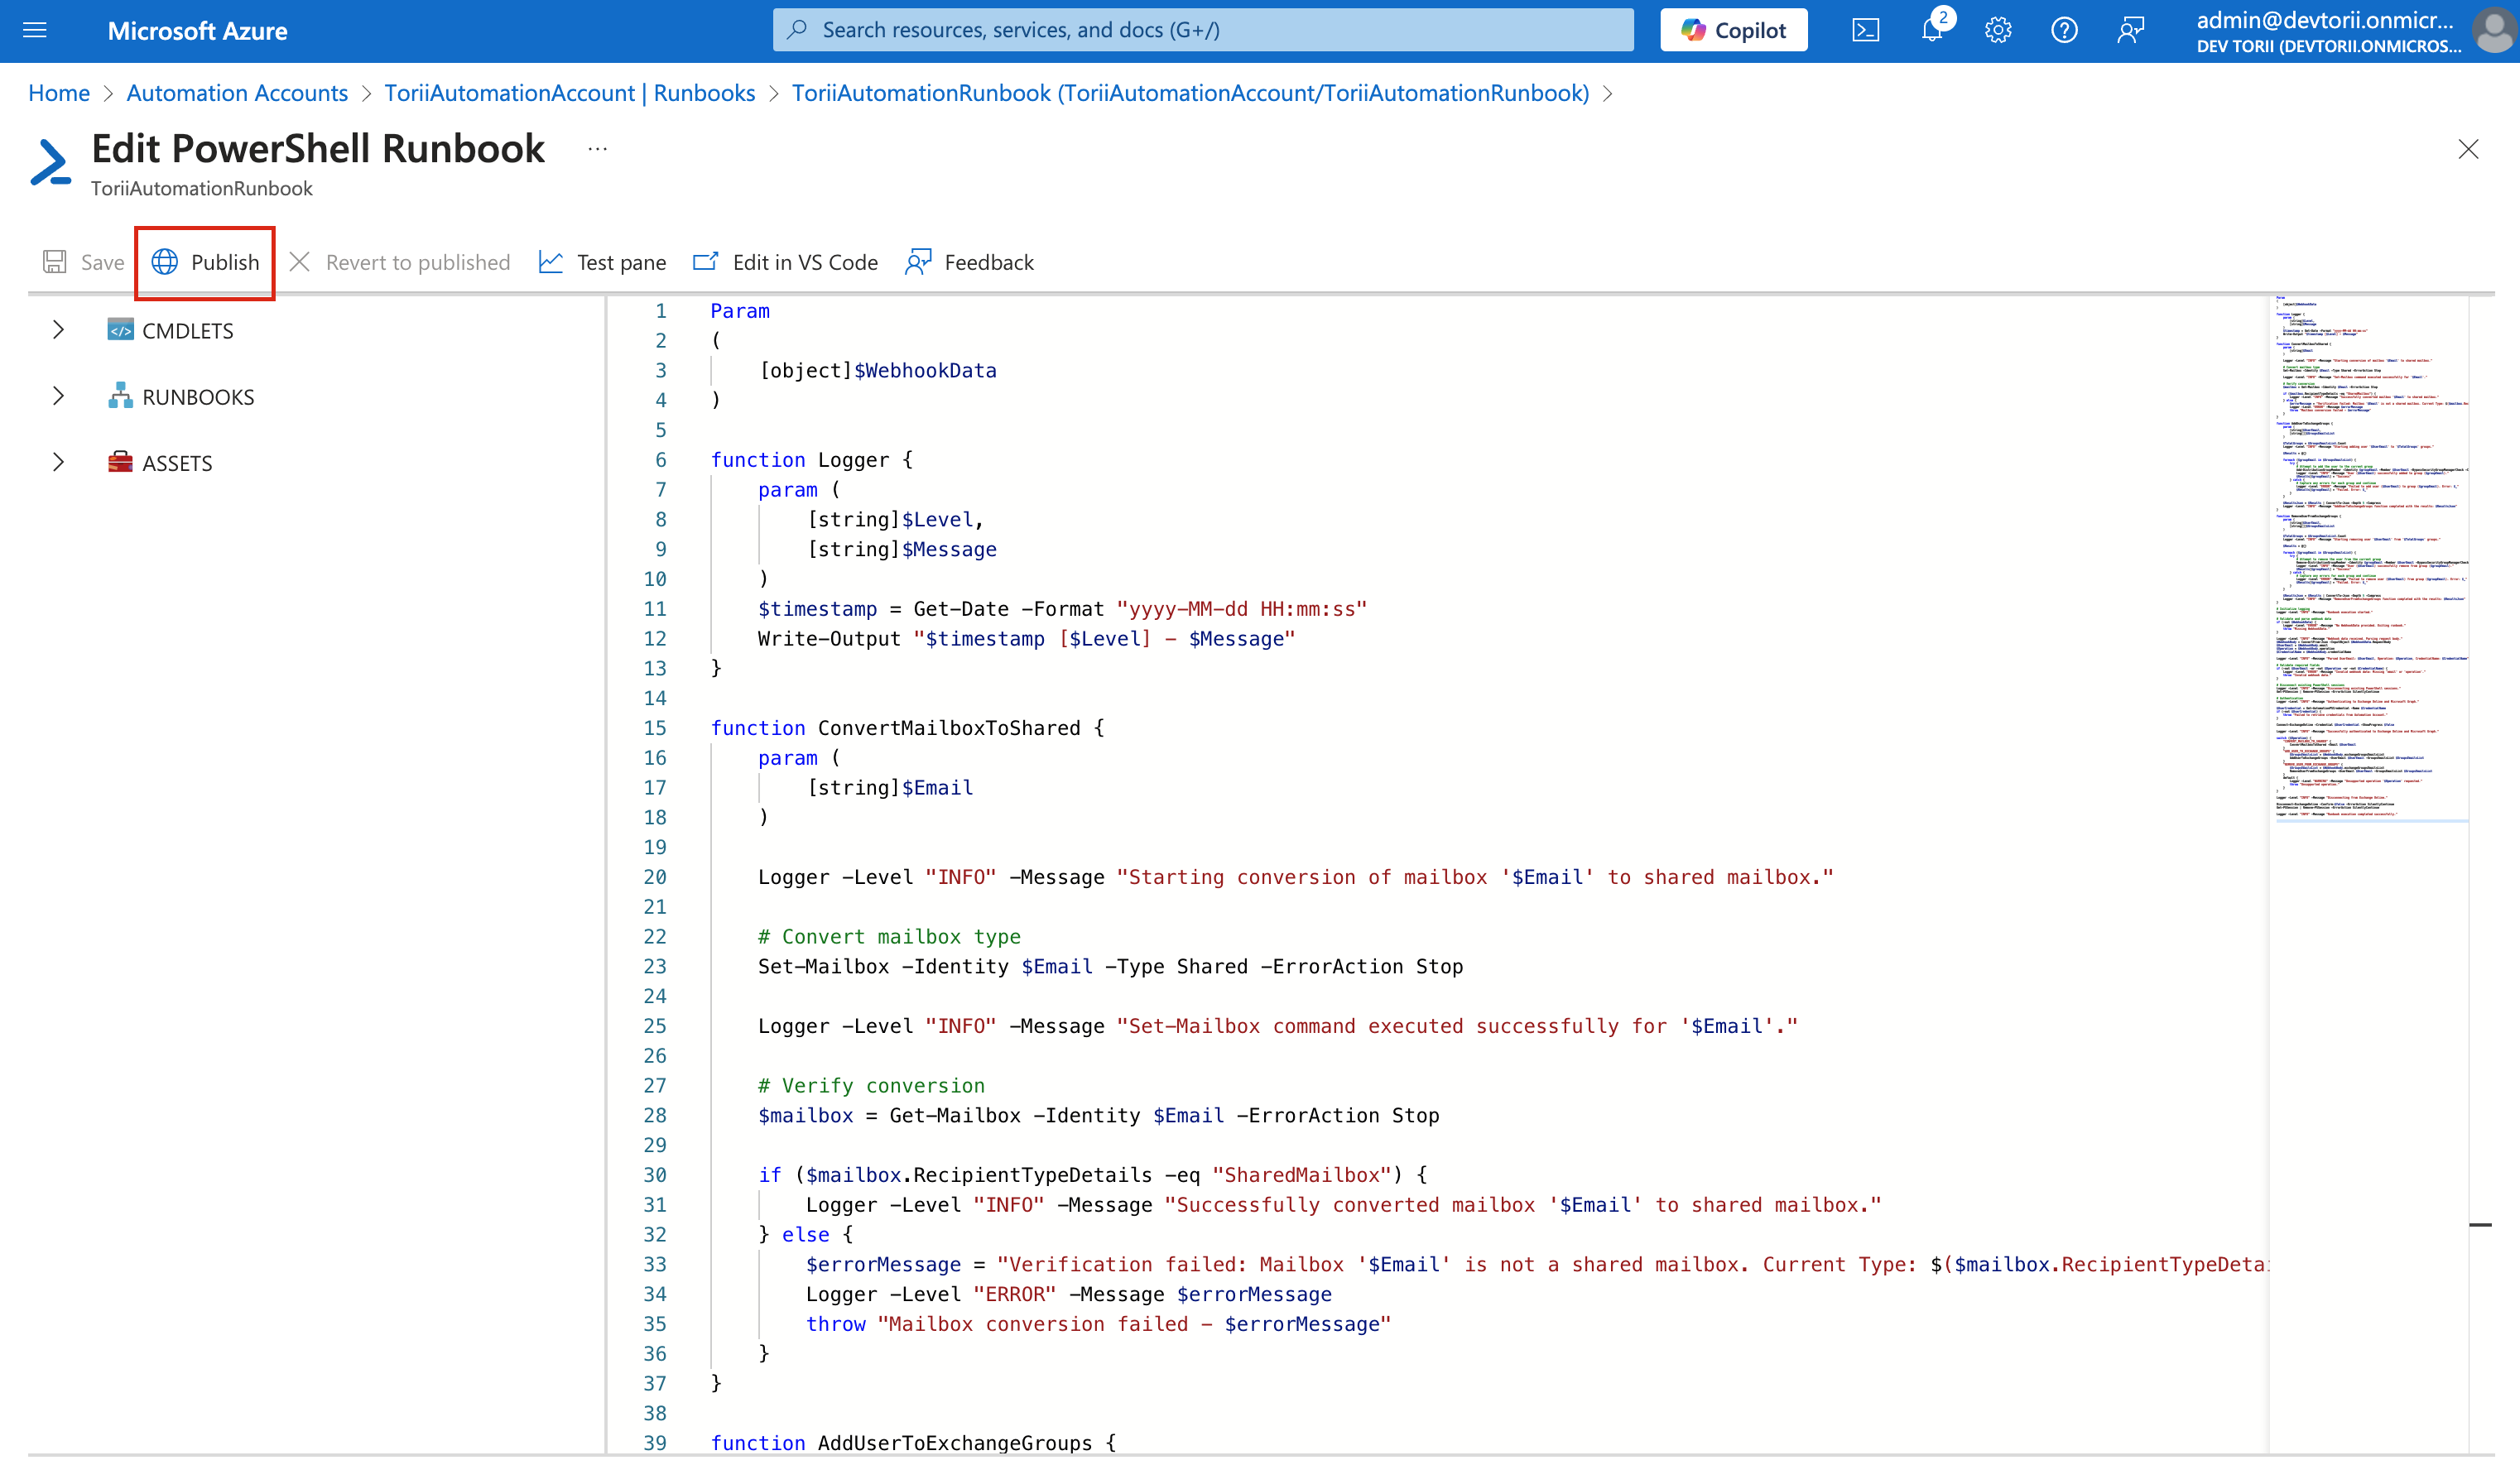
-
Confirm by clicking "Yes".
-
Note Essential Details:
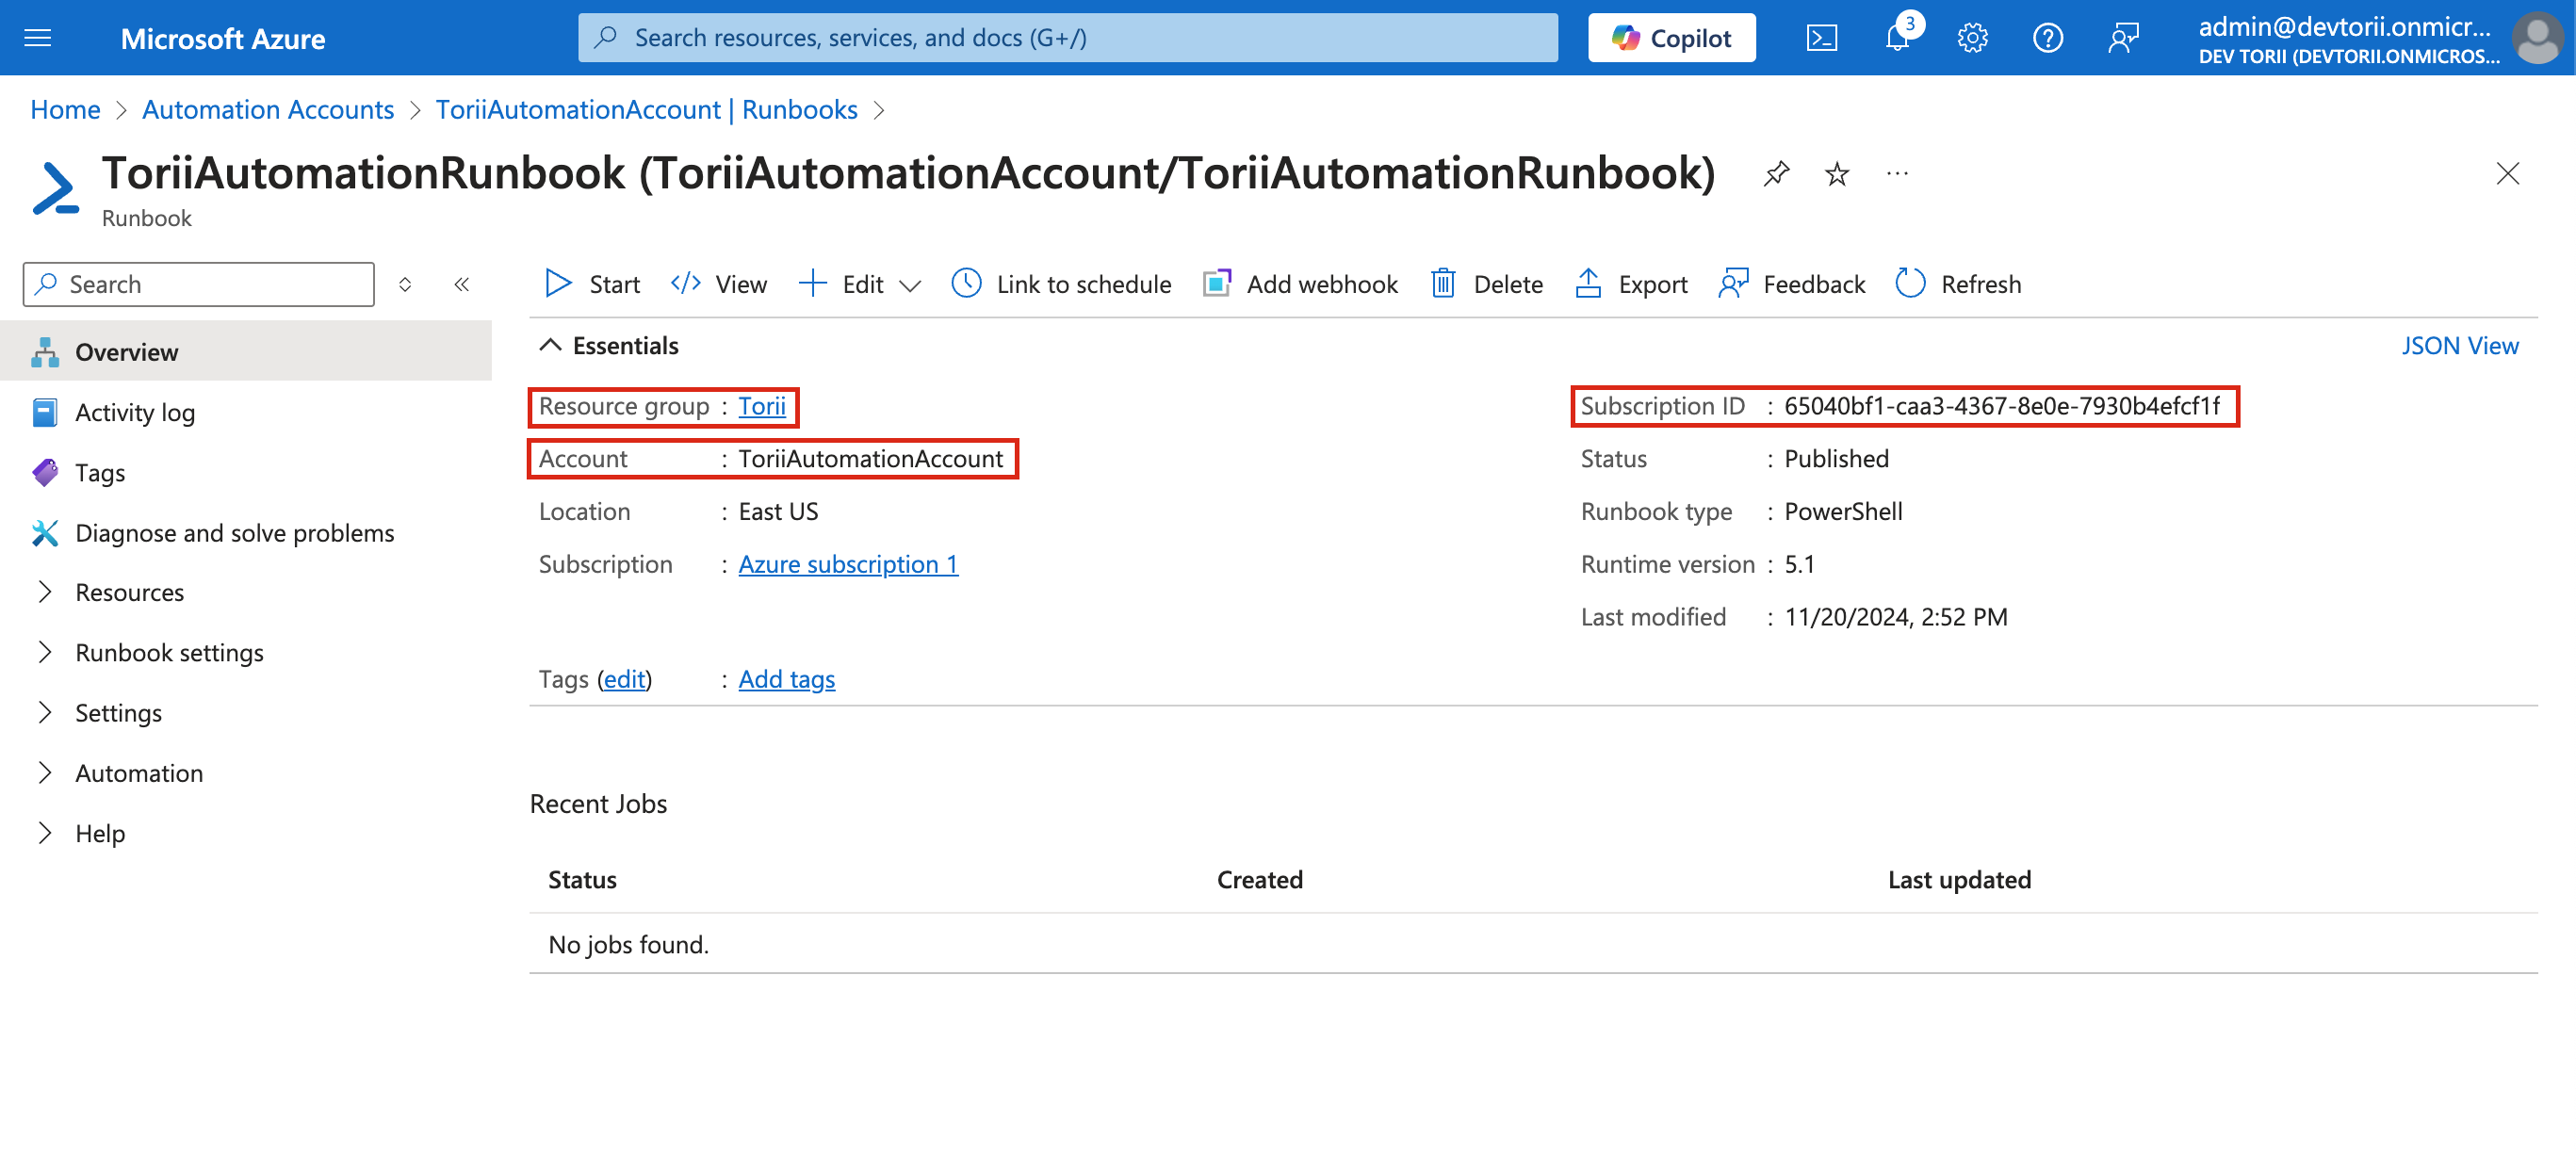
- After publishing, you'll be back on the Runbook's Overview page.
- Make sure to note the following information for later use when connecting to Torii:
- Subscription ID - (e.g., "65040bf1-caa3-4367-8e0e-7930b4efcf1f")
- Automation Account Name (e.g., "ToriiAutomationAccount")
- Resource Group Name (e.g., "Torii")
8. Create a Webhook
-
Add a Webhook
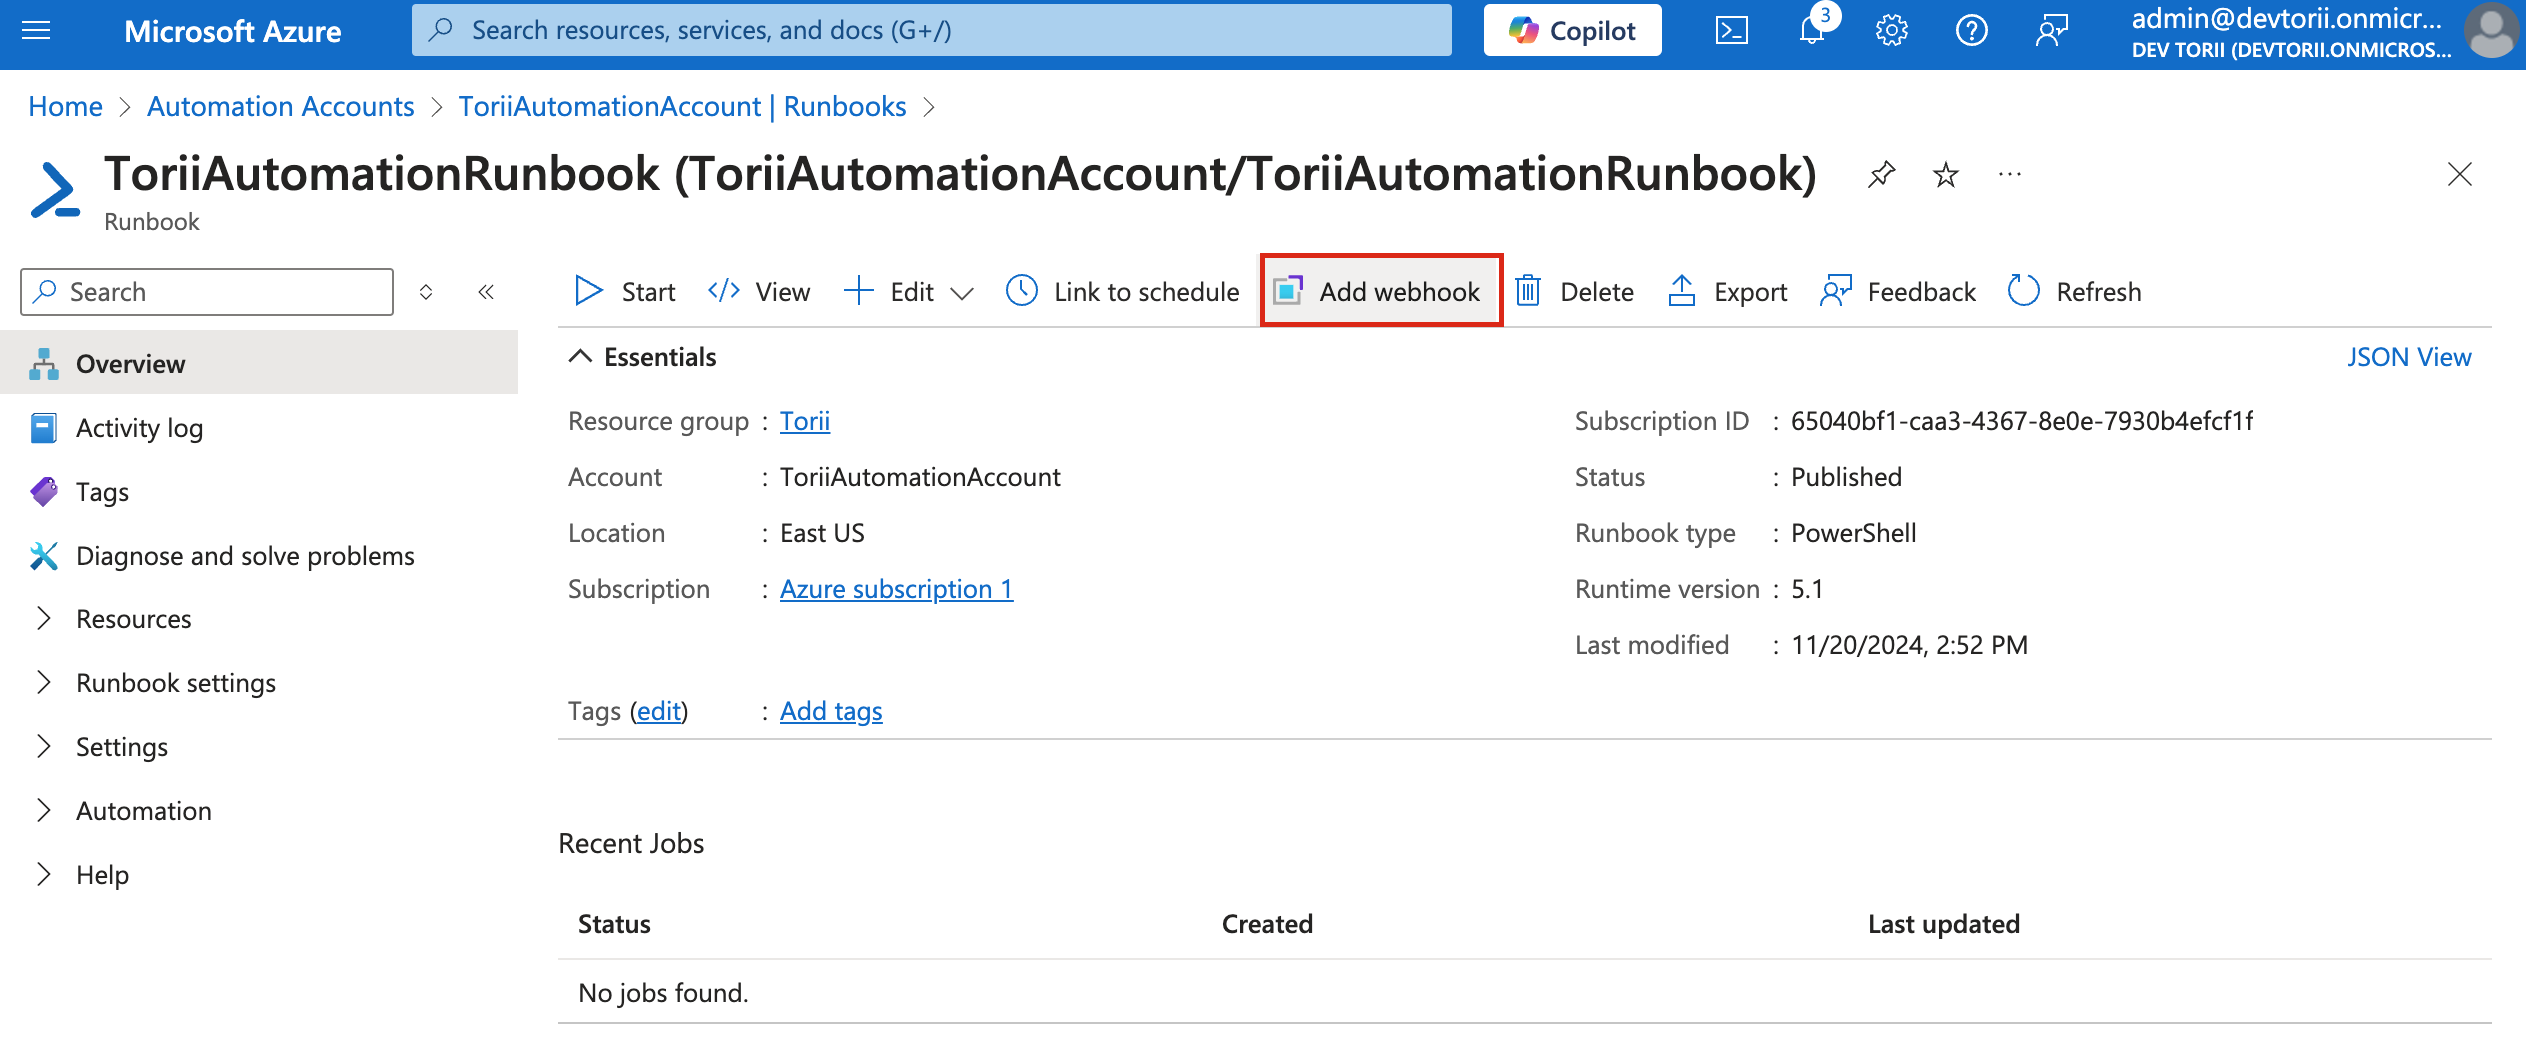
- On the Runbook's Overview page (runbook created in Step 6), click on "Add webhook".
-
Configure the Webhook:
- Click "Create new webhook".
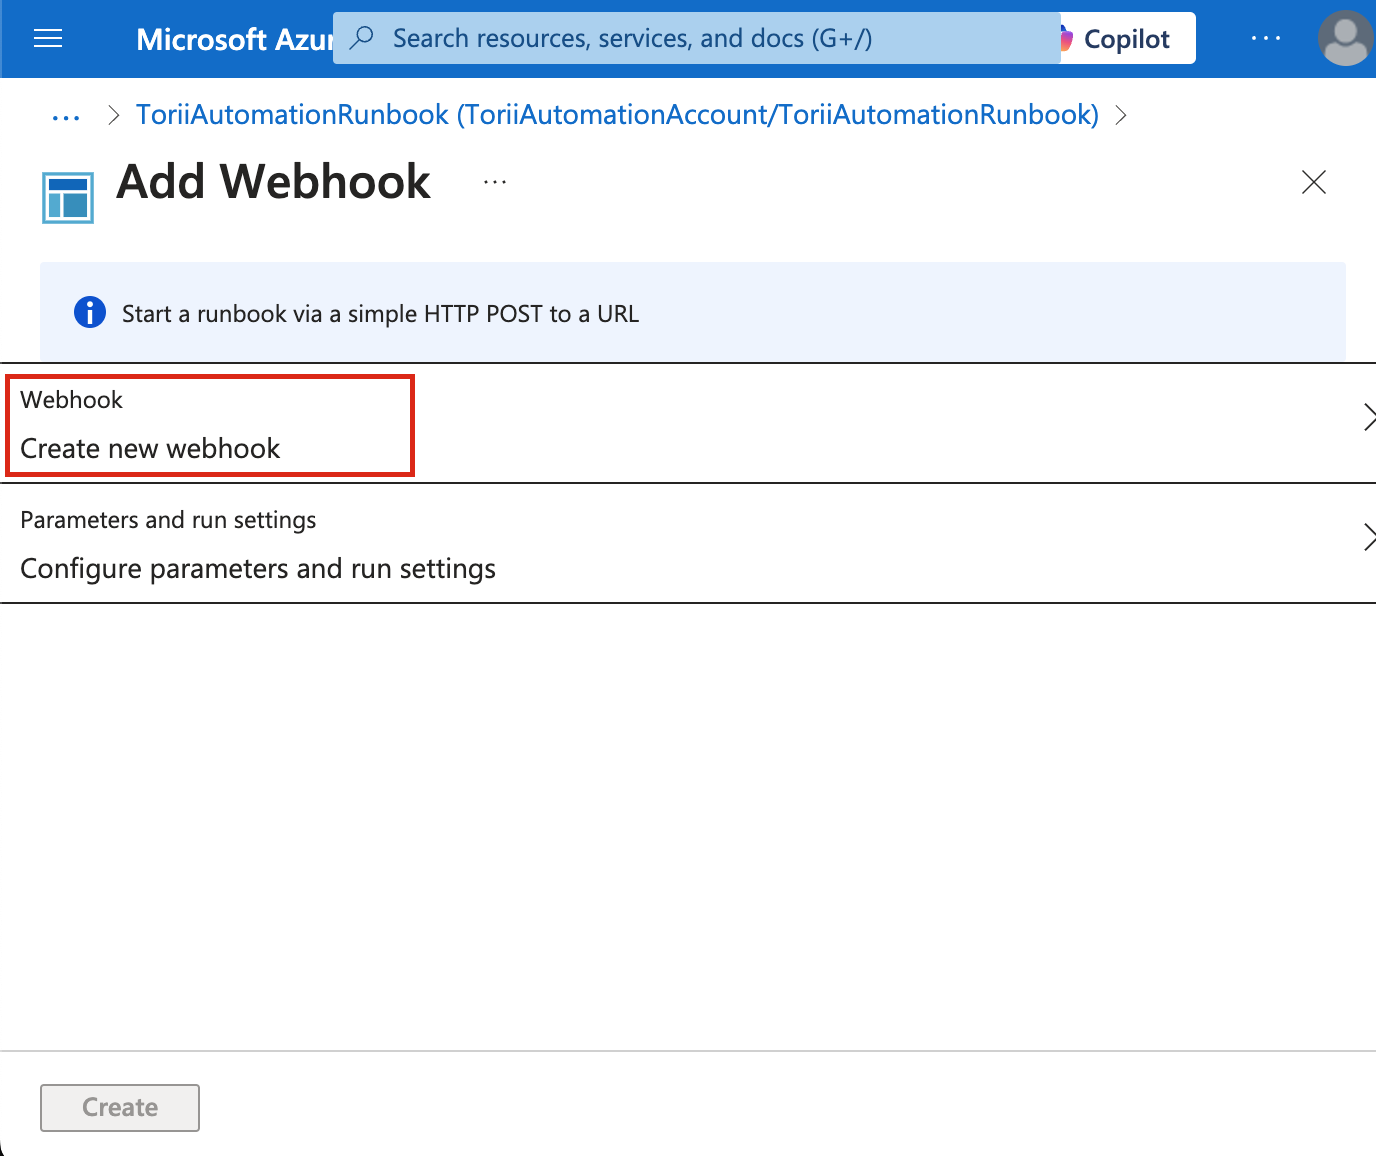
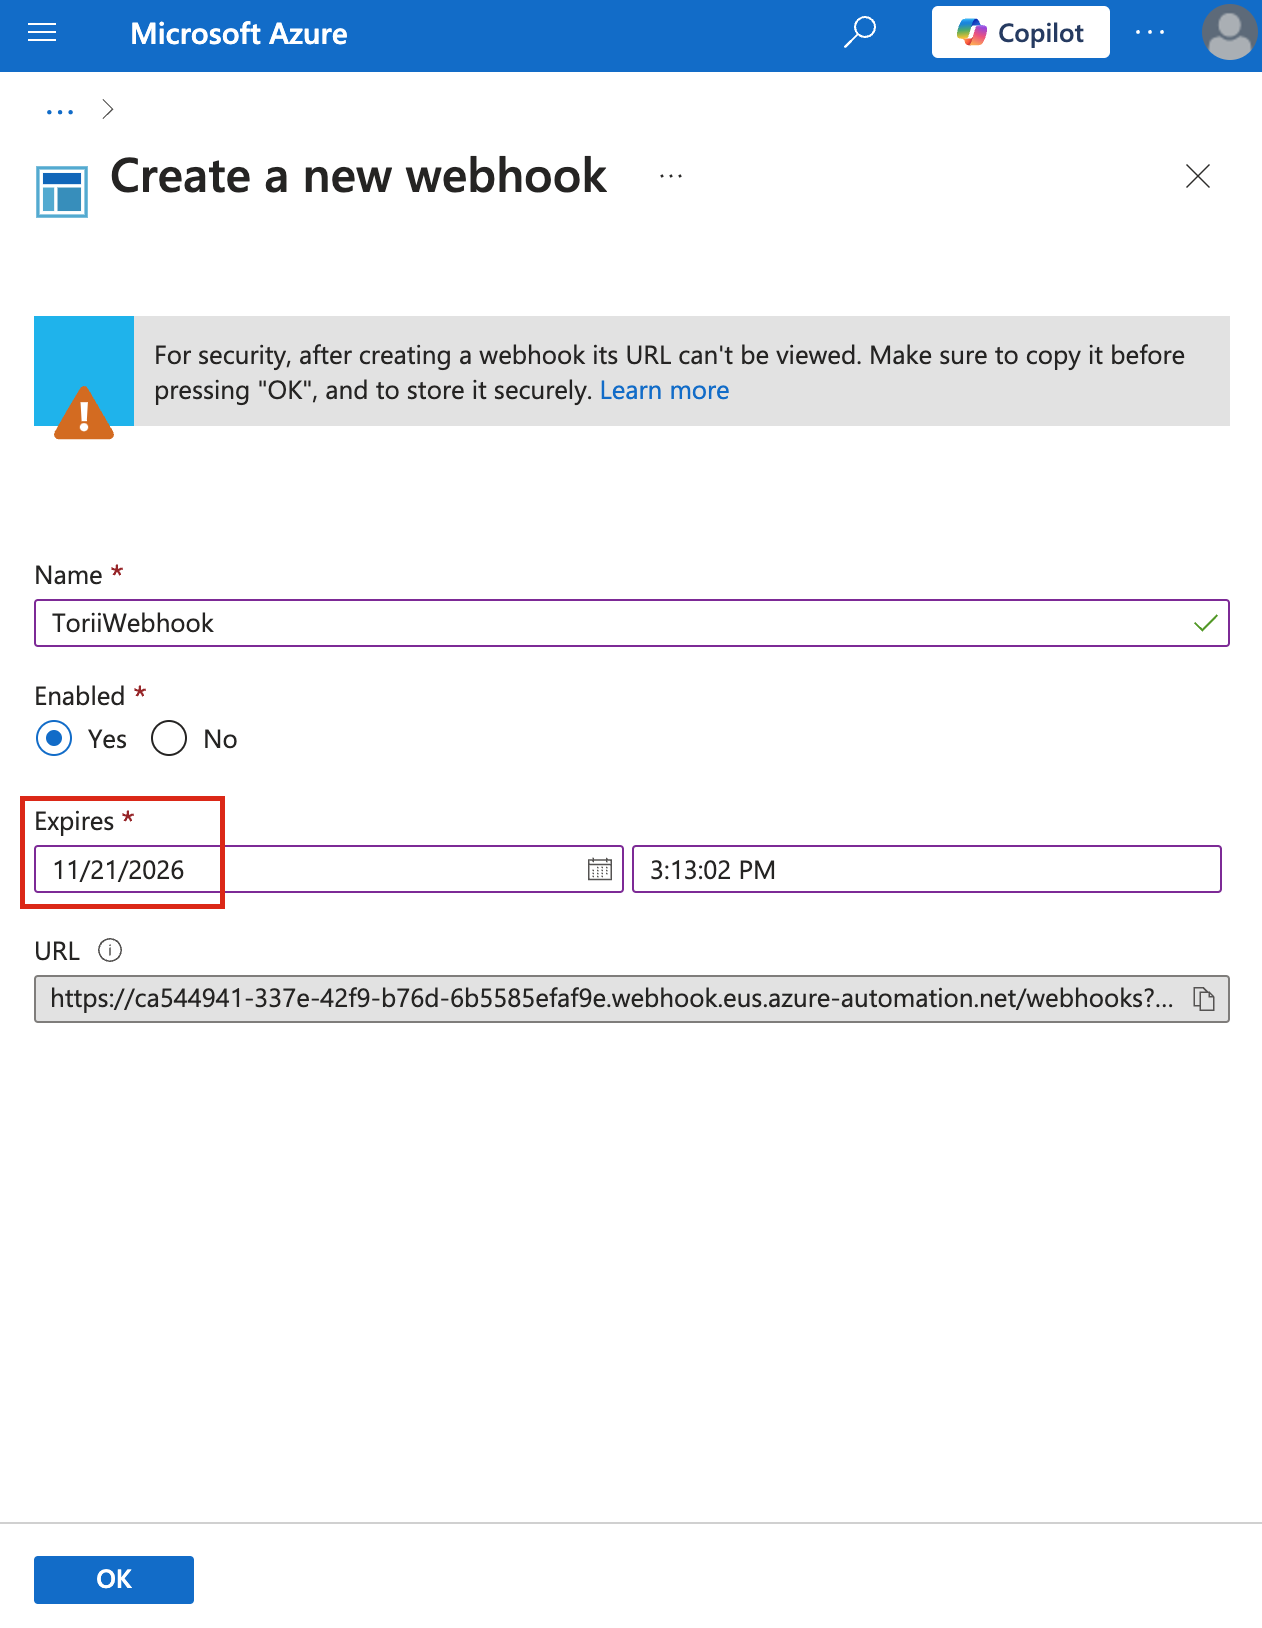
- Name - Enter “ToriiWebhook” in the Name field.
- Enabled - Select "Yes" to enable the webhook.
- Expires - Choose a date at least one year ahead. Remember to set a reminder to update it before it expires to prevent any service interruption.
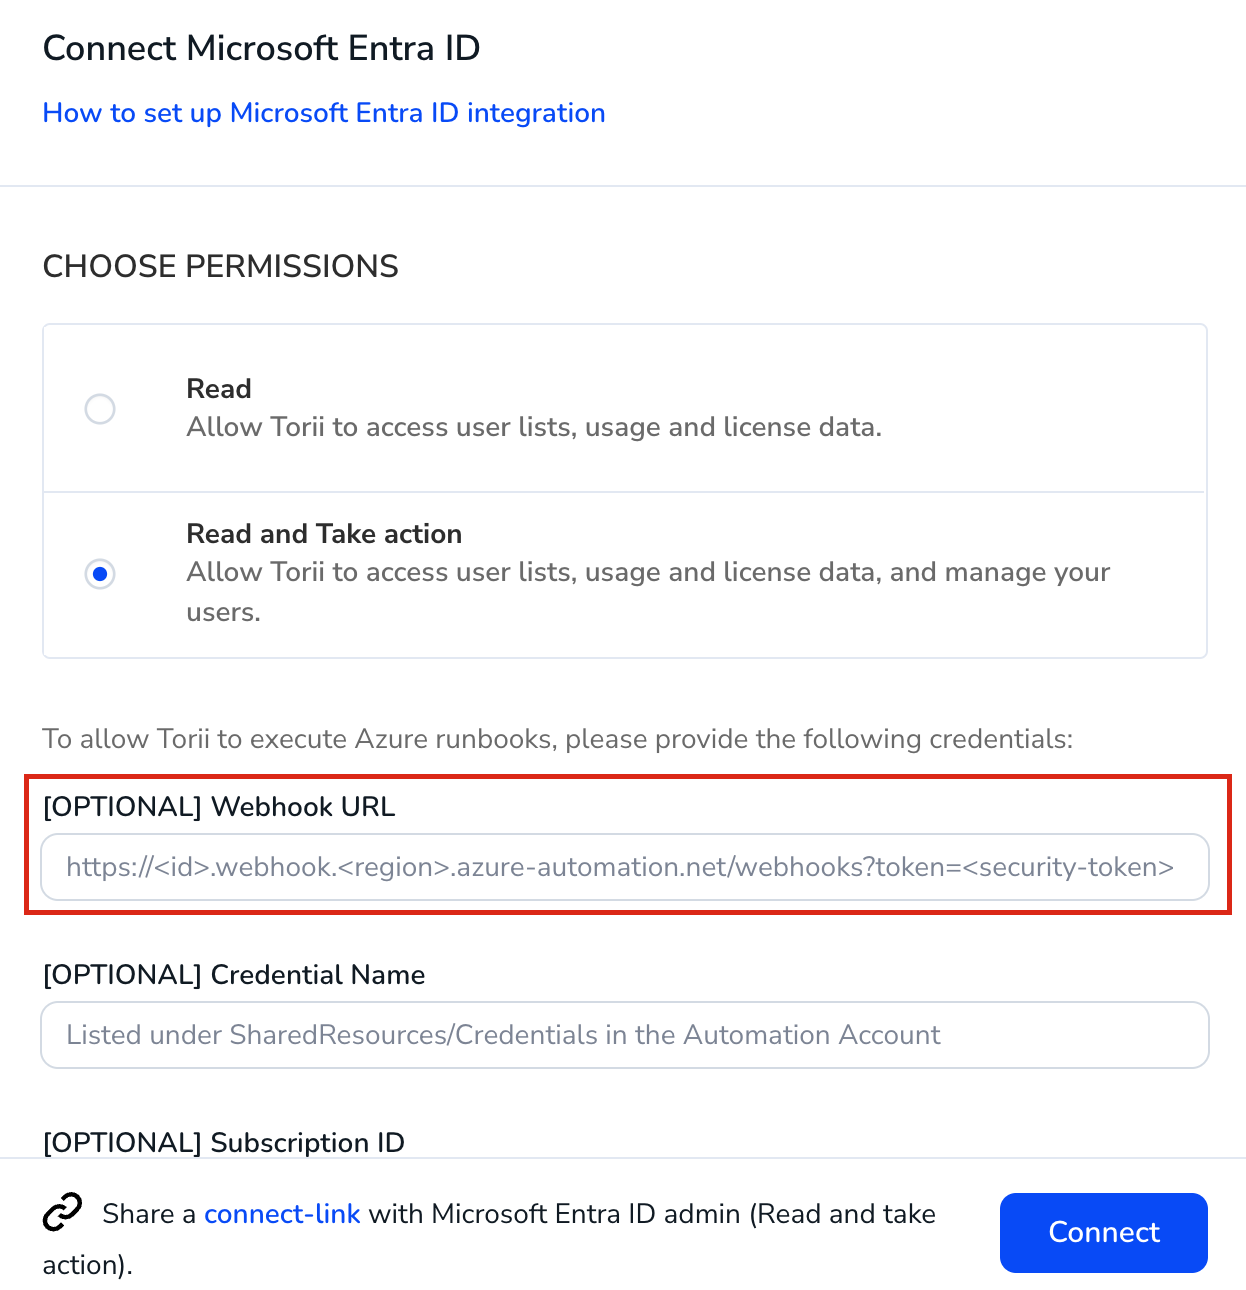
- URL - Copy the generated webhook URL and store it securely. This is the only time you'll see it.
- Click “OK” to confirm
- Click "Create new webhook".
-
Finalize Webhook Creation
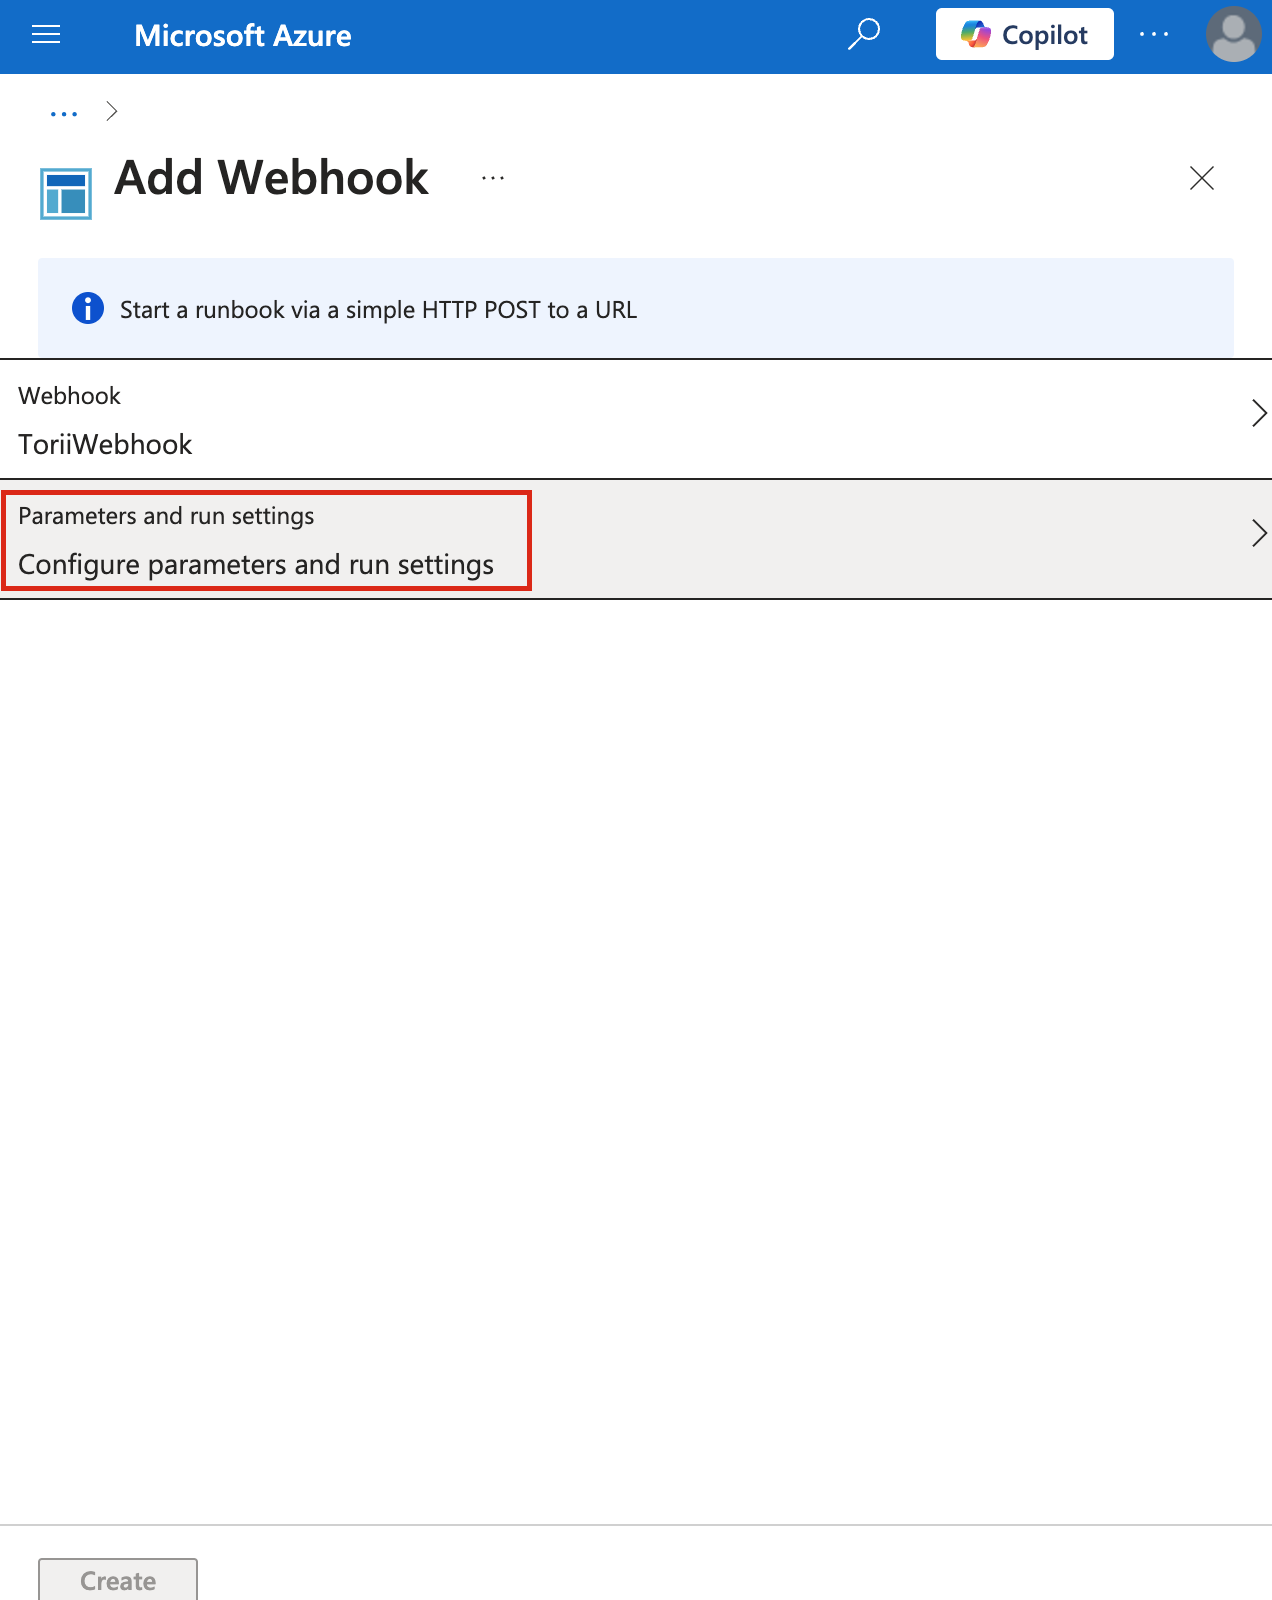
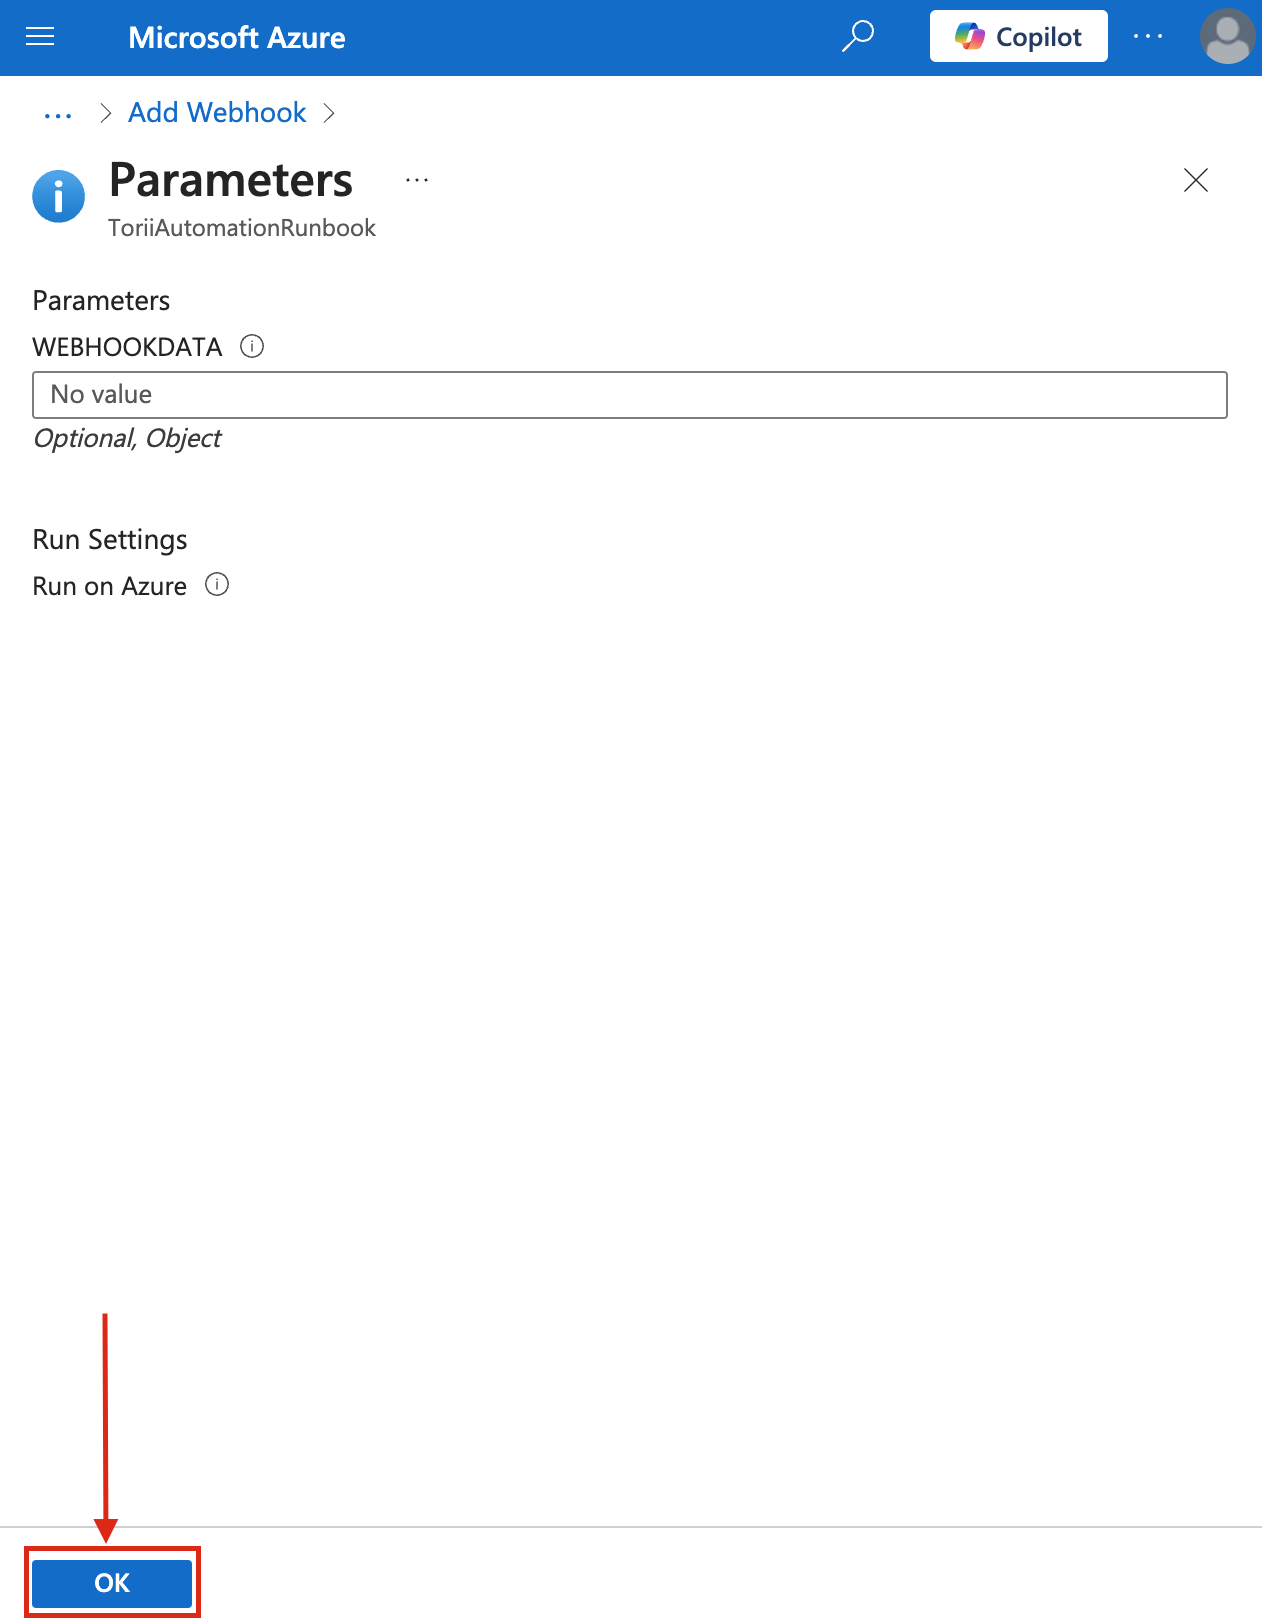
- Click "Parameters and run settings"
- Click "Parameters and run settings"
- Leave the "WEBHOOKDATA" field empty and click "OK".
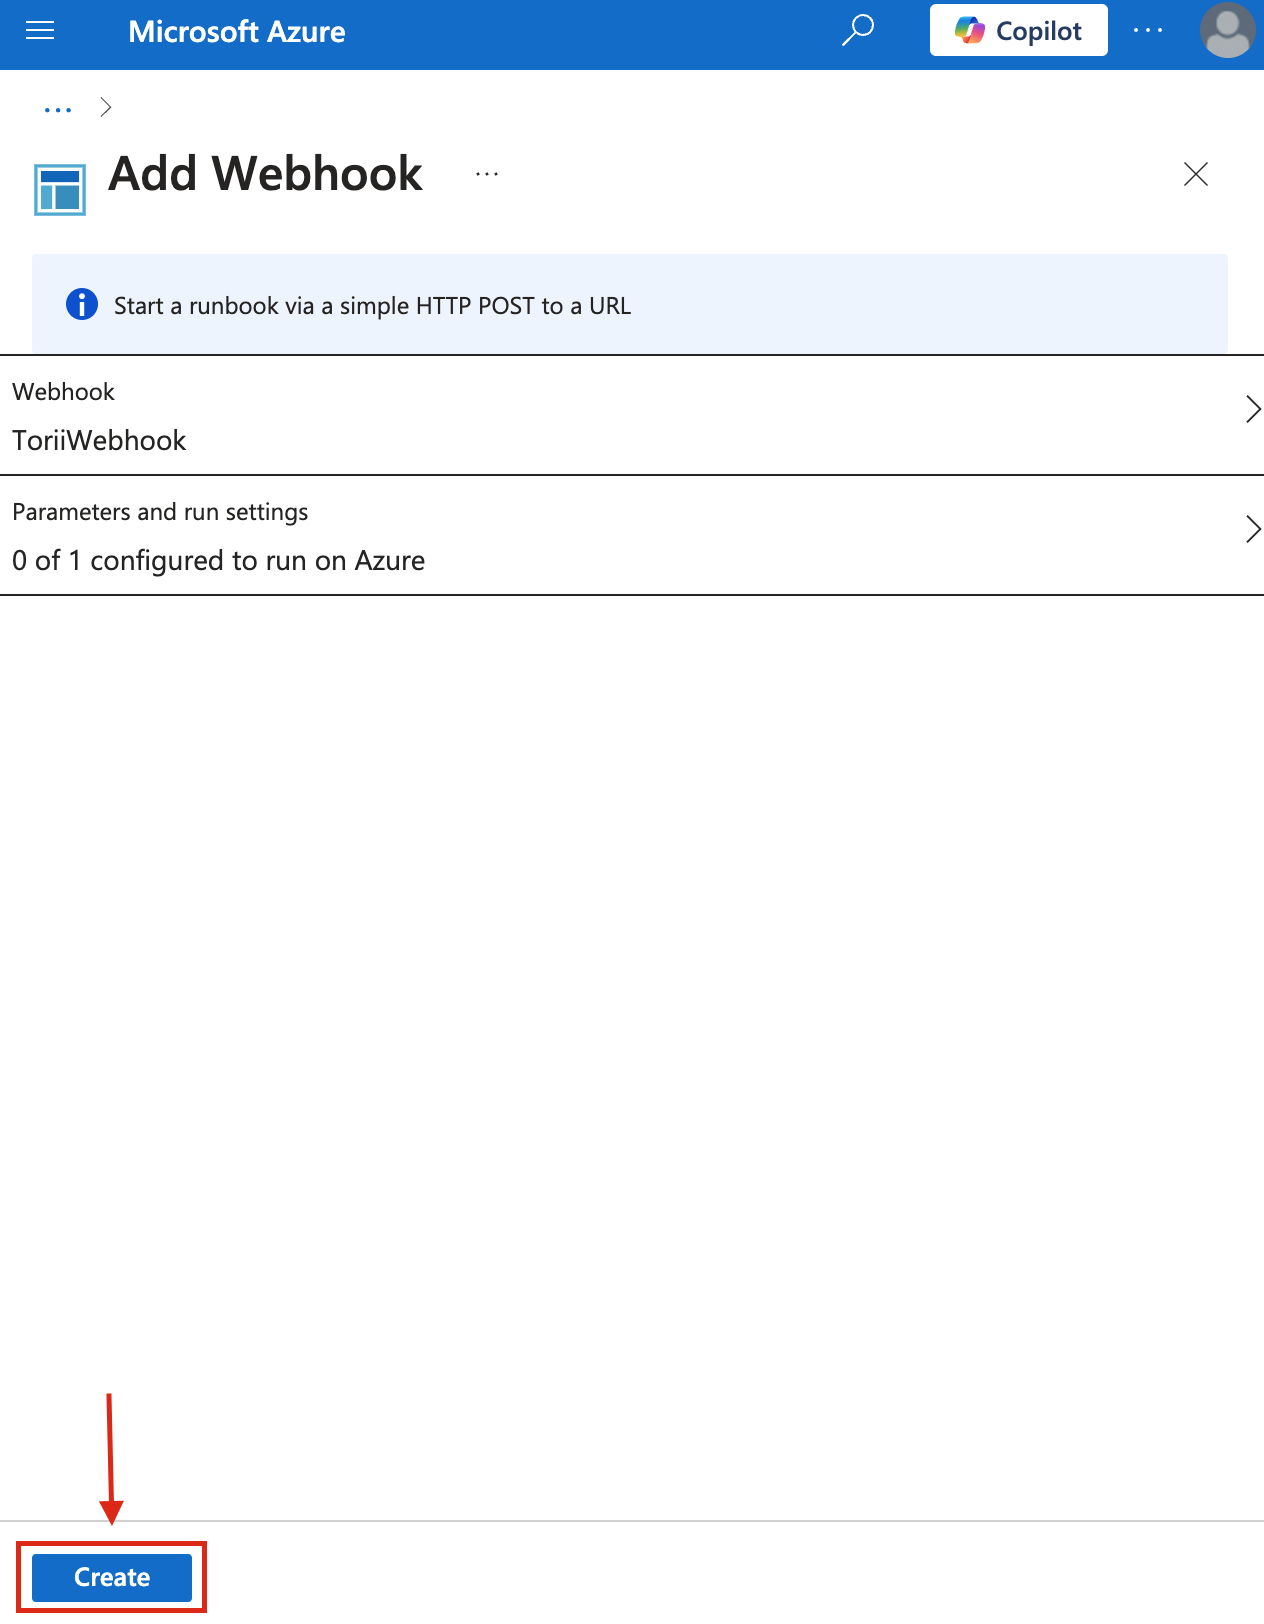
- Click "Create" to finish setting up the webhook.
9. Connect Entra Microsoft 365 Integration in Torii
- Access Torii Integrations:
- Log in to your Torii account.
- Navigate to the "Integrations" section.
- Connect Microsoft Entra ID:
- Choose "Microsoft Entra ID" from the list.
- Provide Required Information:
- Enter the following details collected from previous steps:
- **Webhook URL** (from Step 8)
- **Credential Name (**from Step 5)
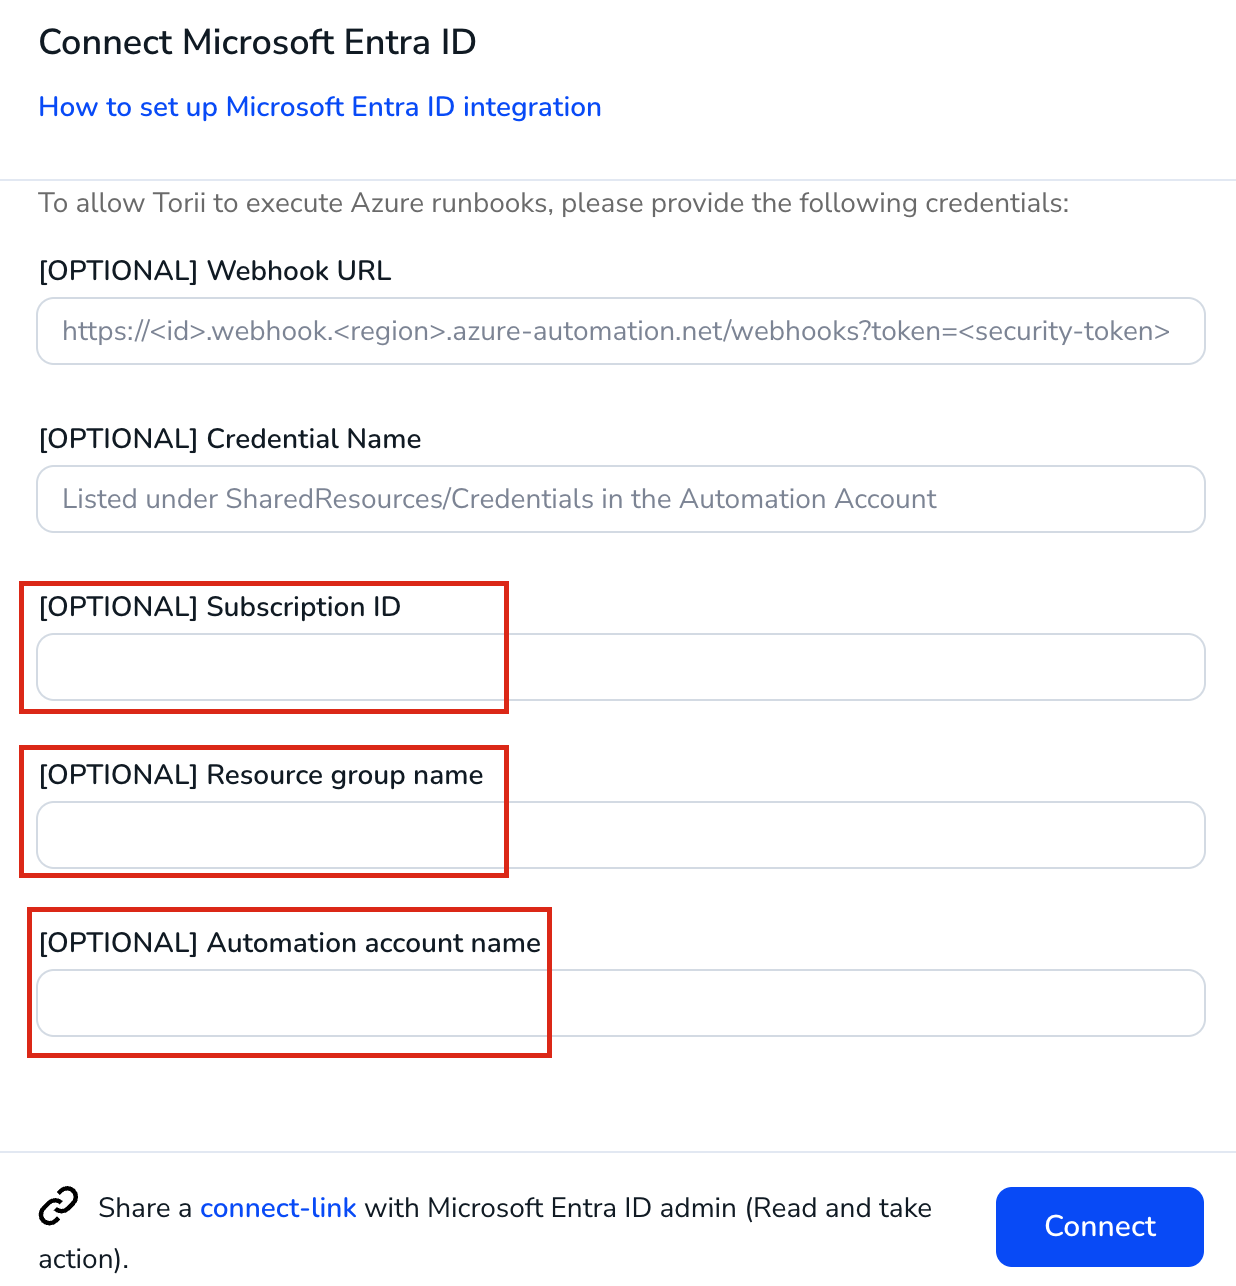
- **Subscription ID** (from Step 7)
- **Resource group name** (from Step 7)
- **Automation account name** (from Step 7)
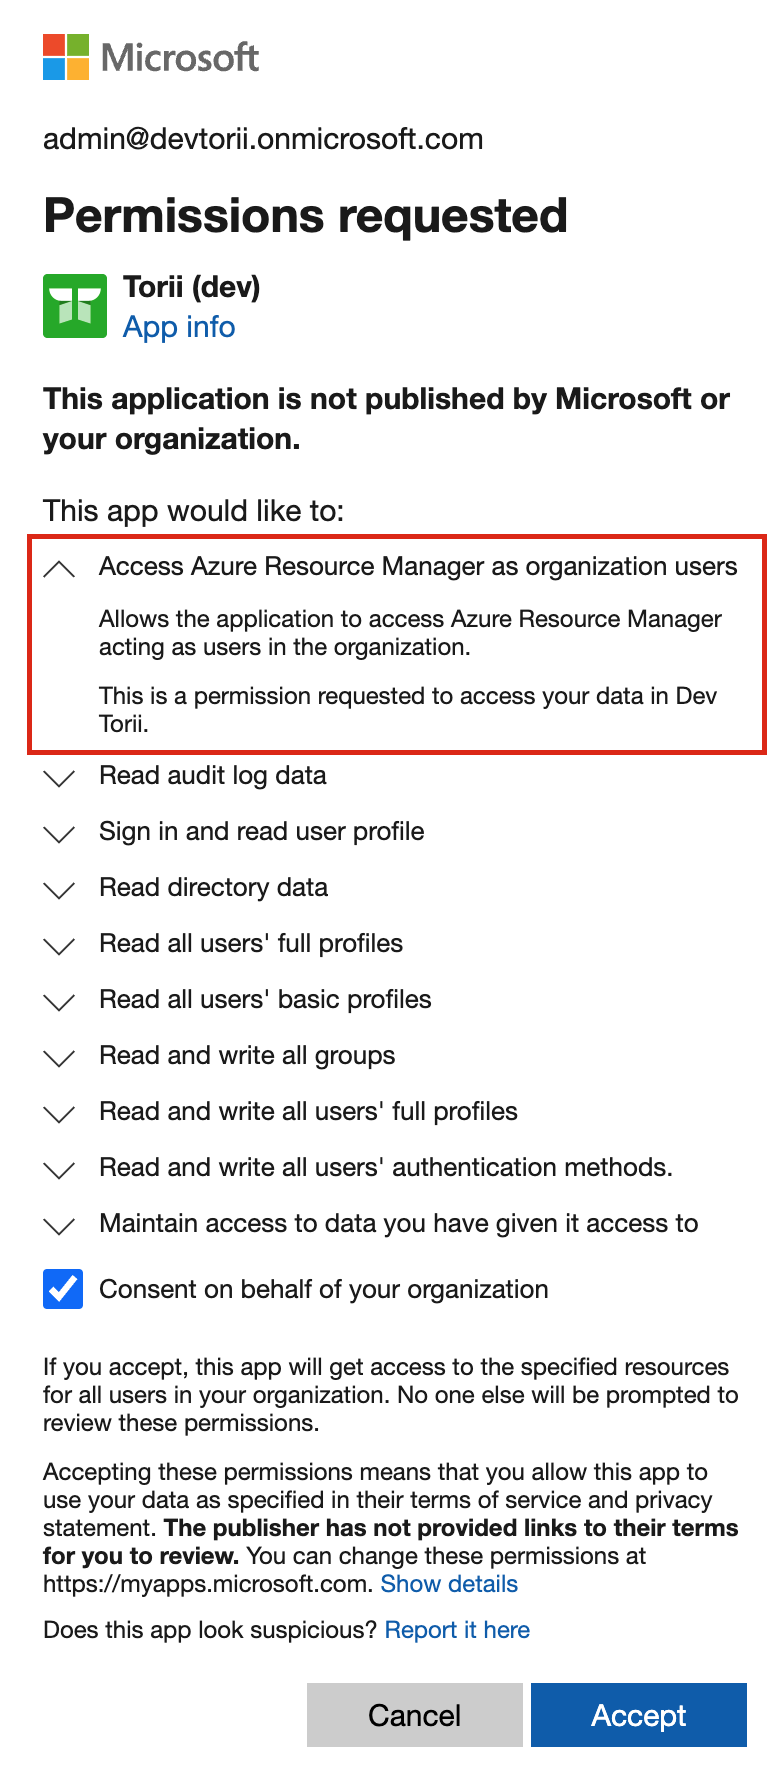
- You may also need to grant permissions for "Access Azure Resource Manager", which allows Torii to check the Runbook status.
10. Guidance for Customers Using Existing PowerShell Custom Actions
Please reconnect the integration and provide the credentials specified in Step 9, using your existing Subscription ID, Automation Account Name, and Resource Group.
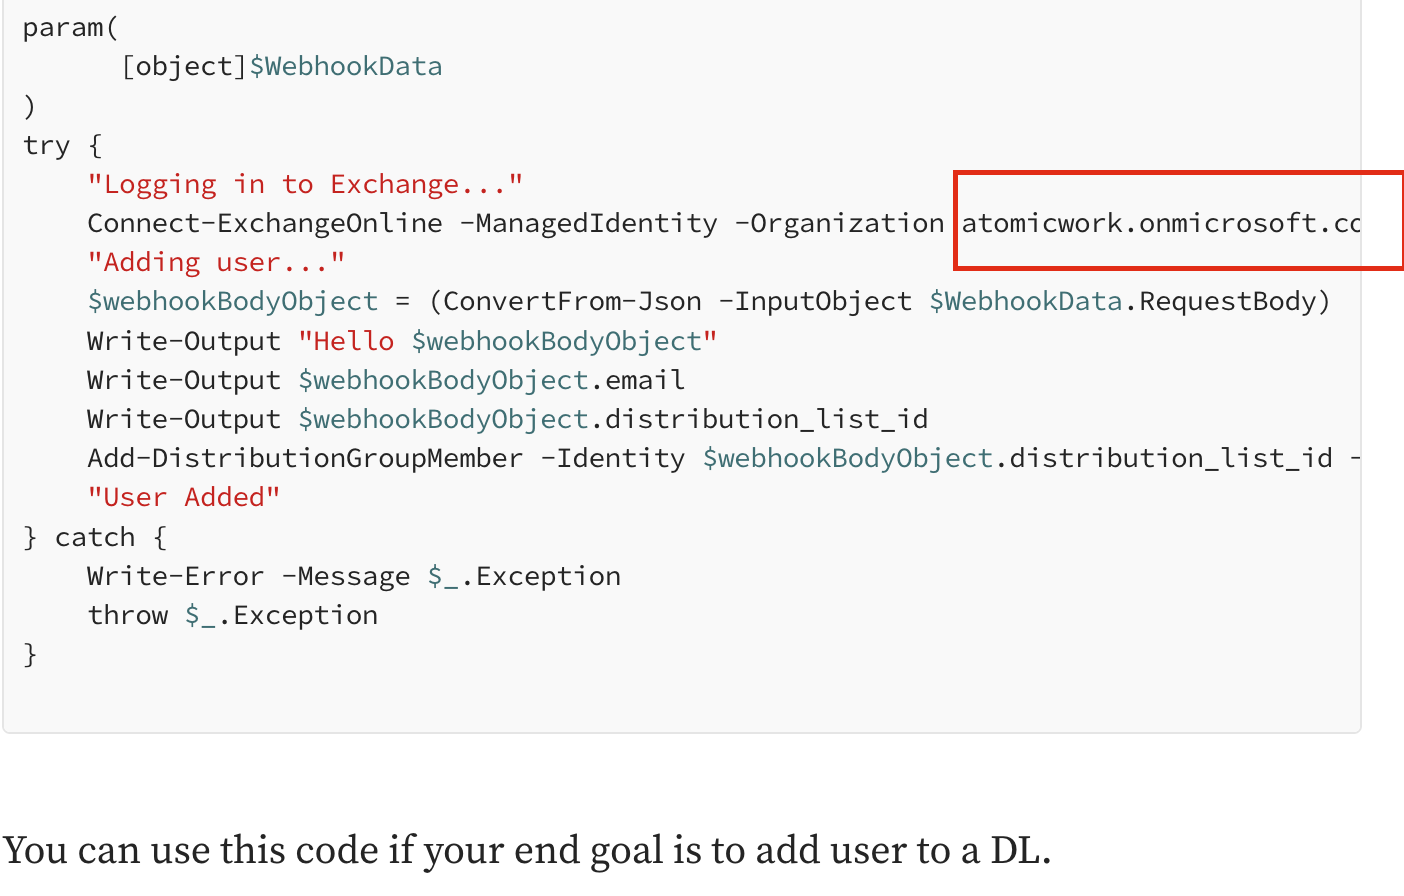
- "Credential Name” will need to be filled with your Domain Entra ID (email domain)
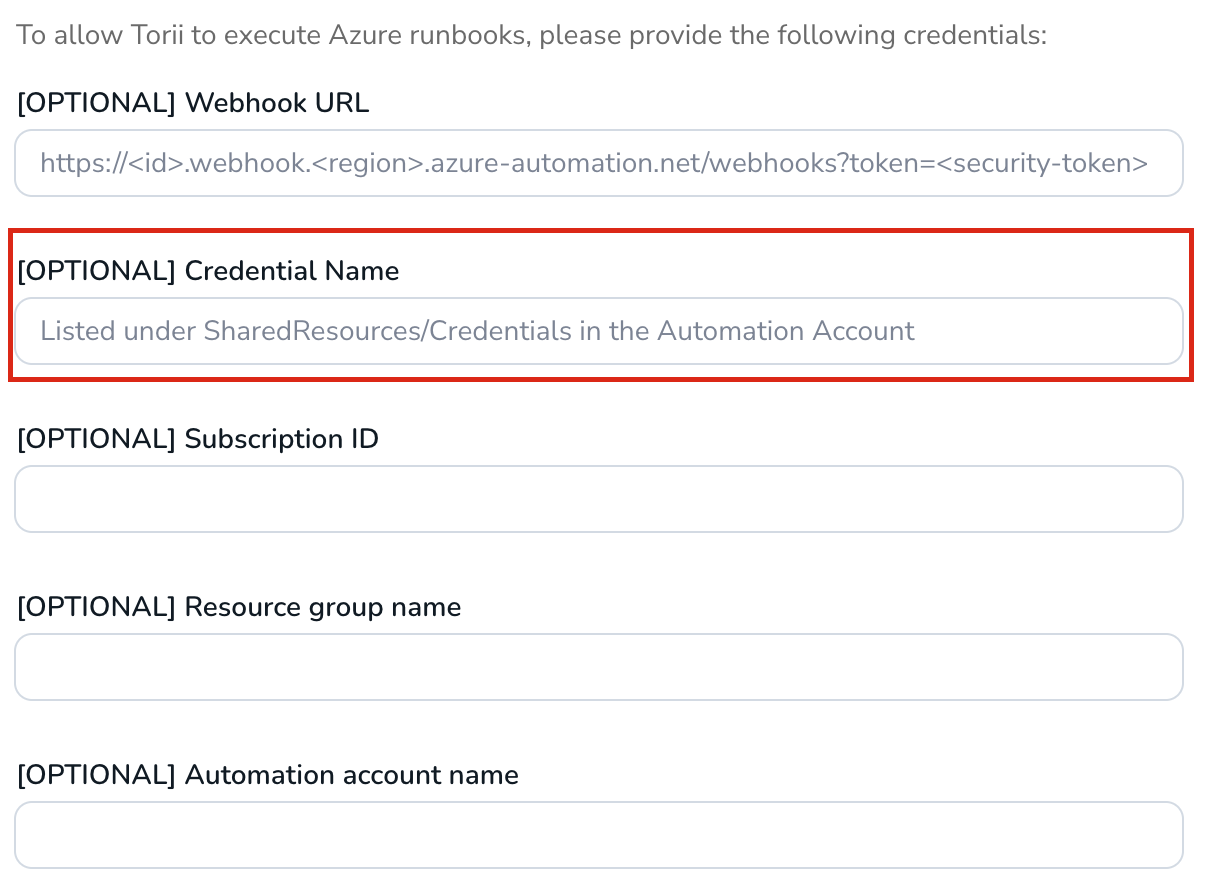
You can find the Domain Entra ID in your existing PowerShell script, as shown below:
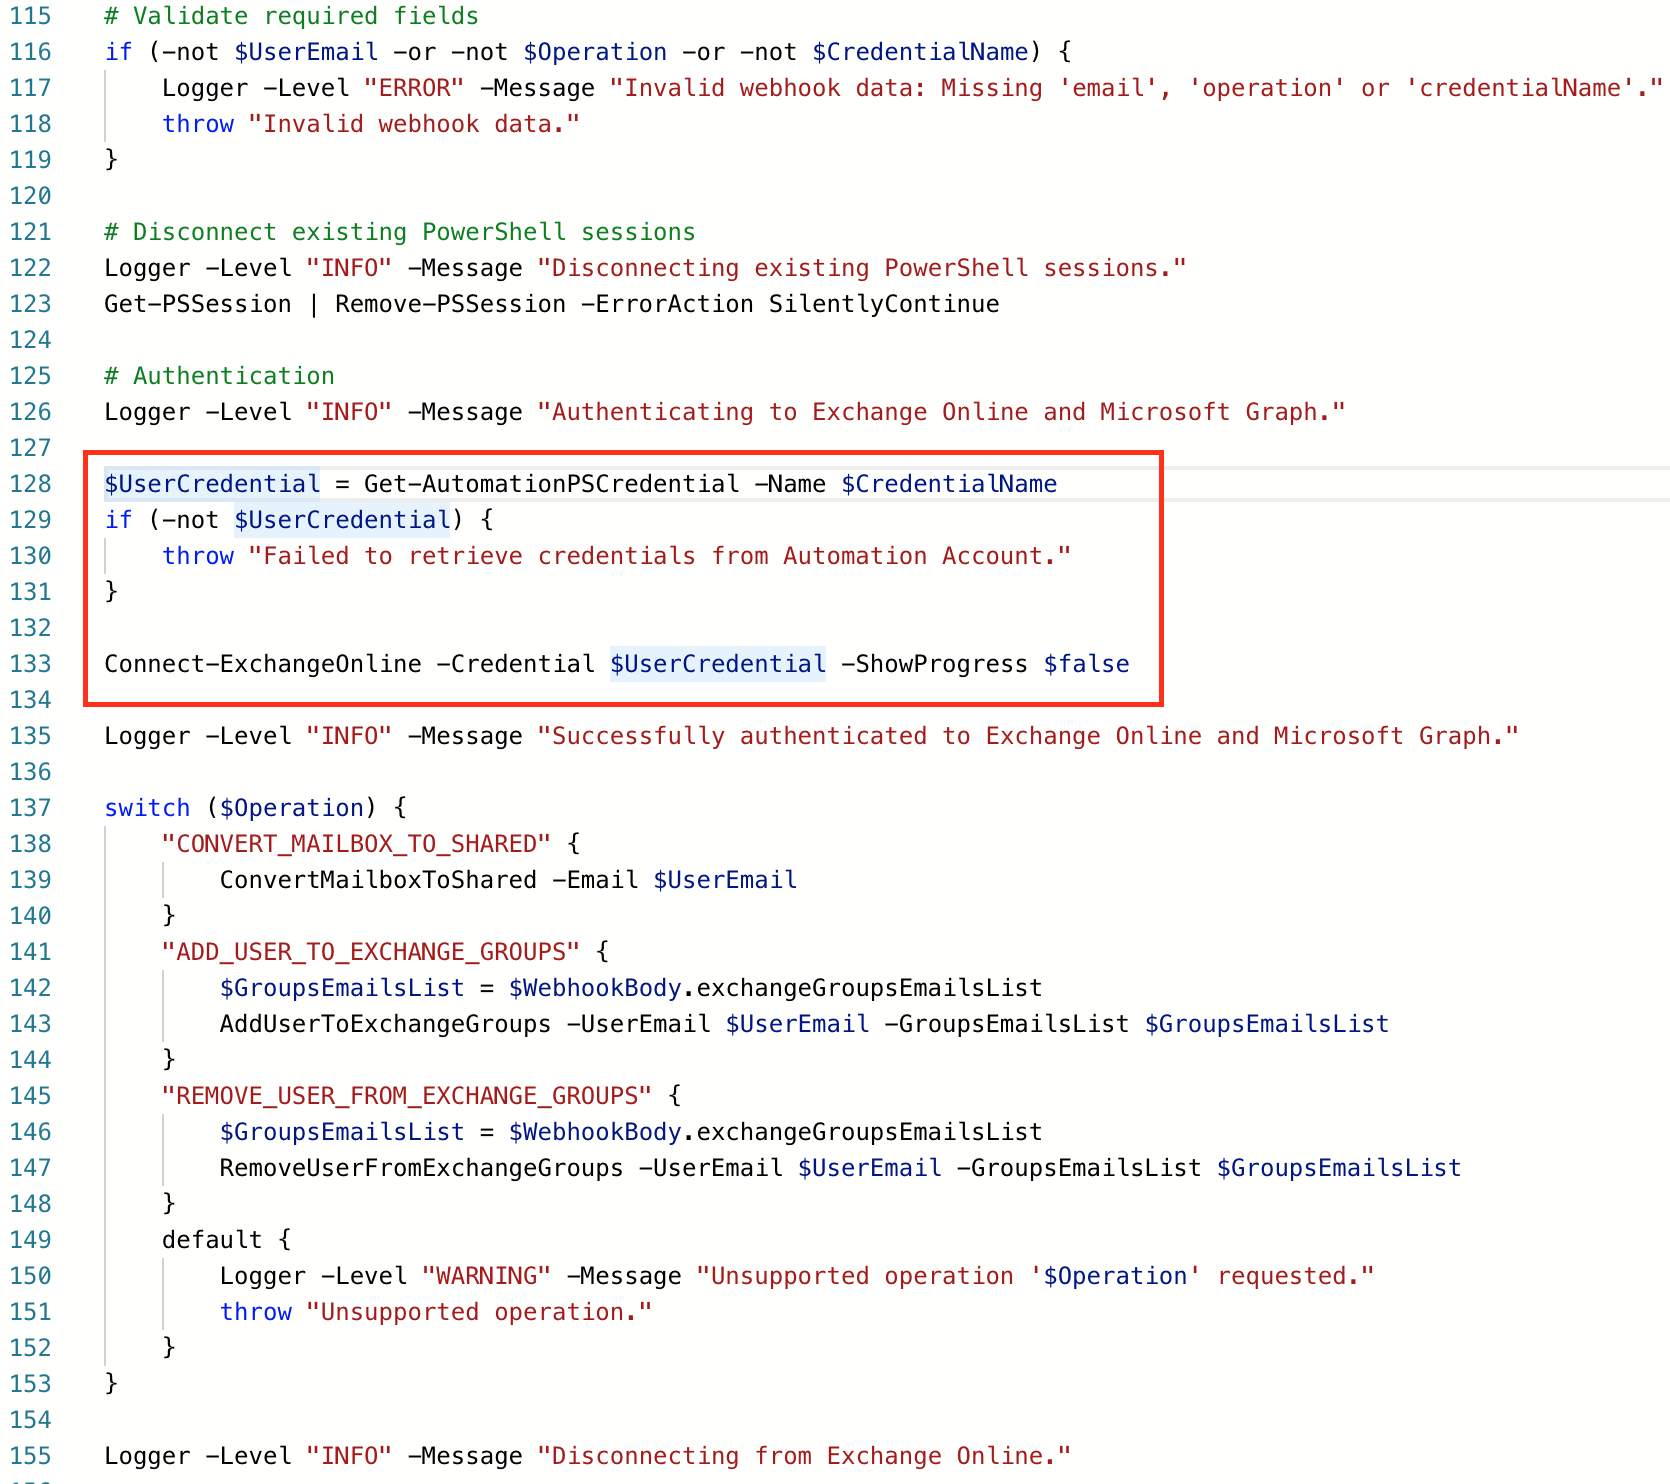
- Modify the Authentication Section in the Script we provided in step 7
$UserCredential = Get-AutomationPSCredential -Name $CredentialName
if (-not $UserCredential) {
    throw "Failed to retrieve credentials from Automation Account."
}

Connect-ExchangeOnline -Credential $UserCredential -ShowProgress $false
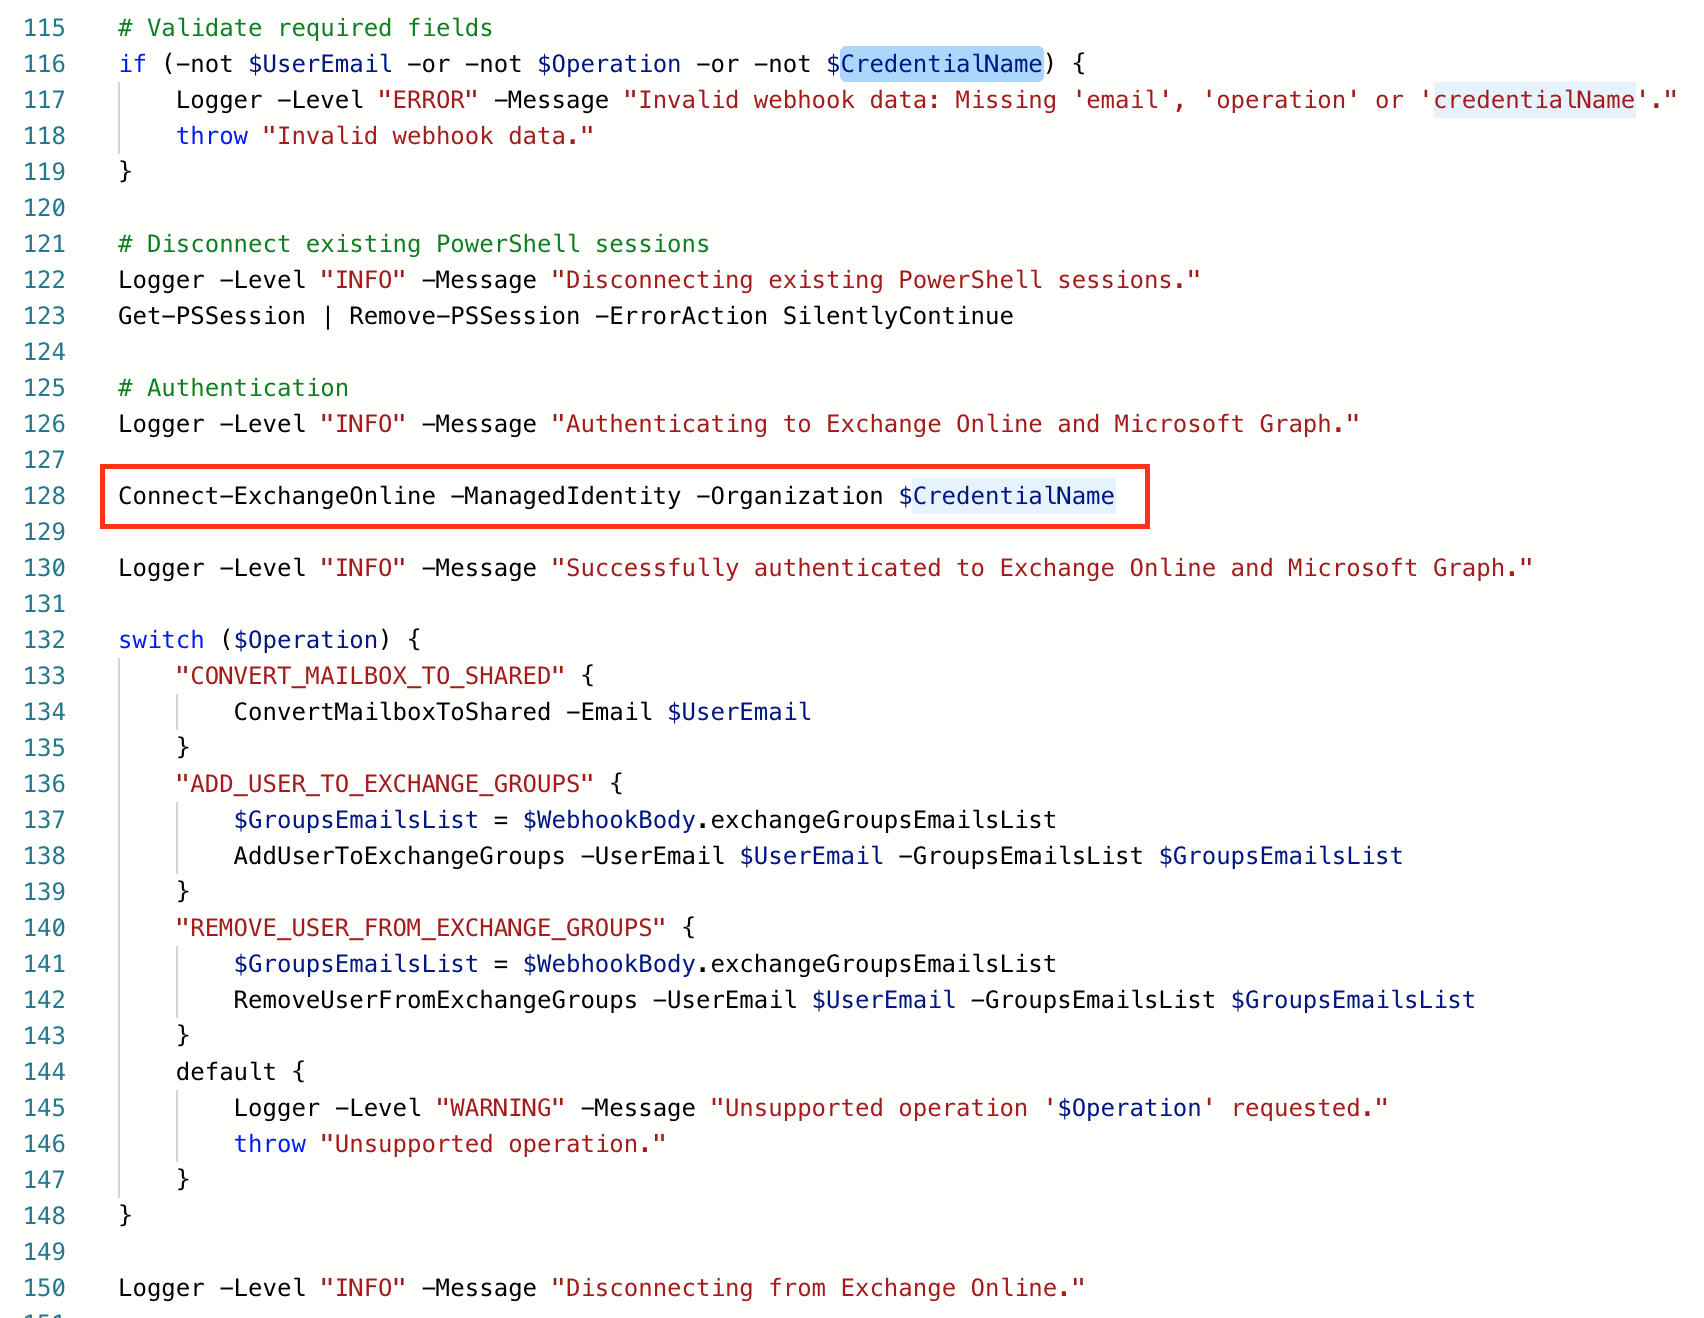
With that code:
Connect-ExchangeOnline -ManagedIdentity -Organization $CredentialNameThe way we implemented in step 7:
The change you should be doing:
Updated 5 months ago